
0. How to Read This Article
This documentation was prepared as a comprehensive guide for those who want to learn Docker from scratch. However, this is not just a blog post — it’s also a reference resource and a practical guide.
Article Structure and Reading Strategy
This article was created with the principle of gradual deepening. While the first sections introduce basic concepts, the later sections dive into advanced topics such as production environments, security, and performance optimization. Therefore:
If you are just starting: Read sequentially, from beginning to end. Each section is built on top of the previous one. Skipping topics may cause difficulty in understanding later.
If you want to solve a specific problem: Jump to the topic you need from the table of contents. Each section has been written to be as independent as possible.
If you want to reinforce your knowledge: Read the sections you are interested in, but be sure to test the examples.
Important Warnings
-
Read slowly. Especially after section 10, technical details increase. If you rush, you may miss important points.
-
Practice. Just reading is not enough. Run the examples on your own computer, make mistakes, fix them. Learning software is a craft — it is learned by doing.
-
Break it into parts. Do not try to read this article in one sitting. Working on one or two sections each day is much more effective than rushing through the entire article in one night.
-
Take notes. Note important commands, patterns you can adapt for your own projects, and problems you encounter. This article is a reference resource; you will return to it often.
Target Audience
- Software developers (backend, frontend, full-stack)
- DevOps engineers and system administrators
- Those new to Docker
- Those who want to deepen their existing Docker knowledge
- Teams that will use Docker in production environments
Philosophy of This Article
Theory + Practice = Learning. Each concept is explained both theoretically and demonstrated with working code examples. I tried to answer both the “Why?” and the “How?” questions.
Plain language. I avoided unnecessary jargon. When technical terms are used, they are explained. Being understandable is more important than technical depth.
Real-world scenarios. Problems you will encounter in production environments, anti-patterns, and their solutions are also included. This is not just a “how to run it” guide, but a “how to run it correctly” guide.
Before You Start
Make sure you have Docker installed on your computer. Installation instructions are explained in detail in Section 3. If you are comfortable using the terminal or PowerShell, you are ready.
Now, without further ado, let’s start understanding what Docker is and why it is so important.
1. Introduction / Why Docker?
1.1 Quick Summary: What is a Container, and How Is It Different from a VM?
Let’s consider two ways to run applications:
-
Install directly on the operating system
-
Use a virtual machine (VM)
In virtual machines (for example, VirtualBox, VMware), each machine has its own operating system. This means heavy consumption of system resources (RAM, CPU, disk space) and longer startup times.
Container technology takes a different approach. Containers share the operating system kernel; they include only the libraries and dependencies necessary for the application to run. They run only what’s required, in isolation. That means they are:
-
Lighter,
-
Faster to start,
-
Portable (run anywhere).
In summary:
-
VM = Emulates the entire computer.
-
Container = Isolates and runs only what the application needs.
1.2 Why Docker?
So why do we use Docker to manage containers? Because Docker:
-
Provides portability: You can run an application on the server the same way you run it on your own computer. The “it works on my machine but not on yours” problem disappears.
-
Offers fast deployment: You can spin up and remove containers in seconds. While traditional installation processes can take hours, with Docker minutes—or even seconds—are enough. You don’t need to install the entire system; it installs just the requirements and lets you bring your project up quickly.
-
Is a standard ecosystem: You can download and instantly use millions of ready-made images (like nginx, mysql, redis) from Docker Hub.
-
Fits modern software practices: Docker has become almost a mandatory tool in microservice architecture, CI/CD, and DevOps processes.
1.3 Who Benefits from This Article and How?
This article is designed as both an informative and a guide-like blog for those new to Docker, software developers, those interested in technical infrastructure, and system administrators.
My goal is to explain Docker concepts not only with technical terms but in simple and understandable language. By turning theory into practice, I aim to help readers use Docker confidently in their own projects.
This blog-documentation:
- Is applicable in both Linux and Windows environments,
- Is practice-oriented rather than theoretical,
- Uses plain language instead of complex jargon,
- Provides a step-by-step learning path.
In short: This article is a resource prepared for everyone from Docker beginners to system administrators, serving as both a blog and a guide. With its simple, jargon-free narrative, I aimed to make learning Docker fast, simple, and effective by turning theory into practice.
2. Docker Ecosystem and Core Components (Docker’s Own Tools)
Docker is not just “software that runs containers.” Many tools, components, and standards have evolved around it. Knowing these is important for understanding how Docker works and for using it effectively.
2.1 Docker Engine (Daemon & CLI)
Docker Engine is the heart of Docker. The background daemon (dockerd) is responsible for managing containers. For example: starting, stopping, networking, volumes.
The part we interact with is the Docker CLI (commands like docker run, docker ps, docker build). The CLI communicates with the daemon and executes the requested operations.
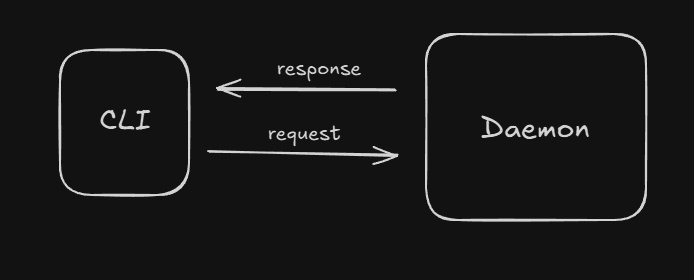
Summary: CLI = User interface, Daemon = Engine.
2.2 Docker CLI commands
Docker container
Container management commands:
| Command | Description |
|---|---|
docker container run |
Creates and runs a new container (Docker Documentation) |
docker container create |
Creates a container but does not run it (Docker Documentation) |
docker container ls / docker container list |
Lists running containers (Docker Documentation) |
docker container stop |
Stops a running container (Docker Documentation) |
docker container start |
Starts a stopped container (Docker Documentation) |
docker container rm |
Removes a container (must be stopped) (Docker Documentation) |
docker container logs |
Shows a container’s log output (Docker Documentation) |
docker container exec |
Runs a command inside a running container (Docker Documentation) |
docker container inspect |
Displays detailed configuration of a container (Docker Documentation) |
docker container stats |
Shows real-time resource usage statistics (Docker Documentation) |
docker container pause / docker container unpause |
Temporarily pauses/resumes a container (Docker Documentation) |
docker container kill |
Immediately stops a container (SIGKILL) (Docker Documentation) |
Docker image
Image management:
-
docker image ls/docker images— lists images on the system (Docker Documentation) -
docker image rm/docker rmi— removes one or more images (Docker Documentation) -
docker image prune— cleans up unused (dangling) images (Docker Documentation)
Docker build
Creating an image from a Dockerfile:
-
docker build— builds an image according to the Dockerfile (Docker Documentation) -
Disable cache usage with flags like
--no-cache(Docker Documentation)
General Commands
-
docker version— shows CLI and daemon version information -
docker info— shows Docker environment status and system details -
docker system— system-related commands (e.g., resource cleanup, disk usage) -
docker --helpordocker <command> --help— shows help information for commands
2.2.1 Docker CLI Parameters — Detailed Explanation and Examples
Parameters used in Docker CLI commands:
| Parameter | Description | Example (Linux) |
|---|---|---|
-it |
Provides an interactive terminal. | docker run -it ubuntu bash |
-d |
Detached mode (runs in the background). | docker run -d nginx |
--rm |
Automatically removes the container when stopped. | docker run --rm alpine echo "Hello" |
-p |
Port mapping (host:container). | docker run -p 8080:80 nginx |
-v / --volume |
File sharing via volume mount. | docker run -v /host/data:/container/data alpine |
--name |
Assigns a custom name to the container. | docker run --name mynginx -d nginx |
-e / --env |
Defines environment variables. | docker run -e MYVAR=value alpine env |
--network |
Selects which network the container will join. | docker run --network mynet alpine |
--restart |
Sets the container restart policy. | docker run --restart always nginx |
2.3 Dockerfile & BuildKit (build optimization)
The Dockerfile is the recipe file that defines Docker images. It specifies which base image to use, which packages to install, which files to copy, and which commands to run.
Dockerfile Basics
Example simple Dockerfile:
FROM python:3.11-slim

WORKDIR /app

COPY requirements.txt .

RUN pip install --no-cache-dir -r requirements.txt

COPY . .

CMD ["python", "app.py"]
Basic commands:
FROM→ selects the base imageWORKDIR→ sets the working directoryCOPY/ADD→ copy filesRUN→ run commands during image buildCMD→ command to execute when the container starts
What is Docker BuildKit?
BuildKit is the modern build engine that makes Docker’s build process faster, more efficient, and more secure.
It has been optionally available since Docker 18.09 and is enabled by default with Docker 20+.
Advantages:
- Parallel build steps (faster)
- Layer cache optimization (saves disk and time)
- Inline cache usage
- Better control of build outputs
- Build secrets management
- Cleaner and smaller images
Using BuildKit
To enable BuildKit in Docker:
export DOCKER_BUILDKIT=1   # Linux/macOS
setx DOCKER_BUILDKIT 1    # Windows (PowerShell)
Docker build command:
docker build -t myapp:latest .
Same command with BuildKit:
DOCKER_BUILDKIT=1 docker build -t myapp:latest .
BuildKit Features
-
Secret Management
Use sensitive information like passwords and API keys securely during the build process.# syntax=docker/dockerfile:1.4 FROM alpine RUN --mount=type=secret,id=mysecret cat /run/secrets/mysecretBuild command:
DOCKER_BUILDKIT=1 docker build --secret id=mysecret,src=secret.txt . -
Cache Management
Use cache from previously built images with--cache-from.docker build --cache-from=myapp:cache -t myapp:latest . -
Parallel Build
Independent layers can be built at the same time, reducing total build time. -
Multi-stage Builds
Define the build in multiple stages for smaller and more optimized images.
FROM golang:1.20 AS builder
WORKDIR /app
COPY . .
RUN go build -o app

FROM alpine:latest
WORKDIR /app
COPY --from=builder /app/app .
CMD ["./app"]
BuildKit provides performance, security, and manageability in the Docker build process. In large and complex projects, using BuildKit reduces image size, shortens build time, and increases the security of sensitive data.
2.4 Docker Compose (multi-container on a single machine)
Most real-world applications do not run with a single container. Typically, for modularity, a separate container is used for each responsibility. This is necessary so that if one part fails, other parts do not also fail. This is a Modular Architecture. For example, in a SaaS project, running each API in a separate container prevents other systems from crashing when one has an issue, and helps with troubleshooting.
Examples:
-
A web application + database (MySQL/Postgres) + cache (Redis)
-
An API service + message queue (RabbitMQ/Kafka)
Starting all of these one by one with docker run quickly becomes complex and error-prone. This is where Docker Compose comes in. To both build a modular setup and keep control, your best option is Docker Compose.
What is Docker Compose?
-
Through a YAML file (
docker-compose.yml), you can define and manage multiple services. -
With a single command (
docker compose up) you can bring the whole system up, and withdocker compose downyou can tear it down. -
It makes it easy to define shared networks and volumes.
-
It’s generally preferred in development and test environments; in production, you typically move to orchestration tools like Kubernetes.
Example docker-compose.yml
Let’s consider a simple Django + Postgres application:
version: "3.9"   # Compose file version

services:
  web:   # 1st service (Web Service)
    build: .   # Use the `Dockerfile` in the current directory to build the image
    ports:
      - "8000:8000"  # Expose port 8000
    depends_on:   # Ensure `db` starts before this service
      - db
    environment:
      - DATABASE_URL=postgres://postgres:secret@db:5432/appdb
    networks:
      - my_network   # Manual network assignment

  db:  # 2nd service (PostgreSQL database)
    image: postgres:16
    environment:
      POSTGRES_USER: postgres
      POSTGRES_PASSWORD: secret
      POSTGRES_DB: appdb
    volumes:
      - db_data:/var/lib/postgresql/data
    networks:
      - my_network   # Manual network assignment

volumes:
  db_data:

networks:   # Manual network definition
  my_network:
    driver: bridge   # Bridge network type (most common)
Basic Commands
docker compose up→ Brings up all services in the YAML.docker compose down→ Stops all services and removes the network.docker compose ps→ Lists containers started by Compose.docker compose logs -f→ Follow service logs live.docker compose exec web bash→ Open a shell in the web container.
2.5 Docker Desktop (for Windows/macOS)
Docker can run directly on the kernel on Linux. However, this is not possible on Windows or macOS because Docker requires a Linux kernel. That’s why Docker Desktop exists.
What is Docker Desktop?
-
Docker Desktop is Docker’s official application for Windows and macOS.
-
To run Docker on a Linux kernel, it includes a lightweight virtual machine (VM) inside.
-
It presents this process transparently to the user: you type commands as if Docker were running directly on Linux.
2.6 Docker Registry / Docker Hub / private registry
Docker Registry is the server/service where Docker images are stored and shared. Images are stored on a registry and pulled from there when needed, or pushed to it when publishing.
In the Docker ecosystem, the most commonly used registry types are Docker Hub and Private Registry.
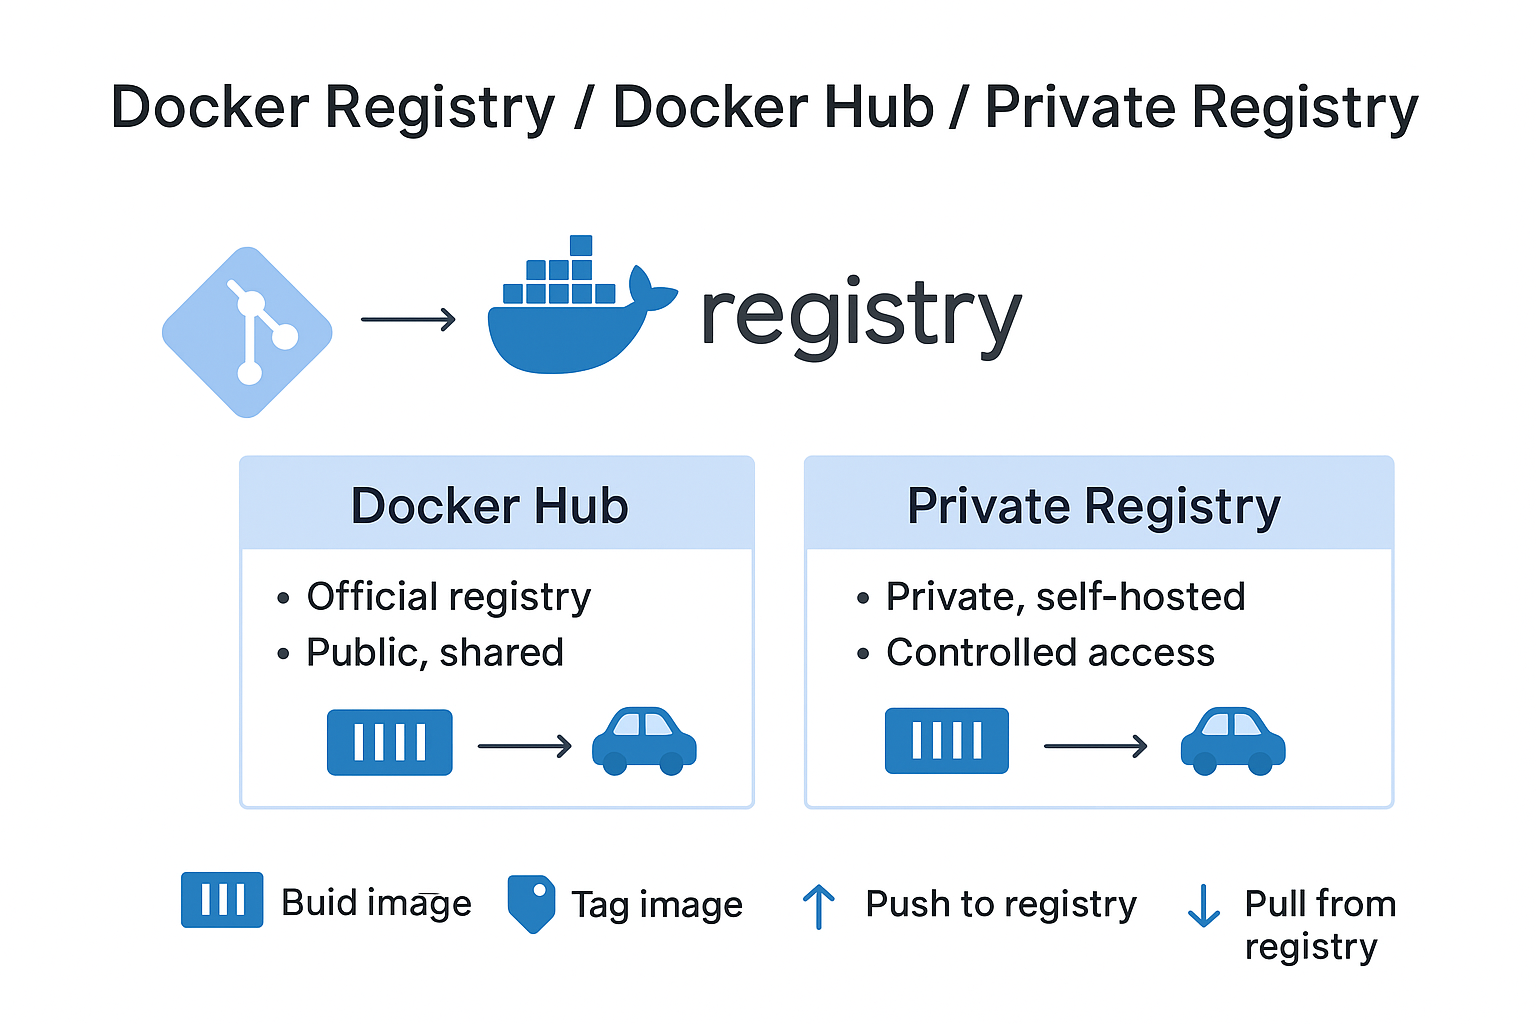
Docker Hub
- Docker’s official registry service.
- Access millions of ready-made images via hub.docker.com (nginx, mysql, redis, etc.).
- Advantages:
- Easy access, large community support
- Official images receive security updates
- Free plan allows limited usage
Usage example:
docker pull nginx:latest   # Pull nginx image from Docker Hub
docker run -d -p 80:80 nginx:latest
Private Registry
-
You can set up your own registry for in-house or private projects.
-
For example, you might want to store sensitive application images only on your own network.
-
Advantages:
- Full control (access, security, storage)
- Privacy and private distribution
-
Setup example:
docker run -d -p 5000:5000 --name registry registry:2
This command starts a local registry.
You can now push/pull your images to/from your own registry.
Example:
docker tag myapp localhost:5000/myapp:latest
docker push localhost:5000/myapp:latest
docker pull localhost:5000/myapp:latest
Registry Usage Workflow
- Build the image (
docker build) - Tag the image (
docker tag) - Push to registry (
docker push) - Pull from registry (
docker pull)
Docker Hub vs Private Registry comparison:
| Type | Advantages | Disadvantages |
|---|---|---|
| Docker Hub | Ready images, easy access, free plan | Limited control for private images and access |
| Private Registry | Privacy, full control, private distribution | Requires setup and maintenance |
2.7 Docker Swarm (native orchestration)
Docker Swarm is Docker’s built-in feature that allows you to manage containers running on multiple machines as if they were a single system. That is:
- Normally you run Docker on a single machine.
- If you want to run hundreds of containers on different machines, doing it manually is very difficult.
- Docker Swarm automates this: it decides which machine runs which containers, how many replicas run, and how they communicate.
An analogy:
Docker Swarm is like an orchestra conductor.
- Instead of a single musician (computer), there are multiple musicians (computers).
- The conductor (Swarm) tells everyone what to play, when to play, and how to stay in harmony.
- The result is proper music (a functioning system).
Core Features of Docker Swarm
-
Cluster Management
Manage multiple Docker hosts as a single virtual Docker host.
These hosts are called nodes. -
Load Balancing
Swarm automatically routes service requests to appropriate nodes. -
Service Discovery
Swarm automatically introduces services to each other.
You can access them via service names. -
Automatic Failover
If a node fails, Swarm automatically moves containers to other nodes.
Docker Swarm Architecture
A Swarm cluster consists of two types of nodes:
- Manager Node
- Handles cluster management.
- Performs service scheduling, cluster state management, and load balancing.
- Worker Node
- Runs tasks assigned by the manager node.
Docker Swarm Usage Example
1. Initialize Swarm (manager node)
docker swarm init
This command makes the current Docker host the manager node of the Swarm cluster.
2. Add a node (worker node)
docker swarm join --token <token> <manager-ip>:2377
This command adds the worker node to the cluster. <token> and <manager-ip> are provided by Swarm.
3. Create a service
docker service create --name myweb --replicas 3 -p 80:80 nginx
--replicas 3: Runs 3 replicas for the service.-p 80:80: Port mapping.
4. Check service status
docker service ls
docker service ps myweb
In summary, Docker Swarm is a simple, fast, and built-in orchestration solution for small and medium-sized projects.
It’s ideal for quick prototypes and small clusters before moving to more complex systems like Kubernetes.
| Advantages | Disadvantages |
|---|---|
| Integrated into the Docker ecosystem, no extra installation needed | Not as comprehensive as Kubernetes |
| Simple configuration | Limited features for very large-scale infrastructures |
| Service deployment and automatic scaling | |
| Built-in load balancing and service discovery |
2.8 containerd / runc (infrastructure) — short note
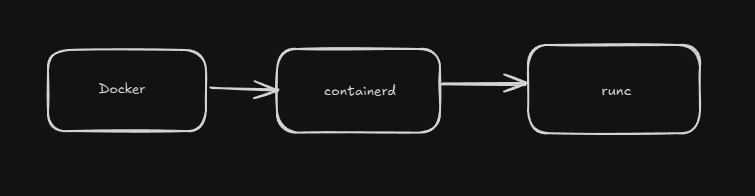
When Docker runs, things happen across multiple layers.
containerd and runc are the most fundamental infrastructure components of Docker.
containerd
- Docker’s high-level runtime that manages the container lifecycle.
- Manages tasks like creating, running, stopping, and removing containers.
- Image management, networking, storage, and container lifecycle operations are handled via containerd.
runc
- The low-level runtime used by containerd.
- Runs containers per the Open Container Initiative (OCI) standard.
- Fundamentally executes containers on the Linux kernel.
In summary:
- containerd → Docker’s container management engine
- runc → The engine that runs containers on the kernel
These two are like Docker’s “engine”; the Docker CLI serves as the “steering wheel.”
3. Installation & First Steps (Linux vs Windows)
Docker installation varies by operating system. In this section, we will explain the installation steps on Linux and Windows.
3.A Linux (distributions: Ubuntu/Debian, RHEL/CentOS, Arch)
When installing Docker on Linux, the following steps are generally applied:
- Add package repository → Add Docker’s official package repository to the system.
- Add GPG key → Required to verify package integrity.
- Install Docker and containerd → Install Docker Engine and the container runtime.
- Enable Docker service → Ensure Docker starts with the system.
- User authorization → Add your user to the docker group to run Docker without root.
Basic commands (Ubuntu example)
sudo apt update
sudo apt install -y ca-certificates curl gnupg lsb-release

# Add Docker’s GPG key
curl -fsSL https://download.docker.com/linux/ubuntu/gpg | sudo gpg --dearmor -o /usr/share/keyrings/docker-archive-keyring.gpg

# Add Docker repository
echo \
 "deb [arch=$(dpkg --print-architecture) signed-by=/usr/share/keyrings/docker-archive-keyring.gpg] \
 https://download.docker.com/linux/ubuntu $(lsb_release -cs) stable" | sudo tee /etc/apt/sources.list.d/docker.list > /dev/null

sudo apt update

# Install Docker Engine, CLI, containerd and Compose
sudo apt install -y docker-ce docker-ce-cli containerd.io docker-compose-plugin

# Enable Docker service
sudo systemctl enable --now docker

# Add user to docker group (use Docker without root)
sudo usermod -aG docker $USER
Explanation:
systemctl enable --now docker: Enables the Docker service and starts it immediately.sudo usermod -aG docker $USER: Adds the user to the docker group, sosudois not required for every command (you need to log out and back in).
3.B Windows (Docker Desktop + WSL2 and Windows containers)
On Windows, you use Docker Desktop to run Docker. Docker Desktop uses WSL2 (Windows Subsystem for Linux) or Hyper-V technologies to run Docker on Windows.
Installation Steps
1. Install Docker Desktop
-
Download Docker Desktop from the official website.
-
During installation, select the WSL2 integration option.
2. Check and Install WSL2
In PowerShell:
wsl --list --verbose
If WSL2 is not installed:
wsl --install -d Ubuntu
This command installs and runs Ubuntu on WSL2.
3. Enable Hyper-V and Containers Features
For Docker Desktop to work properly, the Hyper-V and Containers features must be enabled.
In PowerShell:
dism.exe /online /enable-feature /featurename:Microsoft-Hyper-V /all
dism.exe /online /enable-feature /featurename:Containers /all
4. Start Docker Desktop
- After installation completes, launch Docker Desktop.
- In Settings → General, check “Use the WSL 2 based engine.”
5. Windows Containers vs Linux Containers
You can switch the container type in Docker Desktop:
- Linux containers → Default, recommended for most applications.
- Windows containers → Used for Windows-based applications.
4. Dockerfile — Step by Step (Linux and Windows-based examples)
The Dockerfile is a text file that defines how Docker images will be built. A Docker image is constructed step by step according to the instructions in this file. Writing a Dockerfile is a critical step to standardize the environment in which the application will run and to simplify the deployment process.
In this section, we will cover the Dockerfile’s basic directives, the multi-stage build approach, and using Dockerfile with Windows containers in detail.
4.1 Dockerfile Basic Directives
Basic directives used in a Dockerfile:
| Directive | Description |
|---|---|
FROM |
Defines the base image. |
WORKDIR |
Sets the working directory. |
COPY / ADD |
Used for copying files/directories. |
RUN |
Runs a command inside the container during build. |
CMD |
Sets the default command when the container starts. |
ENTRYPOINT |
Works with CMD, defines the fixed part of the command. |
ENV |
Defines environment variables. |
EXPOSE |
Specifies the port to listen on. |
USER |
Specifies the user that will run in the container. |
Note: The order of directives is important for Docker’s cache mechanism.
4.2 Multi-Stage Builds — Why and How?
Multi-stage builds are used to reduce image size and remove unnecessary dependencies from the final image.
Example: Node.js Multi-Stage Build
# Stage 1: Build
FROM node:18-alpine AS build
WORKDIR /app
COPY package*.json ./
RUN npm ci
COPY . .
RUN npm run build

# Stage 2: Production
FROM node:18-alpine
WORKDIR /app
COPY --from=build /app/dist ./dist
COPY package*.json ./
RUN npm ci --only=production
CMD ["node", "dist/index.js"]
4.3 Windows Container Dockerfile
Windows containers use different Dockerfile directives and base images compared to Linux containers.
Example: Windows PowerShell Base Image
FROM mcr.microsoft.com/windows/servercore:ltsc2022
SHELL ["powershell", "-Command", "$ErrorActionPreference = 'Stop';"]

RUN Write-Host 'Hello from Windows container'
CMD ["powershell.exe"]
Additional Info: Windows container images are generally larger than Linux images.
4.4 Example: Linux Node.js Dockerfile
FROM node:18-alpine

WORKDIR /app
COPY package*.json ./
RUN npm ci --only=production
COPY . .

USER node
CMD ["node", "index.js"]
4.5 Good Practices
When writing a Dockerfile, merge RUN commands to reduce the number of layers, exclude unnecessary files from the build with .dockerignore, prefer small base images (Alpine, distroless, etc.), use multi-stage builds, and manage environment variables with the ENV directive.
In summary:
- Merge RUN commands to reduce the number of layers.
- Exclude unnecessary files from the build with
.dockerignore. - Choose a small base image (Alpine, distroless, etc.).
- Use multi-stage builds.
- Manage environment variables with
ENV.
4.6 Dockerfile Optimization
Dockerfile optimization shortens build time, reduces image size, and speeds up deployment.
Core optimization techniques:
- Manage cache effectively: Keep directive order logical (
COPY package*.json→RUN npm ci→COPY . .). - Reduce the number of layers: Chain RUN commands (with
&&). - Use small base images: Alpine, distroless, or slim images.
- Create a .dockerignore file: Exclude unnecessary files.
- Use multi-stage builds: Remove unnecessary dependencies from the final image.
4.7 Best Practices and Performance Tips
- Keep
COPYcommands to a minimum. - For downloading over the network, prefer build arguments instead of
RUN curl/wgetwhen possible. - Remove unnecessary packages (
apt-get clean,rm -rf /var/lib/apt/lists/*). - Consider using the
--no-cacheoption during build for testing purposes. - Manage configuration with environment variables rather than hard-coding.
4.8 Summary and Further Reading
The Dockerfile is the most critical part of container-based application development. A good Dockerfile:
- Builds quickly,
- Produces a small image,
- Is easy to maintain.
Further Reading:
- Dockerfile Reference — Docker Docs
- Best Practices for Writing Dockerfiles
- Multi-Stage Builds — Docker Docs
5. Image Management and Optimization
Docker images contain all files, dependencies, and configuration required for your application to run. Effective image management directly impacts both storage usage and container startup time. In this section, we’ll cover the fundamentals of image management and optimization techniques.
5.1 Layer Concept and Cache Mechanism
Docker images are based on a layer structure. Each line in a Dockerfile produces a layer. These layers can be reused during the build process. Therefore:
- Image build time is reduced,
- Disk usage decreases.
Important point: For layers to be reusable, changes made in the Dockerfile should be minimized and ordered thoughtfully.
5.2 .dockerignore, Reducing the Number of Layers, Choosing a Small Base Image
.dockerignorefile → Works like.gitignore; prevents unnecessary files from being added to the build context and copied into the image.- Reduce the number of layers → Combine unnecessary RUN commands to lower the number of layers and reduce image size.
- Choose a small base image → Minimal base images like
alpineorbusyboxremove unnecessary dependencies and significantly reduce image size.
5.3 Essential Image Management Commands
docker build --no-cache→ Builds the image without using the layer cache.docker history <image>→ Shows the image’s layer history.docker image prune→ Cleans up unused images.
Examples:
docker build --no-cache -t myapp:latest .
docker history myapp:latest
docker image prune -a
5.4 Multi-Arch and docker buildx
Modern applications can run on different platforms. Multi-arch (multi-architecture) images let you build images for different CPU architectures in a single build.
docker buildx is Docker’s advanced build capability and is used for multi-arch images.
Example:
docker buildx create --use
docker buildx build --platform linux/amd64,linux/arm64 -t myapp:multiarch .
This builds images for both amd64 and arm64 architectures in one go.
6. Volumes and Storage (Linux vs Windows differences)
In Docker, containers are ephemeral — when a container is removed, all data inside it is lost. Therefore, to ensure data persistence, you use volumes and different storage methods. However, mount paths, permissions, and behavior differ between Linux and Windows.
In this section, you will learn in detail:
- The differences between named volumes, bind mounts, and tmpfs
- SELinux permission labels
- Path syntax and permission differences on Windows
- Volume backup and restore methods
6.1 Named Volumes vs Bind Mounts vs tmpfs
There are three main methods for data persistence in Docker:
| Type | Description | Use Case |
|---|---|---|
| Named Volumes | Persistent storage managed by Docker that can be shared between containers. | Data storage, data sharing, data backups. |
| Bind Mounts | Mount a specific directory from the host into the container. | Code sharing during development, configuration files. |
| tmpfs | Temporary storage running in RAM. Not persistent; cleared when the container stops. | Temporary data, operations requiring speed, security by keeping data in RAM. |
Named Volume Example
docker volume create mydata
docker run -d -v mydata:/app/data myimage
docker volume createcreates a volume.- Data under
/app/datainside the container becomes persistent. - Even if the container is removed, the volume contents are preserved.
Bind Mount Example
Linux:
docker run -v /home/me/app:/app myimage
Windows (PowerShell):
docker run -v "C:\Users\Me\app":/app myimage
- A bind mount provides direct file sharing between the host system and the container.
- Commonly used in code development and testing workflows.
tmpfs Example
docker run --tmpfs /app/tmp:rw,size=100m myimage
/app/tmpis stored temporarily in RAM.- Data is lost when the container stops.
- Suitable for performance-critical operations.
6.2 Why SELinux :z / :Z labels are required on Linux
SELinux security policies require additional labels for bind mounts to be usable inside containers.
These labels define permissions on the mounted directory:
:z→ Grants shared access so the mounted directory can be used by multiple containers.:Z→ Restricts access so the mounted directory is only accessible to the specific container.
Example:
docker run -v /home/me/app:/app:Z myimage
On systems with SELinux enabled, if you do not use these labels, bind mounts may not work or you may encounter permission errors.
6.3 Path syntax and permission differences on Windows
On Windows, path syntax and permissions for bind mounts differ from Linux. When using bind mounts on Windows, pay attention to:
- Enclose the path in double quotes for PowerShell.
- You can use
/instead of\, but the format"C:\\path\\to\\dir"is reliable. - Windows ACL permissions can affect bind mounts, so verify permissions as needed.
Bind Mount Example:
Linux:
docker run -v /home/me/app:/app myimage
Windows (PowerShell):
docker run -v "C:\Users\Me\app":/app myimage
6.4 Backup / Restore: Volume Backup with tar
You can use the tar command to back up or restore Docker volumes. This method works on both Linux and Windows.
Backup
docker run --rm -v myvolume:/volume -v $(pwd):/backup alpine \
    tar czf /backup/myvolume-backup.tar.gz -C /volume .
Explanation:
--rm→ Automatically removes the container when it stops.-v myvolume:/volume→ Mounts the volume to be backed up.-v $(pwd):/backup→ Mounts the host directory where the backup file will be stored.tar czf→ Compresses data into a.tar.gzarchive.
Restore
docker run --rm -v myvolume:/volume -v $(pwd):/backup alpine \
    tar xzf /backup/myvolume-backup.tar.gz -C /volume
Before restoring, make sure the volume is empty. Otherwise, existing data will be overwritten.
7. Networking
In Docker, network management enables containers to communicate with each other and with the host system. By default, Docker provides isolation between containers and offers different network modes. Networks are one of Docker’s most critical concepts because the security, scalability, and manageability of applications directly depend on network configuration.
In this section:
- Docker’s default network modes
- Creating a custom bridge network
- In-container DNS and service discovery
- Host networking mode and its constraints
- Overlay, macvlan, and transparent network topologies
7.1 Default Bridge and Creating a Custom Bridge
When Docker is installed, a default bridge network is created automatically.
On this network, containers can see each other via IP addresses, but port forwarding is needed to communicate with the host.
Default Bridge Example:
docker run -d --name web -p 8080:80 nginx
-p 8080:80 → Forwards host port 8080 to container port 80.
Create a Custom Bridge
Custom bridge networks provide more flexible structures for isolation and service discovery.
Create network:
docker network create mynet
Start containers on the custom bridge:
docker run -dit --name a --network mynet busybox
docker run -dit --name b --network mynet busybox
Test:
docker exec -it a ping b
(Container a can resolve container b via its DNS name.)
7.2 In-Container DNS and Service Discovery (with Compose)
Docker Compose provides automatic DNS resolution between containers.
The service name can be used as the container name.
docker-compose.yml Example:
version: "3"
services:
  web:
    image: nginx
    networks:
      - mynet

  app:
    image: busybox
    command: ping web
    networks:
      - mynet

networks:
  mynet:
(Here, the app container can reach the web container via its DNS name.)
7.3 --network host (on Linux) and Constraints of Host Networking
The host networking mode lets the container share the host’s network stack.
In this case, port forwarding is not required.
Linux example:
docker run --network host nginx
The
hostmode works on Linux but is not supported on Windows/macOS via Docker Desktop.
From a security perspective, use
hostmode carefully, as the container directly affects the host network.
7.4 Overlay Network (Swarm), macvlan, Transparent Networks (Windows)
Overlay Network (Docker Swarm)
- Enables containers on different host machines to communicate with each other.
- Used in Docker Swarm clusters.
Create an overlay network:
docker network create -d overlay my_overlay
Macvlan Network
- Assigns containers their own MAC address on the host network.
- Makes them appear as separate devices on the physical network.
Example:
docker network create -d macvlan \
  --subnet=192.168.1.0/24 \
  --gateway=192.168.1.1 \
  -o parent=eth0 my_macvlan
Transparent Network (Windows)
- Used by Windows containers to connect directly to the physical network.
- Generally preferred in enterprise network scenarios.
7.5 Example: Using a Custom Bridge Network
docker network create mynet
docker run -dit --name a --network mynet busybox
docker run -dit --name b --network mynet busybox
Ping test:
docker exec -it a ping b
Containers on the same custom bridge can reach each other via DNS.
7.6 Summary Tips
- Default bridge is suitable for getting started quickly but has limited DNS resolution features.
- Custom bridge provides isolation and DNS support.
- Host networking offers performance advantages but is limited outside Linux platforms.
- Overlay network is very useful in multi-host scenarios.
- macvlan and transparent networks are preferred when physical network integration is required.
8. Docker Swarm / Stack (Native Orchestrator)
We briefly introduced Docker Swarm in 2.7. Now let’s prepare a detailed guide for real-world usage.
Docker Swarm is Docker’s built-in orchestration tool. It manages multiple servers (nodes) as a single cluster, automatically distributes and scales containers, and performs load balancing in failure scenarios.
When is it used?
- Small-to-medium scale projects
- Teams that want something simpler than Kubernetes
- Rapid prototyping and test environments
- Teams already familiar with Docker
Difference from Kubernetes:
- Swarm is simpler, easier to install and manage
- Kubernetes is more powerful but more complex
- Swarm is fully integrated with the Docker ecosystem
8.1 Swarm Cluster Setup and Service Management
8.1.1 Initialize Swarm (docker swarm init)
Manager Node Setup:
docker swarm init --advertise-addr 192.168.1.10
Explanation:
--advertise-addr: The IP address of this node. Other nodes will connect via this IP.- After the command runs, you get a join token.
Sample output:
Swarm initialized: current node (abc123) is now a manager.

To add a worker to this swarm, run the following command:

    docker swarm join --token SWMTKN-1-xxxxx 192.168.1.10:2377
8.1.2 Add a Worker Node
Run this on the worker node:
docker swarm join --token SWMTKN-1-xxxxx 192.168.1.10:2377
Check nodes (on the manager):
docker node ls
Output:
ID                HOSTNAME   STATUS    AVAILABILITY   MANAGER STATUS
abc123 *          node1      Ready     Active         Leader
def456            node2      Ready     Active
8.1.3 Create a Service (docker service create)
A simple web service:
docker service create \
  --name myweb \
  --replicas 3 \
  --publish 80:80 \
  nginx:alpine
Parameters:
--name: Service name--replicas: Number of container replicas to run--publish: Port mapping (host:container)
Check service status:
docker service ls
docker service ps myweb
Output:
ID            NAME       IMAGE         NODE    DESIRED STATE  CURRENT STATE
abc1          myweb.1    nginx:alpine  node1   Running        Running 2 mins
abc2          myweb.2    nginx:alpine  node2   Running        Running 2 mins
abc3          myweb.3    nginx:alpine  node1   Running        Running 2 mins
8.1.4 Update a Service
Update image:
docker service update --image nginx:latest myweb
Change replica count:
docker service scale myweb=5
Add a port:
docker service update --publish-add 8080:80 myweb
8.1.5 Remove a Service
docker service rm myweb
8.2 Replication, Rolling Update, Constraints, Configs & Secrets
8.2.1 Replication
Swarm runs the specified number of replicas. If a container crashes, it automatically starts a new one.
Manual scaling:
docker service scale myweb=10
Automatic load balancing: Swarm distributes incoming requests across all replicas.
8.2.2 Rolling Update (Zero-Downtime Updates)
Use rolling updates to update services without downtime.
Example: Upgrade Nginx from 1.20 to 1.21
docker service update \
  --image nginx:1.21-alpine \
  --update-delay 10s \
  --update-parallelism 2 \
  myweb
Parameters:
--update-delay: Wait time between updates--update-parallelism: Number of containers updated at the same time
Rollback:
docker service rollback myweb
8.2.3 Constraints (Placement Rules)
Use constraints to run a service on specific nodes.
Example: Run only on nodes labeled “production”
docker service create \
  --name prodapp \
  --constraint 'node.labels.env==production' \
  nginx:alpine
Add a label to a node:
docker node update --label-add env=production node2
Example: Run only on manager nodes
docker service create \
  --name monitoring \
  --constraint 'node.role==manager' \
  --mode global \
  prometheus
8.2.4 Configs (Configuration Files)
Swarm stores non-sensitive configuration files as configs.
Create a config:
echo "server { listen 80; }" > nginx.conf
docker config create nginx_config nginx.conf
Use in a service:
docker service create \
  --name web \
  --config source=nginx_config,target=/etc/nginx/nginx.conf \
  nginx:alpine
List configs:
docker config ls
8.2.5 Secrets (Secret Management)
Secrets securely store sensitive information (passwords, API keys).
Create a secret:
echo "myDBpassword" | docker secret create db_password -
Use in a service:
docker service create \
  --name myapp \
  --secret db_password \
  myimage
Access inside the container:
cat /run/secrets/db_password
Secrets are encrypted and only accessible to authorized containers.
List secrets:
docker secret ls
Remove a secret:
docker secret rm db_password
8.3 Compose to Swarm: Migration
Docker Compose files can be used in Swarm with minor changes.
8.3.1 From Compose to Stack
docker-compose.yml (Development):
version: "3.8"

services:
  web:
    image: nginx:alpine
    ports:
      - "80:80"
    volumes:
      - ./html:/usr/share/nginx/html
    depends_on:
      - db

  db:
    image: postgres:15
    environment:
      POSTGRES_PASSWORD: secret
    volumes:
      - db_data:/var/lib/postgresql/data

volumes:
  db_data:
docker-stack.yml (Production - Swarm):
version: "3.8"

services:
  web:
    image: nginx:alpine
    ports:
      - "80:80"
    deploy:
      replicas: 3
      update_config:
        parallelism: 1
        delay: 10s
      restart_policy:
        condition: on-failure
    networks:
      - webnet

  db:
    image: postgres:15
    environment:
      POSTGRES_PASSWORD_FILE: /run/secrets/db_password
    secrets:
      - db_password
    volumes:
      - db_data:/var/lib/postgresql/data
    deploy:
      replicas: 1
      placement:
        constraints:
          - node.role == manager
    networks:
      - webnet

volumes:
  db_data:

secrets:
  db_password:
    external: true

networks:
  webnet:
    driver: overlay
Differences:
- Added
deploysection (replicas, update_config, placement) - Removed
depends_on(does not work in Swarm) - Used
secrets - Network driver changed to
overlay
8.3.2 Stack Deploy
Create the secret:
echo "myDBpassword" | docker secret create db_password -
Deploy the stack:
docker stack deploy -c docker-stack.yml myapp
Check stack status:
docker stack ls
docker stack services myapp
docker stack ps myapp
Remove the stack:
docker stack rm myapp
8.4 Practical Examples
Example 1: WordPress + MySQL Stack
stack.yml:
version: "3.8"

services:
  wordpress:
    image: wordpress:latest
    ports:
      - "8080:80"
    environment:
      WORDPRESS_DB_HOST: db
      WORDPRESS_DB_USER: wordpress
      WORDPRESS_DB_PASSWORD_FILE: /run/secrets/db_password
      WORDPRESS_DB_NAME: wordpress
    secrets:
      - db_password
    deploy:
      replicas: 2
    networks:
      - wpnet

  db:
    image: mysql:8
    environment:
      MYSQL_ROOT_PASSWORD_FILE: /run/secrets/db_password
      MYSQL_DATABASE: wordpress
      MYSQL_USER: wordpress
      MYSQL_PASSWORD_FILE: /run/secrets/db_password
    secrets:
      - db_password
    volumes:
      - db_data:/var/lib/mysql
    deploy:
      replicas: 1
      placement:
        constraints:
          - node.role == manager
    networks:
      - wpnet

volumes:
  db_data:

secrets:
  db_password:
    external: true

networks:
  wpnet:
    driver: overlay
Deploy:
echo "mySecretPassword123" | docker secret create db_password -
docker stack deploy -c stack.yml wordpress
Example 2: Load Balancer + API
version: "3.8"

services:
  nginx:
    image: nginx:alpine
    ports:
      - "80:80"
    configs:
      - source: nginx_config
        target: /etc/nginx/nginx.conf
    deploy:
      replicas: 1
    networks:
      - frontend

  api:
    image: myapi:latest
    deploy:
      replicas: 5
      update_config:
        parallelism: 2
        delay: 10s
    networks:
      - frontend

configs:
  nginx_config:
    external: true

networks:
  frontend:
    driver: overlay
8.5 Swarm Commands Summary
| Command | Description |
|---|---|
docker swarm init |
Start a Swarm cluster |
docker swarm join |
Add a worker node |
docker node ls |
List nodes |
docker service create |
Create a service |
docker service ls |
List services |
docker service ps <service> |
Service details |
docker service scale <service>=N |
Change replica count |
docker service update |
Update a service |
docker service rollback |
Roll back to previous ver |
docker stack deploy |
Deploy a stack |
docker stack ls |
List stacks |
docker stack rm |
Remove a stack |
docker secret create |
Create a secret |
docker config create |
Create a config |
8.6 Summary and Further Reading
Docker Swarm offers easy setup and management. It’s an ideal orchestration solution before moving to Kubernetes.
Advantages:
- Fully integrated with Docker
- Simple commands
- Fast setup
- Built-in load balancing
Disadvantages:
- Not as powerful as Kubernetes for very large-scale projects
- Smaller community support
When to use?
- Clusters of 10–50 nodes
- Rapid prototyping
- Teams familiar with Docker
Further Reading:
9. Comparison with Kubernetes
After learning Docker Swarm, it’s important to understand the differences among orchestration tools. In this section, we’ll compare Docker Compose, Swarm, and Kubernetes technically and examine which tool to choose for which scenario.
9.1 Overview of Orchestration Tools
There are three primary orchestration approaches in the Docker ecosystem. Docker Compose manages multiple containers on a single server, Docker Swarm manages multiple servers as a cluster, and Kubernetes is a powerful orchestration platform designed for large-scale, complex systems.
Each has different use cases and complexity levels. Docker Compose is ideal for development environments; Docker Swarm is sufficient for small-to-medium production environments; and Kubernetes is the most suitable option for large-scale and complex systems.
Use Cases and Scale
| Tool | Number of Servers | Use Case | Complexity |
|---|---|---|---|
| Docker Compose | 1 server | Development, test environments | Low |
| Docker Swarm | 2–50 servers | Small-to-medium production | Medium |
| Kubernetes | 10+ servers | Large-scale production | High |
9.2 Technical Feature Comparison
Each of the three tools has different technical features and capabilities. Installation time, learning curve, scaling capabilities, and other important features are compared in the table below.
| Feature | Docker Compose | Docker Swarm | Kubernetes |
|---|---|---|---|
| Installation | Single command | 5 minutes | Hours |
| Learning Time | 1 day | 1 week | 1–3 months |
| Scaling | Manual | Automatic (basic) | Automatic (advanced) |
| Load Balancing | External tool required | Built-in | Built-in + advanced |
| Self-Healing | None | Yes | Advanced |
| Rolling Update | Manual | Yes | Advanced (canary, blue-green) |
| Multi-Host | Not supported | Supported | Supported |
| Secrets | Environment variables | Docker secrets | Kubernetes secrets + vault |
| Monitoring | External | External | Prometheus integration |
| Cloud Support | None | Limited | EKS, GKE, AKS |
Docker Compose’s biggest advantage is its simplicity, but it’s limited to a single server. Docker Swarm is fully integrated with the Docker CLI and compatible with Compose files. Kubernetes, while offering the most powerful feature set, is also the most complex.
9.3 Advantages and Disadvantages
Docker Compose
Docker Compose is a simple tool designed for local development and single-server applications. Its YAML file is highly readable and easy to understand. You can bring up the entire system with a single command, speeding up development. It’s very easy to learn and is ideal for rapid prototyping.
However, it has important limitations. Because it’s limited to one server, it’s not suitable for growing projects. There is no automatic scaling, and load balancing must be done manually. It is insufficient for production environments and lacks multi-host support.
| Advantages | Disadvantages |
|---|---|
| Simple, readable YAML | Single-server limitation |
| Bring system up with one command | No automatic scaling |
| Ideal for local development | Insufficient for production |
| Rapid prototyping | Manual load balancing |
| Very easy to learn | No multi-host support |
Suitable for: Development environments, single-server applications, MVPs, and prototypes.
Docker Swarm
Docker Swarm is designed as a natural part of the Docker ecosystem. It fully integrates with the Docker CLI and can be learned easily using your existing Docker knowledge. You can use your Compose files in Swarm with small changes. Installation takes about 5 minutes and it has built-in load balancing. The learning curve is much lower compared to Kubernetes.
However, it has some constraints. Its scaling capacity is not as strong as Kubernetes. Advanced features like auto-scaling are basic. Community support is smaller compared to Kubernetes, and cloud provider integration is limited.
| Advantages | Disadvantages |
|---|---|
| Full integration with Docker CLI | Limited scaling capacity |
| Compatible with Compose files | Missing advanced features |
| Fast setup (5 minutes) | Smaller community support |
| Built-in load balancing | Limited cloud integration |
| Low learning curve | Basic auto-scaling |
Suitable for: 5–50 server setups, teams with Docker knowledge, medium-scale production environments, and simple microservice architectures.
Kubernetes
Kubernetes is the most powerful and comprehensive platform in the world of container orchestration. It has strong automatic scaling mechanisms like HPA (Horizontal Pod Autoscaler) and VPA (Vertical Pod Autoscaler). Thanks to self-healing capabilities, it automatically restarts failed pods. It supports advanced deployment strategies such as canary and blue-green. It has a very large community and ecosystem. It is fully supported by all major cloud providers like AWS EKS, Google GKE, and Azure AKS. It can integrate with service mesh tools like Istio and Linkerd.
However, these powerful features come with some costs. Installation and configuration are complex and can take hours. The learning curve is steep and may require 1–3 months. Resource consumption is high due to master nodes. Management costs and operational complexity are significant. For small projects, it can be overkill.
| Advantages | Disadvantages |
|---|---|
| Powerful auto-scaling (HPA, VPA) | Complex installation and configuration |
| Self-healing mechanisms | Steep learning curve |
| Advanced deployment strategies | High resource consumption |
| Large community and ecosystem | High management cost |
| Full cloud provider support | Overkill for small projects |
| Service mesh integration | Master node overhead |
Suitable for: Setups with 50+ servers, complex microservice architectures, multi-cloud strategies, and high-traffic applications.
9.4 Moving from Compose to Kubernetes
You can migrate your Docker Compose files to Kubernetes in two ways: using the automatic conversion tool Kompose or doing it manually. The Kompose tool automatically converts your existing Compose files into Kubernetes YAML.
Automatic Conversion with Kompose
You can install Kompose on Linux, macOS, or Windows. On Linux, download the binary with curl and make it executable. On macOS, use Homebrew; on Windows, use Chocolatey.
Installation:
# Linux
curl -L https://github.com/kubernetes/kompose/releases/download/v1.31.0/kompose-linux-amd64 -o kompose
chmod +x kompose
sudo mv ./kompose /usr/local/bin/kompose

# macOS
brew install kompose

# Windows
choco install kompose
After installation, you can convert your existing docker-compose.yml by using kompose convert. This command analyzes your Compose file and creates the corresponding Kubernetes Service, Deployment, and PersistentVolumeClaim files.
Conversion:
kompose convert -f docker-compose.yml
Kompose creates separate YAML files for each service. For example, for a web service it creates both a Service and a Deployment file; for a database it additionally creates a PersistentVolumeClaim file.
Output:
INFO Kubernetes file "web-service.yaml" created
INFO Kubernetes file "web-deployment.yaml" created
INFO Kubernetes file "db-persistentvolumeclaim.yaml" created
To deploy the generated files to your Kubernetes cluster, use kubectl. The apply command reads all YAML files in the current directory and applies them to the cluster.
Deploy:
kubectl apply -f .
Manual Conversion Example
Sometimes automatic conversion may be insufficient or you may want more control. In that case, perform a manual conversion. Below is how to convert a simple Docker Compose file into its Kubernetes equivalent.
In Docker Compose, defining a service is very simple. You specify the image name, replica count, and port mapping. In Kubernetes, you need to create both a Deployment and a Service to achieve the same functionality.
Docker Compose:
version: "3.8"

services:
  web:
    image: nginx:alpine
    replicas: 3
    ports:
      - "80:80"
The Kubernetes Deployment object defines how many pods will run, which image to use, and how pods are labeled. The Service object provides external access to these pods and performs load balancing. A LoadBalancer-type service automatically obtains an external IP from the cloud provider.
Kubernetes Deployment:
apiVersion: apps/v1
kind: Deployment
metadata:
  name: web
spec:
  replicas: 3
  selector:
    matchLabels:
      app: web
  template:
    metadata:
      labels:
        app: web
    spec:
      containers:
      - name: web
        image: nginx:alpine
        ports:
        - containerPort: 80
---
apiVersion: v1
kind: Service
metadata:
  name: web
spec:
  type: LoadBalancer
  ports:
  - port: 80
    targetPort: 80
  selector:
    app: web
9.5 Scenario-Based Recommendations
Different tools may be more appropriate for different project sizes and requirements. The table below shows recommended orchestration tools and justifications for common scenarios.
For small projects like a simple blog site, Docker Compose is sufficient. For startup MVPs, you can start with Compose and move to Swarm as you grow. For mid-sized e-commerce sites, Swarm’s automatic scaling and load balancing are sufficient. SaaS platforms with thousands of users require Kubernetes’s powerful capabilities.
| Scenario | Recommended Tool | Rationale |
|---|---|---|
| Blog site (single server) | Docker Compose | Simple setup, single server is enough |
| Startup MVP (10–100 users) | Docker Compose → Swarm | Rapid development, easy switch to Swarm when needed |
| E-commerce (1000+ users) | Docker Swarm | Auto-scaling, load balancing, manageable complexity |
| SaaS Platform (10,000+ users) | Kubernetes | Advanced scaling, multi-cloud, complex microservices |
9.6 Migration Roadmap
Migration from one orchestration tool to another should be done gradually. At each stage, it’s important to assess your system’s needs and your team’s capabilities.
In the first stage, start by using Docker Compose in your development environment. At this stage, you can easily manage your local development environment with a simple YAML file. Thanks to the build directive, an image is automatically created from your Dockerfile.
Stage 1: Development (Docker Compose)
version: "3.8"
services:
  web:
    build: .
    ports:
      - "80:80"
As your project grows and you need multiple servers, you can switch to Docker Swarm. At this stage, you convert your Compose file to a Swarm stack file with small changes. Instead of build, you use a prebuilt image, and in the deploy section you specify the number of replicas and the update strategy.
Stage 2: Medium Scale (Docker Swarm)
version: "3.8"
services:
  web:
    image: myapp:latest
    deploy:
      replicas: 3
      update_config:
        parallelism: 1
    ports:
      - "80:80"
When your project grows much larger and you move to a complex microservice architecture, you can migrate to Kubernetes. At this point, you can use the Kompose tool to convert your existing stack file to Kubernetes YAML, or you can write Kubernetes manifests from scratch.
Stage 3: Large Scale (Kubernetes)
kompose convert -f docker-stack.yml
kubectl apply -f .
At each migration stage, you should test your system and give your team time to adapt to the new tool. A phased migration minimizes risks and helps you detect issues early.
10. Security
Docker containers isolate your applications, but isolation alone is not sufficient. Security is one of the most critical aspects of using Docker. In this section, you’ll learn the tools, techniques, and best practices you can use to improve container security.
Containers come with some security features by default, but in production environments you must add additional security layers. Especially for applications that handle sensitive data, you should apply various methods to minimize vulnerabilities.
10.1 Rootless Docker (Linux)
In a normal Docker installation, the daemon runs with root privileges. This can pose a security risk because if there is a container escape, an attacker could gain root access. Rootless Docker eliminates this risk by running the daemon as a non-root user.
The idea behind Rootless Docker is as follows: the daemon and containers run with normal user privileges, so even if there is a vulnerability, the attacker will only have the permissions of that user and will not gain system-wide root access.
Rootless Docker Installation (Ubuntu/Debian)
First stop the normal Docker daemon, then run the rootless installation script. This script configures the necessary settings and starts Docker in user mode.
# Stop existing Docker
sudo systemctl disable --now docker.service docker.socket

# Run the rootless install script
curl -fsSL https://get.docker.com/rootless | sh

# Set environment variables
export PATH=/home/$USER/bin:$PATH
export DOCKER_HOST=unix:///run/user/$(id -u)/docker.sock
After installation, you can run Docker commands without sudo. The daemon now runs with normal user privileges, and containers also run without root.
Advantages and Limitations of Rootless Docker
The biggest advantage of using Rootless Docker is security. Even in container escape scenarios, an attacker cannot gain root access. In multi-user systems, each user can run their own Docker daemon.
However, there are some limitations. You cannot bind to ports below 1024 (like 80, 443) directly; you need to use port forwarding. Some storage drivers (like overlay2) may not work. Performance may be slightly lower than standard Docker.
| Advantages | Limitations |
|---|---|
| No root access risk | Ports below 1024 cannot be used directly |
| Safe on multi-user systems | Some storage drivers may not work |
| Minimal container escape risk | Slightly lower performance |
| User isolation | Some networking features are limited |
10.2 Linux Security Modules (Seccomp, AppArmor, SELinux)
Linux provides several security modules to protect containers. These modules restrict what containers can do and block malicious activities. Each provides security with a different approach.
Seccomp (Secure Computing Mode)
Seccomp controls which system calls a container can make. System calls are requests a program makes to the operating system (e.g., reading files, creating network connections, spawning new processes).
Docker uses a default seccomp profile and blocks dangerous system calls. For example, system calls like reboot, swapon, and mount are blocked by default.
You can also create your own seccomp profile. Below is an example that only allows read, write, and exit system calls.
Example seccomp profile (seccomp.json):
{
  "defaultAction": "SCMP_ACT_ERRNO",
  "architectures": ["SCMP_ARCH_X86_64"],
  "syscalls": [
    {
      "names": ["read", "write", "exit", "exit_group"],
      "action": "SCMP_ACT_ALLOW"
    }
  ]
}
Start a container using this profile:
docker run --security-opt seccomp=seccomp.json myimage
AppArmor
AppArmor controls container access to the filesystem, network, and other resources. On Ubuntu and Debian systems it is enabled by default.
Docker automatically uses an AppArmor profile called docker-default. This profile prevents containers from writing to sensitive system directories, protecting paths like /sys and /proc.
You can also create your own AppArmor profile. For example, a profile that only allows writing to /tmp:
# Create AppArmor profile (/etc/apparmor.d/docker-nginx)
profile docker-nginx flags=(attach_disconnected,mediate_deleted) {
  #include <abstractions/base>
  file,
  /tmp/** rw,
  deny /proc/** w,
  deny /sys/** w,
}

# Load the profile
sudo apparmor_parser -r -W /etc/apparmor.d/docker-nginx

# Use the profile when starting the container
docker run --security-opt apparmor=docker-nginx nginx
SELinux
SELinux (Security-Enhanced Linux) is used on Red Hat, CentOS, and Fedora systems. It works similarly to AppArmor but is more complex and powerful.
SELinux assigns a label to every file, process, and network port. Containers run by default with the svirt_lxc_net_t label and can only access files labeled svirt_sandbox_file_t.
As seen in Section 6, the :Z label is related to SELinux. When you mount a volume with :Z, Docker automatically assigns the correct label to that directory for container access.
docker run -v /mydata:/data:Z myimage
Kernel Capabilities
The Linux kernel breaks root privileges into small pieces called capabilities. For example, changing network settings requires CAP_NET_ADMIN, changing file ownership requires CAP_CHOWN.
By default, Docker grants containers a limited set of capabilities. You can improve security by dropping unnecessary capabilities.
Drop all capabilities:
docker run --cap-drop=ALL myimage
Add only specific capabilities:
docker run --cap-drop=ALL --cap-add=NET_BIND_SERVICE myimage
In this example, all capabilities are dropped and only NET_BIND_SERVICE (binding to ports below 1024) is added.
10.3 Image Scanning and Security Tools
An important part of container security is the security of the images you use. Images may contain vulnerabilities. Use image scanning tools to detect them.
Docker Bench for Security
Docker Bench for Security is an automated script that checks your Docker installation against best practices. It checks the CIS Docker Benchmark standards.
Install and use:
git clone https://github.com/docker/docker-bench-security.git
cd docker-bench-security
sudo sh docker-bench-security.sh
The script performs hundreds of checks and reports the results. Each check is reported as PASS, WARN, or INFO.
Sample output:
[PASS] 1.1.1 - Ensure a separate partition for containers has been created
[WARN] 1.2.1 - Ensure Docker daemon is not running with experimental features
[INFO] 2.1 - Restrict network traffic between containers
You should definitely review WARN items. These indicate potential security issues.
Image Scanning with Trivy
Trivy is an open-source tool that detects vulnerabilities in Docker images. It’s very easy to use and gives quick results.
Installation:
# Linux
wget -qO - https://aquasecurity.github.io/trivy-repo/deb/public.key | sudo apt-key add -
echo "deb https://aquasecurity.github.io/trivy-repo/deb $(lsb_release -sc) main" | sudo tee -a /etc/apt/sources.list.d/trivy.list
sudo apt update
sudo apt install trivy

# macOS
brew install trivy
Scan an image:
trivy image nginx:latest
Trivy scans all packages in the image and lists known vulnerabilities. For each vulnerability, it shows the CVE ID, severity (CRITICAL, HIGH, MEDIUM, LOW), and a suggested fix.
Sample output:
nginx:latest (debian 11.6)
==========================
Total: 45 (CRITICAL: 5, HIGH: 12, MEDIUM: 20, LOW: 8)

┌───────────────┬────────────────┬──────────┬────────┬─────────────────────┐
│   Library     │ Vulnerability  │ Severity │ Status │    Fixed Version    │
├───────────────┼────────────────┼──────────┼────────┼─────────────────────┤
│ openssl       │ CVE-2023-12345 │ CRITICAL │ fixed  │ 1.1.1w-1            │
│ curl          │ CVE-2023-54321 │ HIGH     │ fixed  │ 7.88.1-1            │
└───────────────┴────────────────┴──────────┴────────┴─────────────────────┘
You should fix CRITICAL and HIGH vulnerabilities. Typically, this means updating the image or using a different base image.
Other Image Scanning Tools
Besides Trivy, there are other tools:
| Tool | Description | Usage |
|---|---|---|
| Clair | Image scanner developed by CoreOS | API-based, can be integrated into CI/CD |
| Anchore | Scanner with detailed policy controls | Approve images based on company policies |
| Snyk | Commercial tool that scans both images and code | Advanced reporting and tracking |
| Grype | Similar to Trivy, fast and simple | Easy CLI usage |
10.4 Secrets Management
It’s critical to store sensitive information such as passwords, API keys, and certificates (secrets) securely inside containers. Never hard-code this information into your Dockerfile or images.
Docker Swarm Secrets
Docker Swarm provides a built-in system for secrets. Secrets are encrypted and only mounted into authorized containers.
Create a secret:
# Create secret from input
echo "myDBpassword123" | docker secret create db_password -

# Create secret from file
docker secret create db_config /path/to/config.json
Use a secret in a service:
docker service create \
  --name myapp \
  --secret db_password \
  myimage
Inside the container, the secret appears as a file under /run/secrets/:
# Inside the container
cat /run/secrets/db_password
# Output: myDBpassword123
Use secrets with Docker Compose:
version: "3.8"

services:
  web:
    image: myapp
    secrets:
      - db_password

secrets:
  db_password:
    external: true
Secrets via Environment Variables (Not Recommended)
In some cases you may need to use environment variables, but this is not secure. Environment variables can be viewed with docker inspect.
docker run -e DB_PASSWORD=secret123 myimage
Instead of this approach, you should use Docker secrets or Vault.
HashiCorp Vault Integration
For production environments, HashiCorp Vault can be used for more advanced secret management. Vault stores secrets centrally, encrypts them, and provides access control.
Vault’s basic workflow is as follows: when your application starts, it obtains a token from Vault, uses this token to fetch secrets, and then uses them. Secrets are never stored in the image or as environment variables.
Simple Vault usage example:
# Write a secret to Vault
vault kv put secret/db password=myDBpassword

# Read the secret from inside the container
vault kv get -field=password secret/db
For Vault integration, you typically use an init container or sidecar pattern. These are more advanced topics and are beyond the scope of this section.
10.5 Container Hardening Practices
There are practices you should apply to secure your containers. These practices create a layered defense (defense in depth).
Use the USER Directive
By default, containers run as the root user in the Dockerfile. This is a major security risk. You must run as a non-root user.
Bad example:
FROM node:18
WORKDIR /app
COPY . .
CMD ["node", "app.js"]
# Running as root!
Good example:
FROM node:18
WORKDIR /app
COPY . .

# Create a non-root user
RUN useradd -m -u 1001 appuser && \
    chown -R appuser:appuser /app

# Switch to this user
USER appuser

CMD ["node", "app.js"]
Now the container runs as appuser. Even if there is a vulnerability, the attacker cannot gain root privileges.
Read-Only Filesystem
Make the container filesystem read-only to prevent an attacker from writing malicious files.
docker run --read-only --tmpfs /tmp myimage
If the application must write temporary files, you can use tmpfs. tmpfs runs in RAM and is cleared when the container stops.
With Docker Compose:
services:
  web:
    image: myapp
    read_only: true
    tmpfs:
      - /tmp
Remove Unnecessary Capabilities
As mentioned earlier, you can restrict what an attacker can do by dropping capabilities.
docker run \
  --cap-drop=ALL \
  --cap-add=NET_BIND_SERVICE \
  myimage
Network Isolation
Create separate networks for each container to isolate services. This way, even if one container is compromised, it cannot access the others.
# Frontend network
docker network create frontend

# Backend network
docker network create backend

# Web service connects only to frontend
docker run --network frontend web

# API service connects to both
docker run --network frontend --network backend api

# Database connects only to backend
docker run --network backend db
Resource Limits
Limit container resource usage to prevent DoS (Denial of Service) attacks.
docker run \
  --memory="512m" \
  --cpus="1.0" \
  --pids-limit=100 \
  myimage
With these limits, a single container won’t crash the entire system.
Keep Images Up to Date
You should regularly update the base images you use. Old images may contain known vulnerabilities.
# Update images
docker pull nginx:latest
docker pull node:18-alpine
Also, in production, use specific versions instead of the latest tag:
# Bad
FROM node:latest

# Good
FROM node:18.19.0-alpine
Security Checklist
Summary of essential practices for container security:
Dockerfile Security:
- Use a non-root user (USER directive)
- Choose a minimal base image (alpine, distroless)
- Remove unnecessary tools with multi-stage builds
- Do not bake secrets into images
- Use pinned image versions (not latest)
Runtime Security:
- Use Rootless Docker
- Enable read-only filesystem
- Drop unnecessary capabilities
- Set resource limits
- Implement network isolation
- Use Seccomp/AppArmor/SELinux
Image Security:
- Scan images regularly (Trivy)
- Update base images
- Run Docker Bench for Security
- Pull images only from trusted registries
Secrets Management:
- Use Docker Swarm secrets or Vault
- Do not store secrets in environment variables
- Do not log secrets
- Do not commit secrets to version control
By applying these practices, you significantly improve the security of your containers. Security requires a layered approach; no single method is sufficient on its own.
11. Resource Limits & Performance Management
By default, Docker containers can use all resources of the host system. In this case, a single container could consume all CPU or RAM and cause other containers or the system to crash. Setting resource limits is critical for both system stability and performance.
In this section, you’ll learn how to set resource limits for containers, how Linux enforces these limits, and how to manage resources across different platforms.
11.1 Memory and CPU Limits
Docker allows you to limit the amount of memory and CPU a container can use. With these limits, you can prevent a container from overconsuming resources and ensure system stability.
Memory Limits
Setting memory limits prevents container crashes and system-wide memory exhaustion. When a container tries to exceed the set limit, the Linux kernel’s OOM (Out Of Memory) Killer steps in and stops the container.
Simple memory limit:
docker run --memory="512m" nginx
In this example, the container can use a maximum of 512 MB of RAM. If it exceeds the limit, the container is automatically stopped.
Memory swap setting:
docker run --memory="512m" --memory-swap="1g" nginx
The --memory-swap parameter specifies total memory plus swap. In this example, 512 MB RAM and 512 MB swap can be used (1g - 512m = 512m swap).
Disable swap entirely:
docker run --memory="512m" --memory-swap="512m" nginx
If memory and memory-swap are the same value, swap usage is disabled.
Memory reservation (soft limit):
docker run --memory="1g" --memory-reservation="750m" nginx
Memory reservation is the amount of memory expected under normal conditions. When the system is under memory pressure, Docker enforces this reservation. Under normal conditions the container may use more, but when resources are tight, it is throttled down to the reservation.
OOM (Out of Memory) Killer behavior:
docker run --memory="512m" --oom-kill-disable nginx
The --oom-kill-disable parameter can be dangerous. Even if the container exceeds its memory limit, it won’t be killed, which might crash the host. Use only in test environments.
CPU Limits
CPU limits define how much processing power a container can use. Unlike memory, CPU is shared; if a container exceeds its CPU limit, it will simply slow down rather than crash.
Limit number of CPUs:
docker run --cpus="1.5" nginx
This container can use a maximum of 1.5 CPU cores (one full core plus half of another).
CPU share (weight) system:
docker run --cpu-shares=512 --name container1 nginx
docker run --cpu-shares=1024 --name container2 nginx
CPU shares control how containers share CPU time. The default is 1024. In this example, container2 gets twice as much CPU time as container1 (1024/512 = 2) when the system is under load.
CPU shares only matter under load. If the system is idle, all containers can use as much CPU as they need.
Pin to specific CPU cores:
docker run --cpuset-cpus="0,1" nginx
This container runs only on cores 0 and 1. Useful for distributing workloads on multi-core systems.
CPU period and quota:
docker run --cpu-period=100000 --cpu-quota=50000 nginx
These parameters provide more granular CPU control. Period is in microseconds (100000 = 100ms). Quota is how many microseconds of CPU the container can use within that period. In this example, it can use 50ms every 100ms, i.e., 50% CPU.
Practical Examples
Typical settings for a web server:
docker run -d \
  --name web \
  --memory="512m" \
  --memory-reservation="256m" \
  --cpus="1.0" \
  --restart=unless-stopped \
  nginx
Higher resources for a database:
docker run -d \
  --name postgres \
  --memory="2g" \
  --memory-swap="2g" \
  --cpus="2.0" \
  --cpu-shares=1024 \
  postgres:15
Low priority for a background job:
docker run -d \
  --name background-job \
  --memory="256m" \
  --cpus="0.5" \
  --cpu-shares=512 \
  myworker
Resource Limits with Docker Compose
Specify resource limits in the deploy section of a Docker Compose file:
version: "3.8"

services:
  web:
    image: nginx
    deploy:
      resources:
        limits:
          cpus: '1.0'
          memory: 512M
        reservations:
          cpus: '0.5'
          memory: 256M
Limits specify the upper bound; reservations specify the minimum guaranteed resources.
11.2 Ulimit Settings
Ulimit restricts the system resources a process can use. For example, you can set limits for the number of open files, number of processes, or stack size.
Ulimit types:
| Ulimit | Description | Default |
|---|---|---|
nofile |
Number of open files | 1024 |
nproc |
Number of processes | Unlimited |
core |
Core dump size | 0 |
stack |
Stack size | 8388608 |
Set ulimit:
docker run --ulimit nofile=1024:2048 nginx
In this example, the soft limit is 1024 and the hard limit is 2048. The soft limit is the normal operating limit; the hard limit is the maximum allowed.
Multiple ulimits:
docker run \
  --ulimit nofile=1024:2048 \
  --ulimit nproc=512:1024 \
  myapp
With Docker Compose:
services:
  web:
    image: myapp
    ulimits:
      nofile:
        soft: 1024
        hard: 2048
      nproc:
        soft: 512
        hard: 1024
Ulimit settings are especially important for databases and web servers. For example, Nginx and PostgreSQL open many files, so you may need to increase the nofile limit.
11.3 Linux Cgroups (Control Groups)
Cgroups are the Linux kernel’s resource management system. Docker uses cgroups to apply resource limits to containers. Each container runs in its own cgroup and receives resources according to the set limits.
Cgroups v1 vs v2
There are two cgroups versions in Linux with important differences.
Cgroups v1:
- In use since 2008
- Separate hierarchy for each resource type (cpu, memory, blkio, etc.)
- Default on older systems
- Complex structure; limits can sometimes conflict
Cgroups v2:
- Introduced in 2016
- Single unified hierarchy
- Simpler and more consistent API
- Default on modern distributions (Ubuntu 22.04+, Fedora 31+)
Check which version you use:
stat -fc %T /sys/fs/cgroup/
If the output is cgroup2fs you are on v2; if tmpfs then v1.
Advantages of cgroups v2:
Resource limits are applied more consistently in v2. For example, in v1, managing memory and CPU limits separately could create conflicts. In v2, all resources are managed in a single hierarchy.
Additionally, v2 has “pressure stall information” (PSI), which lets you see how much resource pressure a container is under.
View cgroups information:
# Find the container cgroup path
docker inspect --format='{{.State.Pid}}' mycontainer
# Output: 12345

# View cgroup limits (v2)
cat /sys/fs/cgroup/system.slice/docker-<container-id>.scope/memory.max
cat /sys/fs/cgroup/system.slice/docker-<container-id>.scope/cpu.max
Most users don’t need to deal with cgroups details. Docker CLI parameters (–memory, –cpus, etc.) configure cgroups under the hood. However, for special cases or debugging, cgroups knowledge is useful.
11.4 Resource Settings in Docker Desktop (Windows/macOS)
On Windows and macOS, Docker Desktop runs inside a virtual machine (VM). This VM itself has resource limits. Resources you allocate to containers are first allocated to this VM, then to containers.
Docker Desktop Resource Settings on Windows
To open settings on Windows, right-click the Docker icon in the system tray and select “Settings.”
Limits you can set under Resources:
Memory: The maximum RAM the Docker VM will use. By default, about half of system RAM is allocated. For example, with 16 GB RAM, 8 GB is given to Docker.
Adjustable between 2 GB and total RAM. For production-like workloads, 4–8 GB minimum is recommended.
CPUs: The number of CPU cores the Docker VM will use. By default, all cores are available.
Recommended: about half of your system cores. For example, if you have 8 cores, assign 4 to Docker.
Disk: Maximum disk space for Docker images, volumes, and containers. Default is 64 GB.
Swap: Swap space for the VM. Default is 1 GB. Increasing swap is recommended for production scenarios.
WSL2 Integration:
If you use WSL2 on Windows, resource management behaves a bit differently. The WSL2 VM dynamically acquires and releases resources.
If you want to set manual limits for WSL2, create %UserProfile%\\.wslconfig:
[wsl2]
memory=8GB
processors=4
swap=2GB
Apply these settings by restarting WSL:
wsl --shutdown
Docker Desktop Resource Settings on macOS
Similarly, on macOS, go to Docker Desktop Settings > Resources.
Notes specific to macOS:
On Apple Silicon (M1/M2) Macs, Docker runs more efficiently because ARM-based containers run natively. However, x86 images use emulation and may be slower.
If you enable Rosetta 2 integration, x86 images can run faster:
Settings > General > “Use Rosetta for x86/amd64 emulation on Apple Silicon”
Disk usage optimization:
Docker Desktop uses a disk image file on macOS, which can grow over time. To clean up:
# Clean up unused images and volumes
docker system prune -a --volumes

# Compress/reset the Docker disk image
# Settings > Resources > Disk image location > "Reset disk image"
Performance Tips
To improve Docker Desktop performance:
File Sharing: Bind mounts can be slow. Share only directories you really need. Review under Settings > Resources > File Sharing.
Exclude directories: Configure antivirus to exclude Docker directories. In Windows Defender, exclude the Docker Desktop install directory and WSL directories.
Use volume mounts instead of bind mounts: Bind mounts (especially on Windows/macOS) are slow. Prefer named volumes when possible:
# Slow
docker run -v /Users/me/app:/app myimage

# Fast
docker volume create myapp-data
docker run -v myapp-data:/app myimage
Example Scenario: Development Environment
Recommended Docker Desktop settings for a development environment:
System: 16 GB RAM, 8 Core CPU
Memory: 8 GB
CPUs: 4
Swap: 2 GB
Disk: 128 GB
docker-compose.yml:
version: "3.8"

services:
  web:
    image: nginx
    deploy:
      resources:
        limits:
          cpus: '1.0'
          memory: 512M
    ports:
      - "8080:80"

  db:
    image: postgres:15
    deploy:
      resources:
        limits:
          cpus: '2.0'
          memory: 2G
    volumes:
      - db_data:/var/lib/postgresql/data

  redis:
    image: redis:alpine
    deploy:
      resources:
        limits:
          cpus: '0.5'
          memory: 256M

volumes:
  db_data:
In this configuration, a total of 3.5 CPU and 2.75 GB RAM are used. Since you allocated 4 CPUs and 8 GB to Docker Desktop, there is sufficient headroom.
Monitoring and Troubleshooting
To monitor resource usage:
# All containers’ resource usage
docker stats

# Specific container
docker stats mycontainer

# JSON format
docker stats --no-stream --format "{{json .}}"
The docker stats output shows:
- CPU usage percentage
- Memory usage and limit
- Memory percentage
- Network I/O
- Block I/O
- Number of processes
If a container continuously hits its limit, you have two options: increase the limit or optimize the application. Check the application behavior after throttling via logs:
docker logs mycontainer
If you see OOM (Out of Memory) errors, increase the memory limit. If you see CPU throttling, increase the CPU limit or optimize the application.
With proper resource management, the system runs stably, containers don’t affect each other, and unexpected crashes are avoided. In production, always set and monitor resource limits.
12. Logging, Monitoring and Observability
In Docker containers, logging and monitoring are critical in production to track system health, detect issues, and optimize performance. Because containers are ephemeral, you must centralize logs and continuously monitor system metrics.
In this section, we’ll examine Docker’s built-in logging tools, different log drivers, monitoring architectures, and centralized logging systems in detail.
12.1 docker logs, docker stats, docker events
Docker provides three fundamental commands to monitor container status and logs.
docker logs — View Container Logs
The docker logs command shows a container’s stdout and stderr output. This includes everything your application writes to the console.
Basic usage:
docker logs mycontainer
This prints all logs of the container.
Live log following (like tail -f):
docker logs -f mycontainer
The -f (follow) parameter shows new logs in real time as the container runs.
Show the last N lines:
docker logs --tail 100 mycontainer
Shows only the last 100 lines. Important for performance on large logs.
Add timestamps:
docker logs -t mycontainer
Adds a timestamp to each log line:
2025-09-29T10:30:45.123456789Z [INFO] Application started
2025-09-29T10:30:46.234567890Z [INFO] Database connected
Logs within a time range:
# Last 1 hour of logs
docker logs --since 1h mycontainer

# Logs after a specific time
docker logs --since 2025-09-29T10:00:00 mycontainer

# Logs before a specific time
docker logs --until 2025-09-29T12:00:00 mycontainer
Combination example:
docker logs -f --tail 50 --since 10m mycontainer
Shows the last 50 lines from the past 10 minutes and follows new logs.
docker stats — Resource Usage Statistics
The docker stats command shows real-time resource usage for containers. You can monitor CPU, memory, network, and disk I/O.
All running containers:
docker stats
Sample output:
CONTAINER ID   NAME        CPU %     MEM USAGE / LIMIT     MEM %     NET I/O           BLOCK I/O
abc123def456   web         2.50%     256MiB / 512MiB       50.00%    1.2MB / 850KB     12MB / 5MB
def456abc789   db          15.20%    1.5GiB / 2GiB         75.00%    500KB / 300KB     500MB / 200MB
Explanation:
- CPU %: Container CPU usage percentage
- MEM USAGE / LIMIT: Memory used / Maximum limit
- MEM %: Memory usage percentage
- NET I/O: Network traffic in/out
- BLOCK I/O: Disk read/write traffic
Stats for a single container:
docker stats mycontainer
Single snapshot without streaming:
docker stats --no-stream
Runs once and exits. Useful in scripts.
JSON format:
docker stats --no-stream --format "{{json .}}"
Programmatic JSON output example:
{"BlockIO":"12.3MB / 5.6MB","CPUPerc":"2.50%","Container":"web","ID":"abc123","MemPerc":"50.00%","MemUsage":"256MiB / 512MiB","Name":"web","NetIO":"1.2MB / 850KB","PIDs":"15"}
Custom format example:
docker stats --format "table {{.Name}}\t{{.CPUPerc}}\t{{.MemUsage}}"
Shows only name, CPU, and memory usage in a table format.
docker events — Monitor System Events
The docker events command shows real-time events occurring in the Docker daemon. All events such as container start/stop, network creation, and volume mounts are logged.
Monitor all events:
docker events
Sample output:
2025-09-29T10:30:45.123456789Z container create abc123 (image=nginx, name=web)
2025-09-29T10:30:45.234567890Z container start abc123 (image=nginx, name=web)
2025-09-29T10:30:46.345678901Z network connect bridge abc123
Filter specific events:
# Only container events
docker events --filter type=container

# Specific container
docker events --filter container=mycontainer

# Specific event type
docker events --filter event=start

# Specific image
docker events --filter image=nginx
Filter by time range:
# Events from the last 1 hour
docker events --since 1h

# Specific time range
docker events --since 2025-09-29T10:00:00 --until 2025-09-29T12:00:00
JSON format:
docker events --format '{{json .}}'
Practical example — container state watcher script:
#!/bin/bash
docker events --filter type=container --format '{{.Time}} {{.Action}} {{.Actor.Attributes.name}}' | \
while read timestamp action container; do
    echo "[$timestamp] Container '$container' $action"
    if [ "$action" = "die" ]; then
        echo "WARNING: Container $container stopped unexpectedly!"
    fi
done
This script watches container state and reports unexpected stops.
12.2 Log Drivers (json-file, journald, syslog, gelf)
Docker uses a log driver system to route container logs to different backends. By default, the json-file driver is used, but you can select different drivers as needed.
Log Driver Types
Commonly used log drivers in Docker:
| Driver | Description | Use Case |
|---|---|---|
json-file |
Writes to file in JSON format (default) | Local development, small systems |
journald |
Writes to systemd journal | Linux systems with centralized systemd |
syslog |
Sends to a remote server via syslog | Traditional syslog infrastructures |
gelf |
Graylog Extended Log Format | Graylog, ELK stack |
fluentd |
Sends to Fluentd log collector | Kubernetes, large systems |
awslogs |
Sends to AWS CloudWatch Logs | AWS environments |
gcplogs |
Sends to Google Cloud Logging | GCP environments |
splunk |
Sends to Splunk | Enterprise monitoring |
json-file (Default Driver)
The json-file driver writes logs to files on the host in JSON format. Each log line is stored as a JSON object.
Log file location:
/var/lib/docker/containers/<container-id>/<container-id>-json.log
Example JSON log line:
{"log":"Hello from container\n","stream":"stdout","time":"2025-09-29T10:30:45.123456789Z"}
Start container with json-file:
docker run -d \
  --log-driver json-file \
  --log-opt max-size=10m \
  --log-opt max-file=3 \
  nginx
Log options:
max-size: Maximum size per log file (e.g., 10m, 100k)max-file: Maximum number of files to keepcompress: Compress old log files (true/false)
With Docker Compose:
services:
  web:
    image: nginx
    logging:
      driver: json-file
      options:
        max-size: "10m"
        max-file: "3"
        compress: "true"
Advantages:
- Simple and fast
- Compatible with
docker logs - No setup required
Disadvantages:
- Disk can fill up (requires log rotation)
- No centralized log management
- Search and analysis are harder
journald
journald is systemd’s logging system. It’s available by default on modern Linux distributions (Ubuntu 16.04+, CentOS 7+).
Start container with journald:
docker run -d \
  --log-driver journald \
  nginx
View logs with journalctl:
# By container ID
journalctl CONTAINER_ID=abc123

# By container name
journalctl CONTAINER_NAME=mycontainer

# Last 100 lines
journalctl -n 100 CONTAINER_NAME=mycontainer

# Live follow
journalctl -f CONTAINER_NAME=mycontainer
With Docker Compose:
services:
  web:
    image: nginx
    logging:
      driver: journald
      options:
        tag: "{{.Name}}/{{.ID}}"
Advantages:
- Integrated with system logs
- Powerful filtering and search
- Automatic log rotation
- Centralized journal management
Disadvantages:
docker logsdoes not work- Only available on systems using systemd
- Requires extra configuration to send to remote servers
syslog
Syslog is the traditional Unix logging protocol. It’s used to send logs to a remote syslog server.
Start container with syslog:
docker run -d \
  --log-driver syslog \
  --log-opt syslog-address=tcp://192.168.1.100:514 \
  --log-opt tag="docker/{{.Name}}" \
  nginx
Syslog options:
syslog-address: Syslog server address (tcp://host:port or udp://host:port)tag: Tag added to log messagessyslog-facility: Syslog facility (daemon, local0-7)syslog-format: Message format (rfc5424, rfc3164)
With Docker Compose:
services:
  web:
    image: nginx
    logging:
      driver: syslog
      options:
        syslog-address: "tcp://192.168.1.100:514"
        tag: "web"
        syslog-facility: "local0"
Advantages:
- Centralized log management
- Automatic remote forwarding
- Compatible with existing syslog infrastructure
Disadvantages:
docker logsdoes not work- Requires network connectivity
- Performance overhead
gelf (Graylog Extended Log Format)
GELF is a log format developed by Graylog. It is optimized for structured logging and can be used with the ELK stack as well.
Start container with GELF:
docker run -d \
  --log-driver gelf \
  --log-opt gelf-address=udp://192.168.1.100:12201 \
  --log-opt tag="nginx" \
  nginx
GELF options:
gelf-address: Graylog server addresstag: Log taggelf-compression-type: Compression type (gzip, zlib, none)
With Docker Compose:
services:
  web:
    image: nginx
    logging:
      driver: gelf
      options:
        gelf-address: "udp://graylog:12201"
        tag: "nginx"
        gelf-compression-type: "gzip"
Advantages:
- Structured logging support
- Reduced network traffic via compression
- Easy integration with Graylog and ELK
Disadvantages:
docker logsdoes not work- Requires Graylog or GELF-compatible server
Changing the Log Driver
You cannot change the log driver of a running container. You must remove and recreate the container.
Daemon-level default log driver:
Edit /etc/docker/daemon.json:
{
  "log-driver": "journald",
  "log-opts": {
    "tag": "{{.Name}}"
  }
}
Restart Docker:
sudo systemctl restart docker
Now all newly created containers will use journald by default.
12.3 cAdvisor + Prometheus + Grafana Integration
In production, a popular architecture to monitor Docker containers is: cAdvisor collects metrics, Prometheus stores them, and Grafana visualizes them.
Architecture Overview
Flow:
- cAdvisor collects CPU, memory, network, and disk metrics for each container
- Prometheus scrapes metrics from cAdvisor at regular intervals
- Grafana reads data from Prometheus and builds dashboards
Setup — docker-compose.yml
You can bring up the entire system with a single Compose file:
version: "3.8"

services:
  cadvisor:
    image: gcr.io/cadvisor/cadvisor:latest
    container_name: cadvisor
    ports:
      - "8080:8080"
    volumes:
      - /:/rootfs:ro
      - /var/run:/var/run:ro
      - /sys:/sys:ro
      - /var/lib/docker/:/var/lib/docker:ro
    privileged: true
    networks:
      - monitoring

  prometheus:
    image: prom/prometheus:latest
    container_name: prometheus
    ports:
      - "9090:9090"
    volumes:
      - ./prometheus.yml:/etc/prometheus/prometheus.yml:ro
      - prometheus-data:/prometheus
    command:
      - '--config.file=/etc/prometheus/prometheus.yml'
      - '--storage.tsdb.path=/prometheus'
    networks:
      - monitoring

  grafana:
    image: grafana/grafana:latest
    container_name: grafana
    ports:
      - "3000:3000"
    environment:
      - GF_SECURITY_ADMIN_PASSWORD=admin
    volumes:
      - grafana-data:/var/lib/grafana
    networks:
      - monitoring

volumes:
  prometheus-data:
  grafana-data:

networks:
  monitoring:
prometheus.yml configuration:
global:
  scrape_interval: 15s

scrape_configs:
  - job_name: 'cadvisor'
    static_configs:
      - targets: ['cadvisor:8080']
Start the stack:
docker compose up -d
Access the services:
- cAdvisor: http://localhost:8080
- Prometheus: http://localhost:9090
- Grafana: http://localhost:3000 (admin/admin)
Using cAdvisor
In the cAdvisor web UI (http://localhost:8080) you can view real-time metrics for all containers.
Sample cAdvisor metrics:
container_cpu_usage_seconds_total: CPU usage timecontainer_memory_usage_bytes: Memory usagecontainer_network_receive_bytes_total: Received network trafficcontainer_network_transmit_bytes_total: Transmitted network trafficcontainer_fs_usage_bytes: Disk usage
Prometheus Queries
In the Prometheus web UI (http://localhost:9090), you can write PromQL queries.
Example queries:
Container CPU usage:
rate(container_cpu_usage_seconds_total{name="mycontainer"}[5m])
Container memory usage (MB):
container_memory_usage_bytes{name="mycontainer"} / 1024 / 1024
Network traffic (5-minute average):
rate(container_network_receive_bytes_total{name="mycontainer"}[5m])
Top 5 CPU-consuming containers:
topk(5, rate(container_cpu_usage_seconds_total[5m]))
Create a Grafana Dashboard
- Log in to Grafana (http://localhost:3000, admin/admin)
- Go to Configuration > Data Sources > Add data source
- Select Prometheus
- URL:
http://prometheus:9090 - Save & Test
Add a dashboard:
- Dashboards > Import
- Dashboard ID: 193 (Docker and System Monitoring)
- Load > Import
You can now visualize metrics for all containers.
Create a custom panel:
- Create > Dashboard > Add new panel
- Query:
rate(container_cpu_usage_seconds_total{name="mycontainer"}[5m]) - Visualization: Graph
- Apply
Alert Rules
You can create automatic alerts with Prometheus.
Add alert rules to prometheus.yml:
rule_files:
  - 'alerts.yml'

alerting:
  alertmanagers:
    - static_configs:
        - targets: ['alertmanager:9093']
alerts.yml:
groups:
  - name: container_alerts
    interval: 30s
    rules:
      - alert: HighMemoryUsage
        expr: container_memory_usage_bytes > 1000000000
        for: 5m
        labels:
          severity: warning
        annotations:
          summary: "Container {{ $labels.name }} memory usage high"
          description: "Memory usage is above 1GB for 5 minutes"

      - alert: ContainerDown
        expr: up{job="cadvisor"} == 0
        for: 1m
        labels:
          severity: critical
        annotations:
          summary: "cAdvisor is down"
12.4 Centralized Logging (EFK/ELK/Fluentd)
In large systems, centralizing logs is essential. The most popular solutions are ELK (Elasticsearch, Logstash, Kibana) and EFK (Elasticsearch, Fluentd, Kibana) stacks.
ELK Stack Architecture
EFK Stack Setup
In the EFK stack, Fluentd is used instead of Logstash for a lighter footprint.
docker-compose.yml:
version: "3.8"

services:
  elasticsearch:
    image: docker.elastic.co/elasticsearch/elasticsearch:8.11.0
    container_name: elasticsearch
    environment:
      - discovery.type=single-node
      - "ES_JAVA_OPTS=-Xms512m -Xmx512m"
      - xpack.security.enabled=false
    ports:
      - "9200:9200"
    volumes:
      - es-data:/usr/share/elasticsearch/data
    networks:
      - efk

  fluentd:
    image: fluent/fluentd:v1.16-1
    container_name: fluentd
    volumes:
      - ./fluentd.conf:/fluentd/etc/fluent.conf:ro
      - /var/lib/docker/containers:/var/lib/docker/containers:ro
    ports:
      - "24224:24224"
    depends_on:
      - elasticsearch
    networks:
      - efk

  kibana:
    image: docker.elastic.co/kibana/kibana:8.11.0
    container_name: kibana
    ports:
      - "5601:5601"
    environment:
      - ELASTICSEARCH_HOSTS=http://elasticsearch:9200
    depends_on:
      - elasticsearch
    networks:
      - efk

volumes:
  es-data:

networks:
  efk:
fluentd.conf:
<source>
  @type forward
  port 24224
</source>

<filter docker.**>
  @type parser
  key_name log
  <parse>
    @type json
  </parse>
</filter>

<match docker.**>
  @type elasticsearch
  host elasticsearch
  port 9200
  logstash_format true
  logstash_prefix docker
  include_tag_key true
  tag_key @log_name
  flush_interval 10s
</match>
Connect an application container to Fluentd:
docker run -d \
  --log-driver=fluentd \
  --log-opt fluentd-address=localhost:24224 \
  --log-opt tag="docker.{{.Name}}" \
  nginx
With Docker Compose:
services:
  web:
    image: nginx
    logging:
      driver: fluentd
      options:
        fluentd-address: localhost:24224
        tag: docker.nginx
    networks:
      - efk
View Logs in Kibana
- Log in to Kibana (http://localhost:5601)
- Management > Index Patterns > Create index pattern
- Pattern:
docker-* - Next step > Time field:
@timestamp - Create index pattern
- View logs from the Discover menu
Filtering in Kibana:
- By container name:
docker.name: "nginx" - By log level:
level: "error" - By time range: select from the top-right time picker
Structured Logging
Having applications log in JSON makes searching and filtering easier.
Node.js example (Winston logger):
const winston = require('winston');

const logger = winston.createLogger({
  format: winston.format.json(),
  transports: [
    new winston.transports.Console()
  ]
});

logger.info('User logged in', { userId: 123, ip: '192.168.1.1' });
Output:
{"level":"info","message":"User logged in","userId":123,"ip":"192.168.1.1","timestamp":"2025-09-29T10:30:45.123Z"}
This format is indexed as searchable fields in Elasticsearch.
Log Retention and Performance
Elasticsearch can grow very large over time. You should define index rotation and deletion policies.
ILM (Index Lifecycle Management) example:
PUT _ilm/policy/docker-logs-policy
{
  "policy": {
    "phases": {
      "hot": {
        "actions": {
          "rollover": {
            "max_size": "50GB",
            "max_age": "7d"
          }
        }
      },
      "delete": {
        "min_age": "30d",
        "actions": {
          "delete": {}
        }
      }
    }
  }
}
This policy:
- Creates a new index when each index reaches 50GB or 7 days
- Deletes old indices after 30 days
Alternative: Grafana Loki
Loki is Grafana’s log collection system. It’s lighter than Elasticsearch.
docker-compose.yml:
services:
  loki:
    image: grafana/loki:latest
    ports:
      - "3100:3100"
    volumes:
      - ./loki-config.yml:/etc/loki/local-config.yaml

  promtail:
    image: grafana/promtail:latest
    volumes:
      - /var/log:/var/log:ro
      - /var/lib/docker/containers:/var/lib/docker/containers:ro
      - ./promtail-config.yml:/etc/promtail/config.yml
    command: -config.file=/etc/promtail/config.yml

  grafana:
    image: grafana/grafana:latest
    ports:
      - "3000:3000"
Loki uses fewer resources and is natively integrated with Grafana.
Summary and Best Practices
Logging best practices:
- Use structured logging (JSON)
- Set log levels properly (DEBUG, INFO, WARN, ERROR)
- Do not log sensitive information
- Implement log rotation
- Set up centralized logging
Monitoring best practices:
- Continuously monitor critical metrics
- Define alert rules
- Keep dashboards simple and readable
- Define retention policies
- Take backups
Tool selection:
| Scenario | Recommended Tools |
|---|---|
| Small projects | docker logs + docker stats |
| Medium scale | journald + Prometheus + Grafana |
| Large scale | EFK/ELK + Prometheus + Grafana |
| Cloud environments | CloudWatch, Stackdriver, Azure Monitor |
Logging and monitoring are critical in production environments. With proper setup and configuration, you can monitor system health 24/7, detect issues early, and perform performance optimization.
Logging Documentation
If you encounter errors or get stuck while setting up systems like ELK, EFK, or Prometheus + Grafana, review the following documentation:
| Topic / Link | Description | Source |
|---|---|---|
| EFK stack + Docker Compose example | Useful if you want to set up EFK (Elasticsearch + Fluentd + Kibana) with Docker Compose | https://faun.pub/setting-up-centralized-logging-environment-using-efk-stack-with-docker-compose-c96bb3bebf7 |
| Elastdocker – Full ELK + extra components | For a ready-made stack including ELK + APM + SIEM | https://github.com/sherifabdlnaby/elastdocker |
| Grafana + Prometheus getting started | If you want to pull data with Prometheus and visualize in Grafana | https://grafana.com/docs/grafana/latest/getting-started/get-started-grafana-prometheus |
| Monitor Docker Daemon with Prometheus | For configuring Docker’s built-in metrics for Prometheus | https://docs.docker.com/engine/daemon/prometheus |
| Docker log driver: Fluentd | To route Docker container logs through Fluentd | https://docs.docker.com/engine/logging/drivers/fluentd |
| Fluentd + Prometheus integration | Guide to collect Fluentd metrics with Prometheus | https://docs.fluentd.org/0.12/articles/monitoring-prometheus |
| Docker + EFK logging setup | Example integration of Docker + Fluentd + Elasticsearch + Kibana | https://docs.fluentd.org/0.12/articles/docker-logging-efk-compose |
Note: During setup you may encounter issues such as “connection error,” “port conflict,” or “insufficient resources.”
In such cases, first read the error messages carefully, then check the relevant section of the resources above (e.g., “Configuration,” “Troubleshooting,” or “FAQ”) — most solutions are already documented there.
13. Debugging & Troubleshooting (Practical Tips)
When working with Docker containers, running into issues is inevitable. A container may not start, networking may fail, or behavior may be unexpected. In this section, we’ll cover tools, commands, and practical approaches for debugging and troubleshooting in Docker.
13.1 docker inspect, docker exec -it, docker top, docker diff
Docker’s built-in debugging tools provide powerful capabilities to examine container state and identify problems.
docker inspect — Detailed Container Information
The docker inspect command shows all technical details about a container, image, network, or volume in JSON format. This is a cornerstone of debugging.
Basic usage:
docker inspect mycontainer
This prints hundreds of JSON lines, including network settings, volume mounts, environment variables, resource limits, and more.
Extract specific information (–format):
# Get IP address
docker inspect --format='{{range .NetworkSettings.Networks}}{{.IPAddress}}{{end}}' mycontainer

# Show port mappings
docker inspect --format='{{json .NetworkSettings.Ports}}' mycontainer

# Environment variables
docker inspect --format='{{json .Config.Env}}' mycontainer

# Show volume mounts
docker inspect --format='{{json .Mounts}}' mycontainer

# Container state
docker inspect --format='{{.State.Status}}' mycontainer

# Restart count
docker inspect --format='{{.RestartCount}}' mycontainer
Filter output with jq:
The jq command makes JSON readable and enables detailed filtering.
# Pretty-print the full output
docker inspect mycontainer | jq '.'

# Show only network info
docker inspect mycontainer | jq '.[0].NetworkSettings'

# List environment variables
docker inspect mycontainer | jq '.[0].Config.Env[]'

# Show mounted volumes
docker inspect mycontainer | jq '.[0].Mounts[] | {Source, Destination, Mode}'
Practical inspect examples:
Why did the container stop?
docker inspect --format='{{.State.Status}} - Exit Code: {{.State.ExitCode}}' mycontainer
Exit codes:
0: Normal exit1: General error137: SIGKILL (possibly killed by OOM Killer)139: Segmentation fault143: SIGTERM
Check for OOM (Out of Memory):
docker inspect --format='{{.State.OOMKilled}}' mycontainer
If true, the container exceeded its memory limit and was killed by the kernel.
Find the log path:
docker inspect --format='{{.LogPath}}' mycontainer
docker exec -it — Attach to a Running Container
The docker exec command lets you run commands inside a running container. It’s the most commonly used command for debugging.
Open an interactive shell:
docker exec -it mycontainer bash
If bash isn’t available (e.g., Alpine or minimal images):
docker exec -it mycontainer sh
Run a single command:
# View process list
docker exec mycontainer ps aux

# Read a file
docker exec mycontainer cat /etc/hosts

# Test network connectivity
docker exec mycontainer ping -c 3 google.com

# Disk usage
docker exec mycontainer df -h
Attach with root privileges:
If the container runs as a non-root user but you need root:
docker exec -it --user root mycontainer bash
Change working directory:
docker exec -it --workdir /app mycontainer bash
Add environment variables:
docker exec -it -e DEBUG=true mycontainer bash
Practical debugging scenarios:
Scenario 1: Is the web server running?
# Is the Nginx process running?
docker exec mycontainer ps aux | grep nginx

# Is the port listening?
docker exec mycontainer netstat -tlnp | grep 80

# Test with curl (if installed)
docker exec mycontainer curl -I http://localhost:80
Scenario 2: Is the database connection working?
# Test PostgreSQL connection
docker exec mypostgres psql -U postgres -c "SELECT 1"

# Test MySQL connection
docker exec mymysql mysql -u root -p'password' -e "SELECT 1"
Scenario 3: Check log files
# Nginx error log
docker exec mynginx tail -f /var/log/nginx/error.log

# Application log
docker exec myapp tail -f /var/log/app/error.log
docker top — Process List
The docker top command shows processes running inside a container. Use it to see which processes are running and their resource usage.
Basic usage:
docker top mycontainer
Sample output:
UID      PID     PPID    C    STIME   TTY     TIME        CMD
root     12345   12340   0    10:30   ?       00:00:00    nginx: master process
www-data 12346   12345   0    10:30   ?       00:00:01    nginx: worker process
Custom format (ps options):
# Detailed info
docker top mycontainer aux

# Sort by memory usage
docker top mycontainer -o %mem
Process checks:
# Is the Nginx master process running?
docker top mynginx | grep "nginx: master"

# Any zombie (defunct) processes?
docker top mycontainer aux | grep defunct
docker diff — Filesystem Changes
The docker diff command shows filesystem changes made after the container started. You can see which files were added, changed, or deleted.
Basic usage:
docker diff mycontainer
Sample output:
A /tmp/test.txt
C /etc/nginx/nginx.conf
D /var/log/old.log
Symbols:
A(Added): Newly added fileC(Changed): Modified fileD(Deleted): Deleted file
Practical usage:
Which files changed inside the container?
docker diff mycontainer | grep ^C
Were new log files created?
docker diff mycontainer | grep ^A | grep log
Debug unexpected file changes
Sometimes a container behaves unexpectedly. You can identify issues by seeing which files changed with docker diff.
# List all changes
docker diff mycontainer

# Only changes under /etc
docker diff mycontainer | grep "^C /etc"
13.2 For Network Issues: docker network inspect, tcpdump
Network problems are among the most common issues in Docker. Containers may not see each other, reach the outside, or ports may not work.
docker network inspect — Network Details
The docker network inspect command shows a network’s configuration, connected containers, and IP addresses.
Basic usage:
docker network inspect bridge
Show containers attached to a network:
docker network inspect bridge --format='{{range .Containers}}{{.Name}}: {{.IPv4Address}}{{"\n"}}{{end}}'
Sample output:
web: 172.17.0.2/16
db: 172.17.0.3/16
redis: 172.17.0.4/16
Network subnet and gateway:
docker network inspect mynetwork --format='{{range .IPAM.Config}}Subnet: {{.Subnet}}, Gateway: {{.Gateway}}{{end}}'
Practical network debugging:
Problem: Containers can’t see each other
# Are both containers on the same network?
docker network inspect mynetwork

# Both containers should appear under the "Containers" section in the output
Problem: DNS resolution isn’t working
# Test DNS inside the container
docker exec mycontainer nslookup other-container

# Check Docker DNS server
docker exec mycontainer cat /etc/resolv.conf
Docker’s internal DNS server typically appears as 127.0.0.11.
Network Testing with ping and curl
Use basic tools to test network connectivity inside the container.
Test connectivity with ping:
# Ping another container
docker exec container1 ping -c 3 container2

# Ping the outside world
docker exec mycontainer ping -c 3 8.8.8.8

# DNS resolution test
docker exec mycontainer ping -c 3 google.com
HTTP testing with curl:
# HTTP request to another container
docker exec container1 curl http://container2:80

# Request to external site
docker exec mycontainer curl -I https://google.com

# With timeout
docker exec mycontainer curl --max-time 5 http://slow-service
Port checks with netstat:
# Which ports are listening?
docker exec mycontainer netstat -tlnp

# Is a specific port listening?
docker exec mycontainer netstat -tlnp | grep :80
Packet Analysis with tcpdump (Linux Host)
tcpdump is a powerful tool for capturing and analyzing network traffic. It can run inside the container or on the host.
Capture container traffic on the host:
# Capture all Docker network traffic
sudo tcpdump -i docker0

# Capture traffic to a specific container IP
sudo tcpdump -i docker0 host 172.17.0.2

# Capture HTTP traffic (port 80)
sudo tcpdump -i docker0 port 80

# Save traffic to a file
sudo tcpdump -i docker0 -w capture.pcap
tcpdump inside a container:
Most container images don’t include tcpdump; you may need to install it:
# Alpine
docker exec mycontainer apk add tcpdump

# Ubuntu/Debian
docker exec mycontainer apt-get update && apt-get install -y tcpdump

# Run tcpdump
docker exec mycontainer tcpdump -i eth0 -n
Practical tcpdump examples:
Problem: Container can’t reach the outside
# Watch DNS requests coming from the container
sudo tcpdump -i docker0 port 53

# Then ping from inside the container
docker exec mycontainer ping google.com
If you don’t see packets in tcpdump, there’s a routing problem.
Problem: No connectivity between two containers
# Watch traffic from container1 to container2
sudo tcpdump -i docker0 host 172.17.0.2 and host 172.17.0.3

# Send a request from container1
docker exec container1 curl http://container2:8080
If packets are visible but there’s no response, the application in container2 might not be running.
Enter a Container’s Network Namespace from the Host with nsenter
The nsenter command lets you enter a container’s network namespace directly from the host. Useful for advanced debugging.
Find the container PID:
PID=$(docker inspect --format '{{.State.Pid}}' mycontainer)
Enter the network namespace:
sudo nsenter -t $PID -n ip addr
This shows the container’s network interfaces.
View the routing table:
sudo nsenter -t $PID -n ip route
Run tcpdump:
sudo nsenter -t $PID -n tcpdump -i eth0
13.3 Quick Checklist When “Container Won’t Run”
If a container won’t start or exits immediately, use a systematic approach.
Step 1: Check Container State
docker ps -a
If the container is in Exited, check its exit code:
docker inspect --format='{{.State.ExitCode}}' mycontainer
Exit code meanings:
0: Normal exit (no issue; the container finished and exited)1: Application error125: Docker daemon error126: Command could not be executed127: Command not found137: SIGKILL (OOM or manual kill)143: SIGTERM (graceful shutdown)
Step 2: Inspect Logs
docker logs mycontainer
Show the last 50 lines:
docker logs --tail 50 mycontainer
Typical error messages:
Address already in use: Port is already in use by another processPermission denied: File permission issueConnection refused: Target service is not runningNo such file or directory: Wrong file or path
Step 3: Check Dockerfile and Commands
CMD or ENTRYPOINT might be wrong:
docker inspect --format='{{.Config.Cmd}}' mycontainer
docker inspect --format='{{.Config.Entrypoint}}' mycontainer
Test: Run commands manually inside a shell
If the container exits immediately, start it with a shell and test manually:
docker run -it --entrypoint /bin/sh myimage
Then run the original command manually and observe errors.
Step 4: Check Resource Limits
Was the container OOM-killed?
docker inspect --format='{{.State.OOMKilled}}' mycontainer
If true, increase the memory limit:
docker run --memory="1g" myimage
Step 5: Check Volumes and Bind Mounts
Are mounts correct?
docker inspect --format='{{json .Mounts}}' mycontainer | jq '.'
Checklist:
- Does the source path exist on the host?
- Are permissions correct?
- Are SELinux/AppArmor blocking? (On Linux, try
:Z)
Test: Run without volumes
docker run --rm myimage
If it runs without volumes, the issue is with the mount.
Step 6: Check Networking
Is the container connected to a network?
docker network inspect mynetwork
Is port mapping correct?
docker inspect --format='{{json .NetworkSettings.Ports}}' mycontainer
Test: Run with host networking
docker run --network host myimage
If it works with host networking, the issue is on the bridge network.
Step 7: Check Dependencies
depends_on doesn’t “wait”:
In Docker Compose, depends_on only guarantees start order; it doesn’t wait for services to be ready.
Solution: Use healthcheck or a wait script
services:
  web:
    image: myapp
    depends_on:
      db:
        condition: service_healthy

  db:
    image: postgres
    healthcheck:
      test: ["CMD", "pg_isready", "-U", "postgres"]
      interval: 10s
      timeout: 5s
      retries: 5
Quick Checklist Summary
docker ps -a— Container state and exit codedocker logs mycontainer— Error messagesdocker inspect mycontainer— Detailed configurationdocker run -it --entrypoint /bin/sh myimage— Manual testing- Check volume and network settings
- Check resource limits
- Check healthchecks and dependencies
13.4 Windows Container Debug Tips (PowerShell vs CMD)
Windows containers work differently than Linux containers, and debugging approaches differ as well.
Windows Container Types
Windows Server Core:
- Full Windows API support
- Larger image size (several GB)
- Compatible with legacy applications
Nano Server:
- Minimal Windows image
- Smaller (hundreds of MB)
- Includes PowerShell Core, not the full framework
Debugging with PowerShell
PowerShell is commonly used in Windows containers.
Open a PowerShell shell:
docker exec -it mycontainer powershell
Run with CMD:
docker exec -it mycontainer cmd
Practical PowerShell commands:
Process list:
docker exec mycontainer powershell "Get-Process"
Service status:
docker exec mycontainer powershell "Get-Service"
Network connectivity:
docker exec mycontainer powershell "Test-NetConnection google.com"
Filesystem check:
docker exec mycontainer powershell "Get-ChildItem C:\app"
Read Event Log:
docker exec mycontainer powershell "Get-EventLog -LogName Application -Newest 10"
Windows Container Network Debugging
Networking in Windows containers differs from Linux.
IP configuration:
docker exec mycontainer ipconfig /all
Route table:
docker exec mycontainer route print
DNS cache:
docker exec mycontainer ipconfig /displaydns
Ping test:
docker exec mycontainer ping -n 3 google.com
Port check:
docker exec mycontainer netstat -ano
Windows Container Logs
Log management differs in Windows containers.
Read Event Log:
docker exec mycontainer powershell "Get-EventLog -LogName Application | Select-Object -First 20"
IIS logs (if using IIS):
docker exec mycontainer powershell "Get-Content C:\inetpub\logs\LogFiles\W3SVC1\*.log -Tail 50"
Dockerfile Debugging (Windows)
Example Windows Dockerfile:
FROM mcr.microsoft.com/windows/servercore:ltsc2022

WORKDIR C:\app

COPY app.exe .

CMD ["app.exe"]
Add a shell for debugging:
FROM mcr.microsoft.com/windows/servercore:ltsc2022

WORKDIR C:\app

COPY app.exe .

# Start a shell for debugging
ENTRYPOINT ["powershell.exe"]
Then run manual tests inside the container:
docker run -it myimage
# PowerShell will open
PS C:\app> .\app.exe
Windows vs Linux Container Differences
| Feature | Linux | Windows |
|---|---|---|
| Base image size | 5–50 MB | 300 MB – 4 GB |
| Shell | bash, sh | PowerShell, CMD |
| Process isolation | Namespaces | Job Objects |
| Filesystem | overlay2, aufs | windowsfilter |
| Network driver | bridge, overlay | nat, transparent |
| Debugging tools | strace, tcpdump | Process Monitor, Event Viewer |
Common Windows Container Issues
Issue 1: “The container operating system does not match the host operating system”
Description: Windows container version is incompatible with the host version.
Solution: Use Hyper-V isolation:
docker run --isolation=hyperv myimage
Issue 2: Volume mount not working
Description: Windows paths use a different format.
Wrong:
docker run -v C:\data:/data myimage
Correct:
docker run -v C:\data:C:\data myimage
Issue 3: Port forwarding not working
Description: Windows NAT network limitations.
Check:
# Check NAT network
docker network inspect nat

# Check port mappings
docker port mycontainer
Solution: Try a transparent network:
docker network create -d transparent mytransparent
docker run --network mytransparent myimage
Windows Performance Monitoring
Resource usage:
docker stats
Detailed performance counters:
docker exec mycontainer powershell "Get-Counter '\\Processor(_Total)\\% Processor Time'"
Memory usage:
docker exec mycontainer powershell "Get-Process | Sort-Object WS -Descending | Select-Object -First 10"
Summary and Best Practices
Debugging checklist:
- Check status with
docker ps -a - Read error messages with
docker logs - Inspect detailed configuration with
docker inspect - Enter the container with
docker execand test manually - Test network connectivity (ping, curl, tcpdump)
- Check resource limits
- Check volume mounts and permissions
Recommended tools:
- Linux:
tcpdump,strace,htop - Windows: PowerShell, Event Viewer, Process Monitor
- All platforms:
docker logs,docker inspect,docker exec
Documentation:
After resolving issues, take notes. Document which error you encountered and how you solved it. This saves time the next time you face a similar problem.
Debugging is a systematic process. By proceeding step-by-step without panic, you can solve most problems. Knowing Docker’s tools well lets you resolve critical production issues quickly.
14. CI/CD Integration (Docker-Native Approaches)
In modern software development, CI/CD (Continuous Integration/Continuous Deployment) pipelines are indispensable. Docker plays a central role in these processes. In this section, we’ll explore how to integrate Docker into CI/CD pipelines, multi-platform image build processes, and image tagging strategies in detail.
14.1 Build → Test → Push Pipeline Example
A CI/CD pipeline typically consists of the following stages:
- Build: Create an image from the Dockerfile
- Test: Test the image (unit tests, integration tests)
- Scan: Scan for vulnerabilities
- Push: Push to the registry
- Deploy: Deploy to production
GitHub Actions Pipeline Example
GitHub Actions is a popular CI/CD platform running on GitHub.
Full pipeline for a simple Python app:
.github/workflows/docker-ci.yml:
name: Docker CI/CD Pipeline

on:
  push:
    branches: [ main, develop ]
    tags:
      - 'v*'
  pull_request:
    branches: [ main ]

env:
  REGISTRY: ghcr.io
  IMAGE_NAME: ${{ github.repository }}

jobs:
  build-and-test:
    runs-on: ubuntu-latest
    permissions:
      contents: read
      packages: write

    steps:
      # Checkout code
      - name: Checkout repository
        uses: actions/checkout@v4

      # Set up Docker Buildx
      - name: Set up Docker Buildx
        uses: docker/setup-buildx-action@v3

      # Login to registry
      - name: Log in to GitHub Container Registry
        uses: docker/login-action@v3
        with:
          registry: ${{ env.REGISTRY }}
          username: ${{ github.actor }}
          password: ${{ secrets.GITHUB_TOKEN }}

      # Extract metadata (tags, labels)
      - name: Extract metadata
        id: meta
        uses: docker/metadata-action@v5
        with:
          images: ${{ env.REGISTRY }}/${{ env.IMAGE_NAME }}
          tags: |
            type=ref,event=branch
            type=ref,event=pr
            type=semver,pattern={{version}}
            type=semver,pattern={{major}}.{{minor}}
            type=sha,prefix={{branch}}-

      # Build image
      - name: Build Docker image
        uses: docker/build-push-action@v5
        with:
          context: .
          load: true
          tags: test-image:latest
          cache-from: type=gha
          cache-to: type=gha,mode=max

      # Run tests
      - name: Run tests
        run: |
          docker run --rm test-image:latest pytest tests/

      # Security scan (Trivy)
      - name: Run Trivy vulnerability scanner
        uses: aquasecurity/trivy-action@master
        with:
          image-ref: test-image:latest
          format: 'sarif'
          output: 'trivy-results.sarif'

      # Upload Trivy results to GitHub
      - name: Upload Trivy results to GitHub Security
        uses: github/codeql-action/upload-sarif@v2
        if: always()
        with:
          sarif_file: 'trivy-results.sarif'

      # Push (only for main branch and tags)
      - name: Build and push Docker image
        if: github.event_name != 'pull_request'
        uses: docker/build-push-action@v5
        with:
          context: .
          push: true
          tags: ${{ steps.meta.outputs.tags }}
          labels: ${{ steps.meta.outputs.labels }}
          cache-from: type=gha
          cache-to: type=gha,mode=max
Explanation:
- Trigger: push to main and develop branches, PRs, and v-tags
- Buildx: For multi-platform builds
- Cache: Speed up builds using GitHub Actions cache
- Tests: Run pytest inside the image
- Security scan: Trivy vulnerability scanning
- Conditional push: Only push for main branch and tags
Example Dockerfile (Python app):
FROM python:3.11-slim as builder

WORKDIR /app

COPY requirements.txt .
RUN pip install --no-cache-dir --user -r requirements.txt

FROM python:3.11-slim

WORKDIR /app

COPY --from=builder /root/.local /root/.local
COPY . .

ENV PATH=/root/.local/bin:$PATH

# Non-root user
RUN useradd -m appuser && chown -R appuser:appuser /app
USER appuser

CMD ["python", "app.py"]
GitLab CI Pipeline Example
GitLab CI is GitLab’s built-in CI/CD system.
.gitlab-ci.yml:
stages:
  - build
  - test
  - scan
  - push
  - deploy

variables:
  DOCKER_DRIVER: overlay2
  DOCKER_TLS_CERTDIR: "/certs"
  IMAGE_TAG: $CI_REGISTRY_IMAGE:$CI_COMMIT_REF_SLUG
  DOCKER_BUILDKIT: 1

# Build stage
build:
  stage: build
  image: docker:24-dind
  services:
    - docker:24-dind
  before_script:
    - docker login -u $CI_REGISTRY_USER -p $CI_REGISTRY_PASSWORD $CI_REGISTRY
  script:
    - docker build -t $IMAGE_TAG .
    - docker save $IMAGE_TAG -o image.tar
  artifacts:
    paths:
      - image.tar
    expire_in: 1 hour

# Test stage
test:
  stage: test
  image: docker:24-dind
  services:
    - docker:24-dind
  dependencies:
    - build
  before_script:
    - docker load -i image.tar
  script:
    - docker run --rm $IMAGE_TAG pytest tests/
    - docker run --rm $IMAGE_TAG python -m pylint app/

# Security scan
security-scan:
  stage: scan
  image: aquasec/trivy:latest
  dependencies:
    - build
  before_script:
    - docker load -i image.tar
  script:
    - trivy image --exit-code 0 --severity HIGH,CRITICAL $IMAGE_TAG
  allow_failure: true

# Push to registry
push:
  stage: push
  image: docker:24-dind
  services:
    - docker:24-dind
  dependencies:
    - build
  only:
    - main
    - tags
  before_script:
    - docker load -i image.tar
    - docker login -u $CI_REGISTRY_USER -p $CI_REGISTRY_PASSWORD $CI_REGISTRY
  script:
    - docker push $IMAGE_TAG
    - |
      if [[ "$CI_COMMIT_TAG" =~ ^v[0-9]+\.[0-9]+\.[0-9]+$ ]]; then
        docker tag $IMAGE_TAG $CI_REGISTRY_IMAGE:latest
        docker push $CI_REGISTRY_IMAGE:latest
      fi

# Deploy to staging
deploy-staging:
  stage: deploy
  image: alpine:latest
  only:
    - develop
  before_script:
    - apk add --no-cache openssh-client
    - eval $(ssh-agent -s)
    - echo "$SSH_PRIVATE_KEY" | tr -d '\r' | ssh-add -
  script:
    - ssh -o StrictHostKeyChecking=no user@staging-server "docker pull $IMAGE_TAG && docker-compose up -d"

# Deploy to production
deploy-production:
  stage: deploy
  image: alpine:latest
  only:
    - tags
  when: manual
  before_script:
    - apk add --no-cache openssh-client
    - eval $(ssh-agent -s)
    - echo "$SSH_PRIVATE_KEY" | tr -d '\r' | ssh-add -
  script:
    - ssh -o StrictHostKeyChecking=no user@prod-server "docker pull $IMAGE_TAG && docker-compose up -d"
Features:
- Artifacts: Built image is stored for use in subsequent stages
- Dependencies: Each stage downloads only the artifacts it needs
- Conditional execution: Push and deploy run only on specific branches
- Manual deployment: Production deploy requires manual approval
Docker-in-Docker (DinD) vs Docker Socket Mount
There are two ways to use Docker in CI/CD pipelines:
1. Docker-in-Docker (DinD):
services:
  - docker:24-dind
- Advantages: Isolation, safer
- Disadvantages: Slower, more resource usage
2. Docker Socket Mount:
volumes:
  - /var/run/docker.sock:/var/run/docker.sock
- Advantages: Fast, lightweight
- Disadvantages: Security risk (full access to host Docker)
Recommendation: Use DinD in production. For local development, you can use the socket mount.
14.2 Multi-Platform Image Build & Push with docker buildx
Modern applications should run across different CPU architectures (x86_64, ARM64, ARM). docker buildx makes this easy.
What is Docker Buildx?
Buildx is Docker’s advanced build engine. It uses the BuildKit backend and can build images for multiple platforms.
Features:
- Multi-platform builds (amd64, arm64, arm/v7, etc.)
- Build cache management
- Build secrets support
- SSH agent forwarding
- Parallel builds
Buildx Installation
Included by default in Docker Desktop. On Linux, install manually:
# Download Buildx binary
BUILDX_VERSION=v0.12.0
curl -LO https://github.com/docker/buildx/releases/download/${BUILDX_VERSION}/buildx-${BUILDX_VERSION}.linux-amd64

# Install
mkdir -p ~/.docker/cli-plugins
mv buildx-${BUILDX_VERSION}.linux-amd64 ~/.docker/cli-plugins/docker-buildx
chmod +x ~/.docker/cli-plugins/docker-buildx

# Verify
docker buildx version
Create a Builder Instance
# Create a new builder
docker buildx create --name mybuilder --use

# Install binfmt for QEMU (emulation for different architectures)
docker run --privileged --rm tonistiigi/binfmt --install all

# Bootstrap the builder
docker buildx inspect --bootstrap
Multi-Platform Build Example
Simple example:
docker buildx build \
  --platform linux/amd64,linux/arm64,linux/arm/v7 \
  -t username/myapp:latest \
  --push \
  .
This builds images for three platforms and pushes them to the registry.
Platform-aware Dockerfile example:
FROM --platform=$BUILDPLATFORM golang:1.21 AS builder

ARG TARGETPLATFORM
ARG BUILDPLATFORM
ARG TARGETOS
ARG TARGETARCH

WORKDIR /app

COPY go.mod go.sum ./
RUN go mod download

COPY . .

RUN CGO_ENABLED=0 GOOS=${TARGETOS} GOARCH=${TARGETARCH} \
    go build -o myapp .

FROM alpine:latest

WORKDIR /app

COPY --from=builder /app/myapp .

CMD ["./myapp"]
Explanation:
--platform=$BUILDPLATFORM: Build runs on the host platform (fast)TARGETOSandTARGETARCH: Produce binaries for the target platform- Cross-compilation enables fast builds for multiple platforms
Multi-Platform Build with GitHub Actions
name: Multi-Platform Docker Build

on:
  push:
    tags:
      - 'v*'

jobs:
  build:
    runs-on: ubuntu-latest
    steps:
      - name: Checkout
        uses: actions/checkout@v4

      - name: Set up QEMU
        uses: docker/setup-qemu-action@v3

      - name: Set up Docker Buildx
        uses: docker/setup-buildx-action@v3

      - name: Login to Docker Hub
        uses: docker/login-action@v3
        with:
          username: ${{ secrets.DOCKERHUB_USERNAME }}
          password: ${{ secrets.DOCKERHUB_TOKEN }}

      - name: Extract metadata
        id: meta
        uses: docker/metadata-action@v5
        with:
          images: username/myapp
          tags: |
            type=semver,pattern={{version}}
            type=semver,pattern={{major}}.{{minor}}

      - name: Build and push
        uses: docker/build-push-action@v5
        with:
          context: .
          platforms: linux/amd64,linux/arm64,linux/arm/v7
          push: true
          tags: ${{ steps.meta.outputs.tags }}
          cache-from: type=gha
          cache-to: type=gha,mode=max
Manifest Inspection
After pushing a multi-platform image, you can inspect its manifest:
docker buildx imagetools inspect username/myapp:latest
Output:
Name:      docker.io/username/myapp:latest
MediaType: application/vnd.docker.distribution.manifest.list.v2+json
Digest:    sha256:abc123...

Manifests:
  Name:      docker.io/username/myapp:latest@sha256:def456...
  MediaType: application/vnd.docker.distribution.manifest.v2+json
  Platform:  linux/amd64

  Name:      docker.io/username/myapp:latest@sha256:ghi789...
  MediaType: application/vnd.docker.distribution.manifest.v2+json
  Platform:  linux/arm64
Local Multi-Arch Test
You can test different platforms locally:
# Run an ARM64 image on an x86_64 machine
docker run --platform linux/arm64 username/myapp:latest

# Show platform information
docker run --rm username/myapp:latest uname -m
14.3 Image Tagging Strategies (semver, latest vs digest)
An image tagging strategy is critical for versioning and deployment safety.
Tagging Methods
1. Semantic Versioning (semver)
docker tag myapp:build myapp:1.2.3
docker tag myapp:build myapp:1.2
docker tag myapp:build myapp:1
Advantages:
- Easy version tracking
- Simple rollback
- Safe in production
Usage:
1.2.3: Full version (includes patch)1.2: Minor version (automatically receive patch updates)1: Major version (receive all 1.x updates)
2. latest Tag
docker tag myapp:1.2.3 myapp:latest
Advantages:
- Simple and clear
- Always points to the newest version
Disadvantages:
- Dangerous in production (unexpected updates)
- Hard to roll back
- Unclear which version is running
Recommendation: Use latest only in development environments.
3. Git Commit SHA
docker tag myapp:build myapp:abc123
Advantages:
- Every build is unique
- Traceable back to a Git commit
- Reproducible builds
4. Branch Name + SHA
docker tag myapp:build myapp:main-abc123
docker tag myapp:build myapp:develop-def456
5. Timestamp
docker tag myapp:build myapp:20250929-103045
Recommended Tagging Strategy
Best practice for production:
# Tag with git commit
docker tag myapp:build myapp:${GIT_COMMIT_SHA}

# Tag with semver
docker tag myapp:build myapp:${VERSION}

# Optionally tag latest
docker tag myapp:build myapp:latest

# Push all tags
docker push myapp:${GIT_COMMIT_SHA}
docker push myapp:${VERSION}
docker push myapp:latest
GitHub Actions example:
- name: Extract metadata
  id: meta
  uses: docker/metadata-action@v5
  with:
    images: username/myapp
    tags: |
      type=ref,event=branch
      type=ref,event=pr
      type=semver,pattern={{version}}
      type=semver,pattern={{major}}.{{minor}}
      type=sha,prefix=sha-
      type=raw,value=latest,enable={{is_default_branch}}
This configuration produces the following tags:
main(branch name)1.2.3(full semver)1.2(minor semver)sha-abc123(git commit SHA)latest(only on the main branch)
Using Image Digests
A digest is the image’s SHA256 hash. It is immutable and secure.
What is a digest?
docker pull nginx:latest
# Output: Digest: sha256:abc123...
Pull by digest:
docker pull nginx@sha256:abc123...
Advantages:
- Completely immutable
- Doesn’t change in the registry (latest can change, digest won’t)
- Best practice from a security standpoint
Using a digest in Kubernetes:
apiVersion: apps/v1
kind: Deployment
metadata:
  name: myapp
spec:
  template:
    spec:
      containers:
      - name: myapp
        image: username/myapp@sha256:abc123...
Automatically retrieve the digest (CI/CD):
# Push the image and get the digest
DIGEST=$(docker inspect --format='{{index .RepoDigests 0}}' username/myapp:1.2.3)

# Use it in deployment YAML
sed -i "s|IMAGE_PLACEHOLDER|${DIGEST}|g" deployment.yaml
Tagging Anti-Patterns
** What not to do:**
# Don’t use developer names
docker tag myapp:john-dev

# Don’t encode env in tags
docker tag myapp:test
docker tag myapp:prod

# Don’t use timestamps without a clear format
docker tag myapp:103045
** What to do instead:**
# Semantic versioning
docker tag myapp:1.2.3

# Git SHA
docker tag myapp:abc123f

# Branch + SHA
docker tag myapp:main-abc123f
Tag Management and Cleanup
Over time, the registry can bloat. You should clean up old tags.
Delete a tag on Docker Hub:
# Delete tag via Docker Hub API
curl -X DELETE \
  -H "Authorization: JWT ${TOKEN}" \
  https://hub.docker.com/v2/repositories/username/myapp/tags/old-tag/
Policies in Harbor registry:
In private registries like Harbor, you can configure automatic cleanup policies:
- Keep the last N tags
- Delete tags older than X days
- Delete by regex pattern
Summary and Best Practices
CI/CD Pipeline:
- Set up automated build, test, scan, and push
- Use cache to shorten build times
- Always include a security scan
- Use manual approval for production deploys
Multi-Platform Build:
- Use
docker buildx - Add ARM64 support (for Apple Silicon, AWS Graviton)
- Use cross-compilation to speed up builds
- Inspect manifests
Image Tagging:
- Use semantic versioning (1.2.3)
- Include Git commit SHA (for traceability)
- Don’t use
latestin production - Use digests for immutability
- Perform regular tag cleanup
Security:
- Include image scanning in the pipeline (Trivy, Snyk)
- Manage secrets via CI/CD secrets or dedicated tools
- Use non-root users
- Choose minimal base images (alpine, distroless)
With proper CI/CD and Docker integration, your deployment process becomes fast, secure, and repeatable. Every commit is automatically tested, scanned for vulnerabilities, and can be deployed to production confidently.
15. Smells / Anti-Patterns and How to Fix Them
There are common mistakes made when using Docker. These lead to performance problems, security vulnerabilities, and maintenance challenges. In this section, we’ll examine Docker anti-patterns, why they are problematic, and how to fix them.
15.1 Large Images / Too Many Layers
Problem: Unnecessarily Large Images
Large Docker images cause many issues:
- Slow deployments: Longer image download times
- Disk usage: Consume GBs on every node
- Security surface: Unnecessary packages increase attack surface
- Build time: Layer cache efficiency drops
Bad example:
FROM ubuntu:22.04

# Install all development tools
RUN apt-get update && apt-get install -y \
    build-essential \
    gcc \
    g++ \
    make \
    cmake \
    git \
    curl \
    wget \
    vim \
    nano \
    python3 \
    python3-pip \
    nodejs \
    npm

WORKDIR /app

COPY . .

RUN pip3 install -r requirements.txt

CMD ["python3", "app.py"]
Issues with this Dockerfile:
- Ubuntu base image is already large (~77 MB)
- Unneeded dev tools (gcc, make, cmake)
- Text editors (vim, nano) are unnecessary in production
- apt-get cache not cleared
- Many separate RUN layers
Image size: ~1.2 GB
Good example (Alpine + Multi-stage):
# Build stage
FROM python:3.11-alpine AS builder

WORKDIR /app

# Only packages needed for build
RUN apk add --no-cache gcc musl-dev libffi-dev

COPY requirements.txt .
RUN pip install --no-cache-dir --user -r requirements.txt

# Runtime stage
FROM python:3.11-alpine

WORKDIR /app

# Copy only what’s needed from builder
COPY --from=builder /root/.local /root/.local
COPY . .

# Create non-root user
RUN adduser -D appuser && chown -R appuser:appuser /app
USER appuser

ENV PATH=/root/.local/bin:$PATH

CMD ["python", "app.py"]
Image size: ~50 MB (24x smaller!)
Improvements:
- Alpine base image (7 MB vs 77 MB)
- Multi-stage build (build tools not in final image)
- Removed pip cache with
--no-cache-dir - Non-root user for security
- Only runtime dependencies
Problem: Too Many Layers
Every Dockerfile instruction (RUN, COPY, ADD) creates a new layer. Too many layers reduce performance.
Bad example:
FROM ubuntu:22.04

RUN apt-get update
RUN apt-get install -y python3
RUN apt-get install -y python3-pip
RUN apt-get install -y curl
RUN apt-get install -y git
RUN rm -rf /var/lib/apt/lists/*

COPY requirements.txt .
RUN pip3 install flask
RUN pip3 install requests
RUN pip3 install psycopg2-binary

COPY app.py .
COPY config.py .
COPY utils.py .
Layer count: 12 layers
Problems:
- Each RUN is a separate layer (6 layers for apt-get!)
- apt cache cleaned only in the last layer (exists in previous layers)
- pip installs separately (3 layers)
- COPY commands separately (3 layers)
Good example:
FROM ubuntu:22.04

# All installs in a single RUN
RUN apt-get update && apt-get install -y --no-install-recommends \
    python3 \
    python3-pip \
    curl \
    git \
    && rm -rf /var/lib/apt/lists/*

WORKDIR /app

# Copy requirements first (for cache)
COPY requirements.txt .
RUN pip3 install --no-cache-dir -r requirements.txt

# Copy application files in one go
COPY . .

CMD ["python3", "app.py"]
Layer count: 5 layers
Improvements:
- Combined apt-get commands (
&&) - Cleaned cache in the same RUN
--no-install-recommendsto avoid extra packages- Install pip packages in one go via requirements.txt
- Minimized COPY commands
Layer Cache Strategy
Docker caches layers that haven’t changed. Cache strategy matters:
Bad cache usage:
FROM node:18-alpine

WORKDIR /app

# Copy everything
COPY . .

# Install dependencies
RUN npm install

CMD ["node", "app.js"]
Problem: When code changes (often), the COPY step invalidates the cache and npm install runs every time.
Good cache usage:
FROM node:18-alpine

WORKDIR /app

# Copy only package manifests first
COPY package*.json ./

# Install dependencies (cached if manifests unchanged)
RUN npm ci --only=production

# Then copy app code
COPY . .

# Non-root user
RUN adduser -D appuser && chown -R appuser:appuser /app
USER appuser

CMD ["node", "app.js"]
Advantage: Even if code changes, as long as package.json doesn’t, npm ci is served from cache. Builds drop to seconds.
Distroless Images
Google’s distroless images include only the minimum files needed to run your app. There’s no shell.
Example (Go app):
# Build stage
FROM golang:1.21 AS builder

WORKDIR /app

COPY go.mod go.sum ./
RUN go mod download

COPY . .
RUN CGO_ENABLED=0 GOOS=linux go build -o myapp

# Runtime stage - distroless
FROM gcr.io/distroless/static-debian11

WORKDIR /app

COPY --from=builder /app/myapp .

USER nonroot:nonroot

ENTRYPOINT ["/app/myapp"]
Image size: ~2 MB (just the static binary + minimal OS)
Advantages:
- Minimal attack surface
- No shell = RCE exploitation is harder
- Very small size
Disadvantage: Debugging is harder (no shell, exec is limited)
Image Size Comparison
| Base Image | Size | Use |
|---|---|---|
| ubuntu:22.04 | 77 MB | General purpose, easy to debug |
| debian:bookworm-slim | 74 MB | Similar to Ubuntu, slightly smaller |
| alpine:latest | 7 MB | Minimal, ideal for production |
| python:3.11-slim | 130 MB | Optimized for Python |
| python:3.11-alpine | 50 MB | Python + Alpine (smallest) |
| gcr.io/distroless/python3 | 55 MB | Distroless Python |
| scratch | 0 MB | Empty (for static binaries only) |
15.2 Storing State Inside the Container
Problem: Keeping Persistent Data Inside the Container
Containers are designed to be ephemeral. When removed, all data inside is lost.
Bad example:
FROM postgres:15

# Database files inside the container (default)
# /var/lib/postgresql/data

CMD ["postgres"]
docker run -d --name mydb postgres:15
# Database used, data written

docker stop mydb
docker rm mydb
#  ALL DATA LOST!
Problems:
- Data is lost when the container is removed
- Backups are difficult
- Migrations are harder
- Scaling is impossible (different data per container)
Good example (use a volume):
# Create a named volume
docker volume create pgdata

# Mount the volume
docker run -d \
  --name mydb \
  -v pgdata:/var/lib/postgresql/data \
  postgres:15

# Data persists even if the container is removed
docker stop mydb
docker rm mydb

# New container with the same volume
docker run -d \
  --name mydb2 \
  -v pgdata:/var/lib/postgresql/data \
  postgres:15
#  Data is still there!
With Docker Compose:
version: "3.8"

services:
  db:
    image: postgres:15
    volumes:
      - pgdata:/var/lib/postgresql/data
    environment:
      POSTGRES_PASSWORD: secret

volumes:
  pgdata:
Stateful vs Stateless Applications
Stateless (preferred):
FROM node:18-alpine

WORKDIR /app

COPY package*.json ./
RUN npm ci --only=production
COPY . .

# Store session in Redis (not in the container)
ENV SESSION_STORE=redis
ENV REDIS_URL=redis://redis:6379

CMD ["node", "app.js"]
Application code (Express.js):
const session = require('express-session');
const RedisStore = require('connect-redis')(session);
const redis = require('redis');

const redisClient = redis.createClient({
  url: process.env.REDIS_URL
});

app.use(session({
  store: new RedisStore({ client: redisClient }),
  secret: process.env.SESSION_SECRET,
  resave: false,
  saveUninitialized: false
}));
Advantages:
- Sessions persist even if containers die
- Horizontal scaling is possible
- Works behind a load balancer
Configuration Files
Configuration files are state too and should not be hard-coded into images.
Bad example:
FROM nginx:alpine

# Config file baked into the image
COPY nginx.conf /etc/nginx/nginx.conf

CMD ["nginx", "-g", "daemon off;"]
Problem: Requires rebuilding the image for every config change.
Good example (ConfigMap/Volume):
version: "3.8"

services:
  web:
    image: nginx:alpine
    volumes:
      - ./nginx.conf:/etc/nginx/nginx.conf:ro
    ports:
      - "80:80"
In Kubernetes:
apiVersion: v1
kind: ConfigMap
metadata:
  name: nginx-config
data:
  nginx.conf: |
    server {
      listen 80;
      location / {
        proxy_pass http://backend:8080;
      }
    }
---
apiVersion: apps/v1
kind: Deployment
metadata:
  name: nginx
spec:
  template:
    spec:
      containers:
      - name: nginx
        image: nginx:alpine
        volumeMounts:
        - name: config
          mountPath: /etc/nginx/nginx.conf
          subPath: nginx.conf
      volumes:
      - name: config
        configMap:
          name: nginx-config
Uploaded Files
User-uploaded files must be stored on a volume or external storage.
Bad example:
# Flask app
UPLOAD_FOLDER = '/app/uploads'  # Inside the container!

@app.route('/upload', methods=['POST'])
def upload_file():
    file = request.files['file']
    file.save(os.path.join(UPLOAD_FOLDER, file.filename))
    return 'OK'
Good example (S3 or Volume):
import boto3

s3 = boto3.client('s3')

@app.route('/upload', methods=['POST'])
def upload_file():
    file = request.files['file']
    s3.upload_fileobj(
        file,
        'my-bucket',
        file.filename
    )
    return 'OK'
Or with a volume:
services:
  web:
    image: myapp
    volumes:
      - uploads:/app/uploads

volumes:
  uploads:
15.3 Storing Secrets Inside the Image
Problem: Embedding Sensitive Data in the Image
This is the most dangerous anti-pattern. Images are often stored in registries and accessible by many.
** VERY BAD EXAMPLE (NEVER DO THIS!):**
FROM node:18-alpine

WORKDIR /app

COPY package*.json ./
RUN npm ci --only=production

COPY . .

#  SECRETS BAKED INTO THE IMAGE!
ENV DATABASE_PASSWORD=SuperSecret123
ENV API_KEY=sk-abc123xyz456
ENV AWS_SECRET_KEY=AKIAIOSFODNN7EXAMPLE

CMD ["node", "app.js"]
Why this is terrible:
- Remains in image layers (even if you “remove” it, it exists in history)
- Once pushed to a registry, many can see it
- Visible via
docker history - Visible via
docker inspect - Might be committed to Git
See secrets:
docker history myapp:latest
docker inspect myapp:latest | grep -i password
Correct Method 1: Environment Variables (Runtime)
docker run -d \
  -e DATABASE_PASSWORD=SuperSecret123 \
  -e API_KEY=sk-abc123xyz456 \
  myapp:latest
Docker Compose:
services:
  web:
    image: myapp
    environment:
      - DATABASE_PASSWORD=${DATABASE_PASSWORD}
      - API_KEY=${API_KEY}
.env file (do NOT commit!):
DATABASE_PASSWORD=SuperSecret123
API_KEY=sk-abc123xyz456
.gitignore:
.env
Advantages:
- Not stored in the image
- Varies by environment (dev/staging/prod)
- Easy rotation
Disadvantage: Still visible via docker inspect.
Correct Method 2: Docker Secrets (Swarm)
# Create a secret
echo "SuperSecret123" | docker secret create db_password -

# Use in a service
docker service create \
  --name myapp \
  --secret db_password \
  myapp:latest
Application code:
const fs = require('fs');

// Read secret from file
const dbPassword = fs.readFileSync(
  '/run/secrets/db_password',
  'utf8'
).trim();

const dbConfig = {
  password: dbPassword,
  // ...
};
Docker Compose (Swarm mode):
version: "3.8"

services:
  web:
    image: myapp
    secrets:
      - db_password
    deploy:
      replicas: 3

secrets:
  db_password:
    external: true
Advantages:
- Encrypted at rest
- Only authorized containers can access
- Mounted in memory (not written to disk)
- Not visible via
docker inspect
Correct Method 3: HashiCorp Vault
Vault is an enterprise-grade secrets management system.
Vault setup:
services:
  vault:
    image: vault:latest
    ports:
      - "8200:8200"
    environment:
      VAULT_DEV_ROOT_TOKEN_ID: myroot
    cap_add:
      - IPC_LOCK

  app:
    image: myapp
    environment:
      VAULT_ADDR: http://vault:8200
      VAULT_TOKEN: myroot
Application code (Node.js):
const vault = require('node-vault')({
  endpoint: process.env.VAULT_ADDR,
  token: process.env.VAULT_TOKEN
});

async function getSecrets() {
  const result = await vault.read('secret/data/myapp');
  return result.data.data;
}

getSecrets().then(secrets => {
  const dbPassword = secrets.db_password;
  // Database connection...
});
Write a secret to Vault:
docker exec -it vault vault kv put secret/myapp \
  db_password=SuperSecret123 \
  api_key=sk-abc123xyz456
Correct Method 4: Cloud Provider Secrets (AWS, Azure, GCP)
AWS Secrets Manager example:
FROM python:3.11-alpine

RUN pip install boto3

COPY app.py .

CMD ["python", "app.py"]
app.py:
import boto3
import json

def get_secret():
    client = boto3.client('secretsmanager', region_name='us-east-1')
    response = client.get_secret_value(SecretId='myapp/db-password')
    secret = json.loads(response['SecretString'])
    return secret['password']

db_password = get_secret()
# Database connection...
Run with an IAM role:
docker run -d \
  -e AWS_REGION=us-east-1 \
  -v ~/.aws:/root/.aws:ro \
  myapp:latest
BuildKit Secrets (Build-time Secrets)
Sometimes you need a secret during the build (private npm registry, git clone, etc.).
Bad example:
FROM node:18-alpine

WORKDIR /app

#  NPM token remains in the image
ENV NPM_TOKEN=npm_abc123xyz

RUN echo "//registry.npmjs.org/:_authToken=${NPM_TOKEN}" > .npmrc

COPY package*.json ./
RUN npm install

# Even if you remove the token, it remains in layer history!
RUN rm .npmrc

COPY . .

CMD ["node", "app.js"]
Good example (BuildKit secrets):
# syntax=docker/dockerfile:1.4
FROM node:18-alpine

WORKDIR /app

COPY package*.json ./

# Secret mount (not baked into the image!)
RUN --mount=type=secret,id=npmrc,target=/root/.npmrc \
    npm install

COPY . .

CMD ["node", "app.js"]
Build command:
DOCKER_BUILDKIT=1 docker build \
  --secret id=npmrc,src=$HOME/.npmrc \
  -t myapp:latest .
Advantages:
- Secret is used only during build
- Not stored in the final image
- Not visible in layer history
Protect Sensitive Files with .dockerignore
The .dockerignore file specifies files that should not be included in the build context.
.dockerignore:
# Secrets
.env
.env.*
*.key
*.pem
credentials.json

# Git
.git
.gitignore

# IDE
.vscode
.idea

# Logs
*.log
logs/

# Dependencies
node_modules
__pycache__
Secrets Rotation
Secrets should be rotated regularly.
Manual rotation:
# Create a new secret
echo "NewPassword456" | docker secret create db_password_v2 -

# Update the service
docker service update \
  --secret-rm db_password \
  --secret-add db_password_v2 \
  myapp

# Remove the old secret
docker secret rm db_password
Automated rotation (Vault):
Vault can rotate secrets automatically:
vault write database/rotate-role/myapp-role
Summary and Best Practices
Image Size:
- Use Alpine or distroless base images
- Separate build tools with multi-stage builds
- Minimize layers (combine RUN instructions)
- Apply a cache strategy (requirements first, code later)
- Use
--no-cache-dir,--no-install-recommends
State Management:
- Do not store persistent data in containers
- Use volumes (named volumes)
- Design stateless applications
- Keep sessions in an external store (Redis, DB)
- Manage configs via volumes or ConfigMaps
Secrets Management:
- NEVER bake secrets into images
- Use runtime environment variables
- Docker Secrets (Swarm) or Kubernetes Secrets
- Enterprise solutions like Vault
- BuildKit secrets (for build-time)
- Protect sensitive files with
.dockerignore - Rotate secrets regularly
Checklist:
# Check image size
docker images myapp

# Inspect layer history
docker history myapp:latest

# Check for secrets
docker history myapp:latest | grep -i password

# Scan the image
trivy image myapp:latest
By avoiding these anti-patterns, you can build secure, high-performance, and maintainable Docker images. In production environments, it’s critical to stick to these practices.
16. Registry & Distribution Strategies
Registries are used to store and distribute Docker images. Registry selection and management are critical to your deployment strategy. In this section, we’ll cover Docker Hub, private registry setup, access management, and solutions for rate limit issues.
16.1 Docker Hub vs Private Registry
Docker Hub
Docker Hub is Docker’s official public registry. It hosts millions of ready-to-use images.
Advantages:
- Official images available (nginx, postgres, redis, etc.)
- Free public repositories
- Automated builds (GitHub/Bitbucket integration)
- Webhook support
- Community support
Disadvantages:
- Pull rate limits (100 pulls/6 hours on free accounts)
- Private repository limits (1 private repo on free)
- Network latency (requires internet access)
- Compliance constraints (some companies can’t use public cloud)
Using Docker Hub:
# Login
docker login

# Tag image
docker tag myapp:latest username/myapp:latest

# Push
docker push username/myapp:latest

# Pull
docker pull username/myapp:latest
Private Registry (registry:2)
A private registry is a Docker registry running on your own servers. You have full control.
Simple private registry setup:
docker run -d \
  -p 5000:5000 \
  --name registry \
  --restart=always \
  -v registry-data:/var/lib/registry \
  registry:2
This starts a registry on port 5000 locally.
Push an image:
# Tag image for the local registry
docker tag myapp:latest localhost:5000/myapp:latest

# Push
docker push localhost:5000/myapp:latest

# Pull
docker pull localhost:5000/myapp:latest
Production-Ready Private Registry Setup
Security and resilience matter in production.
docker-compose.yml:
version: "3.8"
services:
registry:
image: registry:2
ports:
- "5000:5000"
environment:
REGISTRY_STORAGE_FILESYSTEM_ROOTDIRECTORY: /data
REGISTRY_AUTH: htpasswd
REGISTRY_AUTH_HTPASSWD_REALM: Registry Realm
REGISTRY_AUTH_HTPASSWD_PATH: /auth/htpasswd
REGISTRY_HTTP_TLS_CERTIFICATE: /certs/domain.crt
REGISTRY_HTTP_TLS_KEY: /certs/domain.key
volumes:
- registry-data:/data
- ./auth:/auth
- ./certs:/certs
restart: always
volumes:
registry-data:
Create users (htpasswd):
# Install htpasswd (Ubuntu/Debian)
sudo apt-get install apache2-utils
# Create auth dir
mkdir auth
# Add a user
htpasswd -Bc auth/htpasswd admin
# It will prompt for a password
# Add another user (append mode)
htpasswd -B auth/htpasswd developer
Create an SSL certificate (self-signed for testing):
mkdir certs
openssl req -newkey rsa:4096 -nodes -sha256 \
-keyout certs/domain.key \
-x509 -days 365 \
-out certs/domain.crt \
-subj "/CN=registry.local"
Start the registry:
docker-compose up -d
Login to the registry:
docker login registry.local:5000
# Username: admin
# Password: (the password you created)
Registry Configuration (config.yml)
For more advanced config, use config.yml.
config.yml:
version: 0.1
log:
level: info
fields:
service: registry
storage:
filesystem:
rootdirectory: /var/lib/registry
delete:
enabled: true
http:
addr: :5000
headers:
X-Content-Type-Options: [nosniff]
tls:
certificate: /certs/domain.crt
key: /certs/domain.key
auth:
htpasswd:
realm: basic-realm
path: /auth/htpasswd
health:
storagedriver:
enabled: true
interval: 10s
threshold: 3
Add to docker-compose.yml:
services:
registry:
image: registry:2
volumes:
- ./config.yml:/etc/docker/registry/config.yml
# ...
Registry with S3 Backend
You can use S3 (or compatible storage) instead of disk.
config.yml (S3):
version: 0.1
storage:
s3:
accesskey: AKIAIOSFODNN7EXAMPLE
secretkey: wJalrXUtnFEMI/K7MDENG/bPxRfiCYEXAMPLEKEY
region: us-east-1
bucket: my-docker-registry
encrypt: true
secure: true
# ... other settings
Advantages:
- Unlimited storage
- Automatic backups
- Multi-AZ durability
- Pay-as-you-go
Registry UI (Web Interface)
The registry does not ship with a web UI. To add one:
docker-compose.yml:
services:
registry:
# ... registry config
registry-ui:
image: joxit/docker-registry-ui:latest
ports:
- "8080:80"
environment:
REGISTRY_TITLE: My Private Registry
REGISTRY_URL: http://registry:5000
DELETE_IMAGES: true
SHOW_CONTENT_DIGEST: true
depends_on:
- registry
Access the UI: http://localhost:8080
Features:
- List and search images
- View tags
- Inspect image details
- Delete images (if delete is enabled in the registry)
Alternative: Harbor
Harbor is a CNCF project providing enterprise features.
Harbor features:
- Web UI
- RBAC (Role-Based Access Control)
- Image scanning (Trivy, Clair integration)
- Image replication (multi-datacenter)
- Webhooks
- Helm chart repository
- OCI artifact support
Harbor installation:
# Download Harbor installer
wget https://github.com/goharbor/harbor/releases/download/v2.10.0/harbor-online-installer-v2.10.0.tgz
tar xzvf harbor-online-installer-v2.10.0.tgz
cd harbor
# Edit harbor.yml
cp harbor.yml.tmpl harbor.yml
vim harbor.yml
# Install
sudo ./install.sh
harbor.yml example:
hostname: harbor.local
http:
port: 80
https:
port: 443
certificate: /data/cert/server.crt
private_key: /data/cert/server.key
harbor_admin_password: Harbor12345
database:
password: root123
data_volume: /data
log:
level: info
16.2 docker login, docker push and Access Management
docker login
The docker login command authenticates to a registry.
Public Docker Hub:
docker login
# Username: yourusername
# Password: ********
Private registry:
docker login registry.local:5000
# Username: admin
# Password: ********
Non-interactive login (for CI/CD):
echo "$DOCKER_PASSWORD" | docker login -u "$DOCKER_USERNAME" --password-stdin
GitHub Container Registry:
echo "$GITHUB_TOKEN" | docker login ghcr.io -u "$GITHUB_USERNAME" --password-stdin
AWS ECR:
aws ecr get-login-password --region us-east-1 | \
docker login --username AWS --password-stdin 123456789.dkr.ecr.us-east-1.amazonaws.com
Credential Storage
Docker credentials are stored by default in ~/.docker/config.json.
config.json example:
{
"auths": {
"https://index.docker.io/v1/": {
"auth": "dXNlcm5hbWU6cGFzc3dvcmQ="
},
"registry.local:5000": {
"auth": "YWRtaW46c2VjcmV0"
}
}
}
Problem: The auth field is a base64-encoded username:password (not secure).
Credential Helpers
Use credential helpers for more secure credential management.
Docker Credential Helper (Linux):
# Install pass (password store)
sudo apt-get install pass gnupg2
# Create a GPG key
gpg --gen-key
# Initialize pass
pass init your-gpg-key-id
# Install Docker credential helper
wget https://github.com/docker/docker-credential-helpers/releases/download/v0.8.0/docker-credential-pass-v0.8.0.linux-amd64
chmod +x docker-credential-pass-v0.8.0.linux-amd64
sudo mv docker-credential-pass-v0.8.0.linux-amd64 /usr/local/bin/docker-credential-pass
# Enable in config.json
vim ~/.docker/config.json
config.json:
{
"credsStore": "pass"
}
Now credentials are encrypted via pass after docker login.
macOS (keychain):
Docker Desktop on macOS uses the keychain automatically.
config.json:
{
"credsStore": "osxkeychain"
}
Windows (wincred):
{
"credsStore": "wincred"
}
docker push and pull
Push an image:
# Tag the image
docker tag myapp:latest registry.local:5000/myapp:1.0.0
# Push it
docker push registry.local:5000/myapp:1.0.0
Push multiple tags:
docker tag myapp:latest registry.local:5000/myapp:1.0.0
docker tag myapp:latest registry.local:5000/myapp:1.0
docker tag myapp:latest registry.local:5000/myapp:latest
docker push registry.local:5000/myapp:1.0.0
docker push registry.local:5000/myapp:1.0
docker push registry.local:5000/myapp:latest
Push all tags:
docker push --all-tags registry.local:5000/myapp
Access Control (Harbor RBAC Example)
In Harbor, access control is done via projects and users.
Harbor project structure:
library/
├── nginx:latest
├── postgres:15
└── redis:alpine
myapp/
├── frontend:1.0.0
├── backend:1.0.0
└── worker:1.0.0
Roles:
- Project Admin: Full permissions
- Master: Push, pull, delete images
- Developer: Push, pull
- Guest: Pull only
Add a user (Harbor UI):
- Administration > Users > New User
- Username, Email, Password
- Projects > myapp > Members > Add
- Select user and assign a role
Robot accounts (for CI/CD):
Harbor provides robot accounts for programmatic access.
- Projects > myapp > Robot Accounts > New Robot Account
- Name: cicd-bot
- Expiration: 30 days
- Permissions: Push, Pull
- Save the token (shown once)
Usage in CI/CD:
# GitHub Actions
- name: Login to Harbor
uses: docker/login-action@v3
with:
registry: harbor.local
username: robot$cicd-bot
password: ${{ secrets.HARBOR_ROBOT_TOKEN }}
Registry API Usage
Docker Registry exposes an HTTP API v2.
List images:
curl -u admin:password https://registry.local:5000/v2/_catalog
Response:
{
"repositories": [
"myapp",
"nginx",
"postgres"
]
}
List image tags:
curl -u admin:password https://registry.local:5000/v2/myapp/tags/list
Delete an image:
# First, get the digest
DIGEST=$(curl -I -u admin:password \
-H "Accept: application/vnd.docker.distribution.manifest.v2+json" \
https://registry.local:5000/v2/myapp/manifests/1.0.0 \
| grep Docker-Content-Digest | awk '{print $2}' | tr -d '\r')
# Delete
curl -X DELETE -u admin:password \
https://registry.local:5000/v2/myapp/manifests/$DIGEST
Note: Deleting removes only metadata. To reclaim disk space, run garbage collection:
docker exec registry bin/registry garbage-collect /etc/docker/registry/config.yml
16.3 Pull Rate Limits & Mirror Strategies
Docker Hub Rate Limits
Docker Hub limits the number of pulls:
| Account Type | Limit |
|---|---|
| Anonymous | 100 pulls / 6 hours (per IP) |
| Free | 200 pulls / 6 hours (per user) |
| Pro | 5000 pulls / day |
| Team | Unlimited |
Check rate limit:
TOKEN=$(curl "https://auth.docker.io/token?service=registry.docker.io&scope=repository:ratelimitpreview/test:pull" | jq -r .token)
curl --head -H "Authorization: Bearer $TOKEN" https://registry-1.docker.io/v2/ratelimitpreview/test/manifests/latest
Response headers:
ratelimit-limit: 100
ratelimit-remaining: 95
Problem: Rate Limit in CI/CD
Base images are pulled in every build. Many builds can exceed limits.
Problematic scenario:
# GitHub Actions - Pulling on every build
jobs:
build:
runs-on: ubuntu-latest
steps:
- uses: actions/checkout@v4
- run: docker build -t myapp .
Dockerfile:
FROM node:18-alpine # Pulled from Docker Hub on each build
# ...
100 builds/6 hours → Rate limit exceeded!
Solution 1: Docker Login
Authenticated pulls provide higher limits.
GitHub Actions:
jobs:
build:
runs-on: ubuntu-latest
steps:
- uses: actions/checkout@v4
# Login to Docker Hub
- name: Login to Docker Hub
uses: docker/login-action@v3
with:
username: ${{ secrets.DOCKERHUB_USERNAME }}
password: ${{ secrets.DOCKERHUB_TOKEN }}
- name: Build
run: docker build -t myapp .
Limit: 100 → 200 pulls/6 hours
Solution 2: Registry Mirror (Pull-Through Cache)
A registry mirror caches images pulled from Docker Hub.
Mirror registry setup:
config.yml:
version: 0.1
storage:
filesystem:
rootdirectory: /var/lib/registry
http:
addr: :5000
proxy:
remoteurl: https://registry-1.docker.io
username: yourusername # Docker Hub credentials
password: yourpassword
docker-compose.yml:
services:
registry-mirror:
image: registry:2
ports:
- "5000:5000"
volumes:
- ./config.yml:/etc/docker/registry/config.yml
- mirror-data:/var/lib/registry
restart: always
volumes:
mirror-data:
Use the mirror in Docker daemon:
/etc/docker/daemon.json:
{
"registry-mirrors": ["http://localhost:5000"]
}
Restart Docker:
sudo systemctl restart docker
Test:
docker pull nginx:alpine
The first pull comes from Docker Hub and is cached in the mirror. Subsequent pulls come from the mirror.
Solution 3: GitHub Container Registry (GHCR)
You can use GitHub Container Registry instead of Docker Hub.
Advantages:
- No rate limits (within GitHub Actions)
- Integration with GitHub
- Free public and private repositories
Push base images to GHCR:
# Pull from Docker Hub
docker pull node:18-alpine
# Tag for GHCR
docker tag node:18-alpine ghcr.io/yourorg/node:18-alpine
# Push to GHCR
docker push ghcr.io/yourorg/node:18-alpine
Dockerfile:
FROM ghcr.io/yourorg/node:18-alpine
# ...
Solution 4: Layer Cache (GitHub Actions)
GitHub Actions layer cache reduces build time and pulls.
- name: Set up Docker Buildx
uses: docker/setup-buildx-action@v3
- name: Build
uses: docker/build-push-action@v5
with:
context: .
cache-from: type=gha
cache-to: type=gha,mode=max
Base image layers are cached and not pulled on every build.
Solution 5: Self-Hosted Runner
With a self-hosted GitHub Actions runner, you can use your own registry mirror.
Docker on a self-hosted runner:
{
"registry-mirrors": ["http://internal-mirror:5000"]
}
Multi-Registry Strategy
In production, a multi-registry strategy is common.
Scenario:
- Internal registry: private images
- Mirror registry: cache for public images
- Docker Hub: fallback
docker-compose.yml example:
services:
frontend:
image: internal-registry:5000/myapp/frontend:1.0.0
# Private image
nginx:
image: mirror-registry:5000/nginx:alpine
# Cached public image
postgres:
image: postgres:15
# Fallback to Docker Hub
Registry Replication (Harbor)
Harbor supports registry replication for multi-datacenter scenarios.
Create a replication policy:
- Harbor UI > Replication
- New Replication Rule
- Source registry: harbor-us-east
- Destination registry: harbor-eu-west
- Trigger: Event-based (on each push)
- Filter: All repositories or a specific pattern
Advantages:
- Lower latency (each region has its own cache)
- Disaster recovery
- Compliance (data residency)
Monitoring and Alerting
Monitor registry health.
Registry metrics (Prometheus):
The registry exposes a /metrics endpoint by default.
prometheus.yml:
scrape_configs:
- job_name: 'registry'
static_configs:
- targets: ['registry:5000']
Key metrics:
registry_http_requests_total: Total HTTP requestsregistry_storage_action_seconds: Storage operation durationsgo_goroutines: Number of goroutines (check for leaks)
Alert example:
groups:
- name: registry_alerts
rules:
- alert: RegistryDown
expr: up{job="registry"} == 0
for: 5m
annotations:
summary: "Registry is down"
- alert: HighPullLatency
expr: registry_storage_action_seconds{action="Get"} > 5
for: 10m
annotations:
summary: "Registry pull latency is high"
Summary and Best Practices
Registry Selection:
- Small projects: Docker Hub (free tier)
- Medium projects: Private registry (registry:2)
- Large projects: Harbor (RBAC, scanning, replication)
- Enterprise: Cloud-managed (ECR, ACR, GCR)
Security:
- Use HTTPS (TLS certificates)
- Enable authentication (htpasswd, LDAP)
- Apply RBAC (Harbor)
- Perform image scanning (Trivy, Clair)
Performance:
- Set up a registry mirror (pull-through cache)
- Use layer cache (CI/CD)
- Use S3 backend (scalability)
- Multi-region replication (global apps)
Rate Limit Solutions:
- Docker Hub login (200 pulls/6 hours)
- Registry mirror (unlimited local pulls)
- Use GHCR (for GitHub Actions)
- Self-hosted runner (with your own mirror)
Operations:
- Regular garbage collection
- Monitoring and alerting
- Backup strategy
- Access logging
- Monitor disk usage
With a solid registry strategy, image distribution becomes fast, secure, and scalable. In production, registry infrastructure is critical and should not be overlooked.
17. Image Verification and Trust Chain
The security of Docker images is not limited to vulnerability scanning. It’s also critical to verify that an image actually comes from the expected source and hasn’t been tampered with. In this section, we’ll examine image signing and verification mechanisms.
17.1 Docker Content Trust / Notary
Docker Content Trust (DCT) is a system that uses cryptographic signatures to verify the integrity and provenance of images. Under the hood, it uses The Update Framework (TUF) and the Notary project.
What is Docker Content Trust?
DCT ensures that images come from a trusted source and weren’t modified in transit. It protects against man-in-the-middle attacks.
Core concepts:
- Publisher: The person/system that builds and signs the image
- Root key: Top-level key; must be stored offline
- Targets key: Signs image tags
- Snapshot key: Ensures metadata consistency
- Timestamp key: Protects against replay attacks
Enabling DCT
DCT is disabled by default. Enable it with:
export DOCKER_CONTENT_TRUST=1
When enabled, Docker only pulls signed images.
Test:
# DCT on
export DOCKER_CONTENT_TRUST=1
# Pull a signed image (works)
docker pull alpine:latest
# Pull an unsigned image (fails)
docker pull unsigned-image:latest
# Error: remote trust data does not exist
Image Signing
When DCT is enabled, pushing an image signs it automatically.
First push (key generation):
export DOCKER_CONTENT_TRUST=1
docker tag myapp:latest username/myapp:1.0.0
docker push username/myapp:1.0.0
On first push, Docker will prompt for passphrases:
Enter root key passphrase:
Repeat passphrase:
Enter targets key passphrase:
Repeat passphrase:
Root key: stored under ~/.docker/trust/private/root_keys/
Targets key: stored under ~/.docker/trust/private/tuf_keys/
Important: Back up the root key securely. If you lose it, you cannot update images.
Signature Verification
With DCT enabled, pull automatically verifies the signature.
export DOCKER_CONTENT_TRUST=1
docker pull username/myapp:1.0.0
Output:
Pull (1 of 1): username/myapp:1.0.0@sha256:abc123...
sha256:abc123... Pulling from username/myapp
Digest: sha256:abc123...
Status: Downloaded newer image for username/myapp@sha256:abc123...
Tagging username/myapp@sha256:abc123... as username/myapp:1.0.0
Presence of the digest indicates successful verification.
Notary Server
Notary stores image metadata and signatures. Docker Hub hosts its own Notary server.
Private Notary server setup:
version: "3.8"
services:
notary-server:
image: notary:server-0.7.0
ports:
- "4443:4443"
volumes:
- ./notary-server-config.json:/etc/notary/server-config.json
- notary-data:/var/lib/notary
environment:
NOTARY_SERVER_DB_URL: mysql://server@mysql:3306/notaryserver
notary-signer:
image: notary:signer-0.7.0
ports:
- "7899:7899"
volumes:
- ./notary-signer-config.json:/etc/notary/signer-config.json
- notary-signer-data:/var/lib/notary
mysql:
image: mysql:8
environment:
MYSQL_ROOT_PASSWORD: root
MYSQL_DATABASE: notaryserver
volumes:
notary-data:
notary-signer-data:
Using DCT in CI/CD
To use DCT in CI/CD, manage keys securely.
GitHub Actions example:
name: Build and Sign
on:
push:
tags:
- 'v*'
jobs:
build-and-sign:
runs-on: ubuntu-latest
steps:
- uses: actions/checkout@v4
- name: Login to Docker Hub
uses: docker/login-action@v3
with:
username: ${{ secrets.DOCKERHUB_USERNAME }}
password: ${{ secrets.DOCKERHUB_TOKEN }}
# Restore DCT root key
- name: Setup DCT keys
env:
DCT_ROOT_KEY: ${{ secrets.DCT_ROOT_KEY }}
DCT_ROOT_KEY_PASSPHRASE: ${{ secrets.DCT_ROOT_KEY_PASSPHRASE }}
run: |
mkdir -p ~/.docker/trust/private
echo "$DCT_ROOT_KEY" | base64 -d > ~/.docker/trust/private/root_key.key
chmod 600 ~/.docker/trust/private/root_key.key
- name: Build image
run: docker build -t username/myapp:${{ github.ref_name }} .
# Enable DCT and push
- name: Sign and push
env:
DOCKER_CONTENT_TRUST: 1
DOCKER_CONTENT_TRUST_ROOT_PASSPHRASE: ${{ secrets.DCT_ROOT_KEY_PASSPHRASE }}
DOCKER_CONTENT_TRUST_REPOSITORY_PASSPHRASE: ${{ secrets.DCT_TARGETS_KEY_PASSPHRASE }}
run: |
docker push username/myapp:${{ github.ref_name }}
Secrets:
DCT_ROOT_KEY: Base64-encoded root key fileDCT_ROOT_KEY_PASSPHRASE: Root key passphraseDCT_TARGETS_KEY_PASSPHRASE: Targets key passphrase
DCT Limitations
DCT has limitations:
Disadvantages:
- Works with Docker Hub and Docker Trusted Registry (other registries require Notary)
- Key management complexity
- Limited multi-arch support
- Not fully aligned with modern OCI standards
Therefore, modern alternatives have emerged.
17.2 Modern Alternatives: cosign and OCI Image Signing
What is Cosign?
Cosign is a modern image signing tool developed by Sigstore. It’s fully OCI-compliant and offers advanced features like keyless signing.
Advantages:
- OCI-native (works with all OCI registries)
- Keyless signing (via OpenID Connect)
- Kubernetes policy enforcement integration
- Attestations (SLSA provenance)
- Easy to use
Install Cosign
Linux:
wget https://github.com/sigstore/cosign/releases/download/v2.2.0/cosign-linux-amd64
chmod +x cosign-linux-amd64
sudo mv cosign-linux-amd64 /usr/local/bin/cosign
macOS:
brew install cosign
Windows:
choco install cosign
Key-Based Signing
Traditional public/private key signing.
Generate a key pair:
cosign generate-key-pair
This creates two files:
cosign.key: Private key (store securely)cosign.pub: Public key (shareable)
Sign an image:
# Sign
cosign sign --key cosign.key username/myapp:1.0.0
# Prompts for passphrase
Verify an image:
# Verify signature
cosign verify --key cosign.pub username/myapp:1.0.0
Sample successful output:
[
{
"critical": {
"identity": {
"docker-reference": "index.docker.io/username/myapp"
},
"image": {
"docker-manifest-digest": "sha256:abc123..."
},
"type": "cosign container image signature"
},
"optional": {
"Bundle": {...}
}
}
]
Keyless Signing (OIDC)
Keyless signing lets you sign without managing private keys, using OpenID Connect for identity.
Keyless signing:
cosign sign username/myapp:1.0.0
This opens a browser and prompts you to log in via an OIDC provider (GitHub, Google, Microsoft).
Keyless verification:
cosign verify \
--certificate-identity=your-email@example.com \
--certificate-oidc-issuer=https://github.com/login/oauth \
username/myapp:1.0.0
Advantages:
- No private key management
- No key rotation needed
- Automatic revocation (certificate expiration)
- Audit trail (who signed when)
Cosign with GitHub Actions
Workflow example:
name: Build and Sign with Cosign
on:
push:
tags:
- 'v*'
permissions:
contents: read
packages: write
id-token: write # Required for OIDC
jobs:
build-and-sign:
runs-on: ubuntu-latest
steps:
- uses: actions/checkout@v4
- name: Login to GitHub Container Registry
uses: docker/login-action@v3
with:
registry: ghcr.io
username: ${{ github.actor }}
password: ${{ secrets.GITHUB_TOKEN }}
- name: Install Cosign
uses: sigstore/cosign-installer@v3
- name: Build image
run: docker build -t ghcr.io/${{ github.repository }}:${{ github.ref_name }} .
- name: Push image
run: docker push ghcr.io/${{ github.repository }}:${{ github.ref_name }}
# Keyless signing (OIDC)
- name: Sign image
run: |
cosign sign --yes ghcr.io/${{ github.repository }}:${{ github.ref_name }}
Verification (in another workflow):
- name: Verify image signature
run: |
cosign verify \
--certificate-identity=https://github.com/${{ github.repository }}/.github/workflows/build.yml@refs/tags/${{ github.ref_name }} \
--certificate-oidc-issuer=https://token.actions.githubusercontent.com \
ghcr.io/${{ github.repository }}:${{ github.ref_name }}
Attestations (SLSA Provenance)
An attestation contains metadata about how an image was built. You can add SLSA-compliant provenance.
Create an attestation:
cosign attest --yes \
--predicate predicate.json \
--type slsaprovenance \
username/myapp:1.0.0
predicate.json example:
{
"buildType": "https://github.com/myorg/myrepo/.github/workflows/build.yml@main",
"builder": {
"id": "https://github.com/actions/runner"
},
"invocation": {
"configSource": {
"uri": "git+https://github.com/myorg/myrepo@refs/tags/v1.0.0",
"digest": {
"sha1": "abc123..."
}
}
},
"materials": [
{
"uri": "pkg:docker/node@18-alpine",
"digest": {
"sha256": "def456..."
}
}
]
}
Verify an attestation:
cosign verify-attestation \
--key cosign.pub \
--type slsaprovenance \
username/myapp:1.0.0
Policy Enforcement (Kubernetes)
To ensure only signed images run in Kubernetes, use an admission controller.
Install Sigstore Policy Controller:
kubectl apply -f https://github.com/sigstore/policy-controller/releases/latest/download/policy-controller.yaml
Create a ClusterImagePolicy:
apiVersion: policy.sigstore.dev/v1beta1
kind: ClusterImagePolicy
metadata:
name: require-signatures
spec:
images:
- glob: "ghcr.io/myorg/**"
authorities:
- keyless:
url: https://fulcio.sigstore.dev
identities:
- issuer: https://token.actions.githubusercontent.com
subject: https://github.com/myorg/myrepo/.github/workflows/*
This policy enforces that all images under ghcr.io/myorg/ are signed by GitHub Actions.
Test:
# Signed image (allowed)
kubectl run test --image=ghcr.io/myorg/myapp:1.0.0
# Unsigned image (denied)
kubectl run test --image=ghcr.io/myorg/unsigned:latest
# Error: admission webhook denied the request
OCI Artifact and Signature Storage
Cosign stores signatures as OCI artifacts in the same registry, using a special tag pattern.
Signature artifact:
username/myapp:1.0.0 # Original image
username/myapp:sha256-abc123.sig # Signature artifact
Show signatures:
cosign tree username/myapp:1.0.0
Output:
📦 username/myapp:1.0.0
├── 🔐 Signature: sha256:def456...
└── 📄 Attestation: sha256:ghi789...
Multi-Signature Support
An image can be signed by multiple parties (multi-party signing).
First signature:
cosign sign --key alice.key username/myapp:1.0.0
Second signature:
cosign sign --key bob.key username/myapp:1.0.0
Verification (both signatures verified):
cosign verify --key alice.pub username/myapp:1.0.0
cosign verify --key bob.pub username/myapp:1.0.0
Cosign with Harbor
Harbor 2.5+ natively supports cosign signatures.
In Harbor UI:
- Artifacts > Image > Accessories
- Signature and attestation artifacts are listed
Harbor webhook for automatic scans:
Harbor can trigger a Trivy scan automatically when a signed image is pushed.
Comparison Table
| Feature | Docker Content Trust | Cosign |
|---|---|---|
| Standard | TUF (The Update Framework) | Sigstore + OCI |
| Registry support | Docker Hub, DTR | All OCI registries |
| Key management | Root + Targets keys | Key-based or keyless (OIDC) |
| Ease of use | Medium | Easy |
| CI/CD integration | Complex | Simple |
| Kubernetes policy | None | Sigstore Policy Controller |
| Attestations | None | SLSA provenance |
| Multi-arch | Limited | Full support |
| Community | Declining | Growing (CNCF project) |
Summary and Best Practices
Why Image Signing Matters:
- Protects against supply chain attacks
- Guarantees image integrity
- Verifies provenance (who signed?)
- Meets compliance requirements (SOC2, HIPAA)
Which Method:
Small projects:
- Cosign keyless signing
- GitHub Actions OIDC integration
- Simple verification
Medium projects:
- Cosign key-based signing
- Private key management (Vault, KMS)
- CI/CD automation
Large/Enterprise:
- Cosign + Sigstore Policy Controller
- SLSA attestations
- Multi-party signing
- Kubernetes admission control
- Audit logging
CI/CD Pipeline:
1. Build image
2. Security scan (Trivy)
3. Sign with cosign (keyless/OIDC)
4. Add attestation (SLSA provenance)
5. Push to registry
6. Verify signature (deployment stage)
7. Deploy (only signed images)
Key Management:
- Key-based: HashiCorp Vault, AWS KMS, Azure Key Vault
- Keyless: GitHub OIDC, Google, Microsoft
- Multi-party signing: For critical images requiring multiple approvals
Policy Enforcement:
In Kubernetes, enforce that only signed images run via ClusterImagePolicy. This is a last line of defense against a compromised registry or man-in-the-middle attack.
Image signing and verification are critical parts of modern software supply chain security. Tools like Cosign simplify the process and enable broad adoption. In production, you should always implement image signing.
18. Alternatives, Ecosystem and Advanced Topics
While Docker is the most popular tool in container technology, it’s not the only option. In this section, we’ll look at Docker alternatives, detailed BuildKit features, and remote host management.
18.1 Podman (rootless), containerd, CRI-O (quick differences)
Podman
Podman is a daemonless container engine developed by Red Hat. It’s designed as an alternative to Docker.
Key features:
- Daemonless: No long-running background daemon
- Rootless: Run containers without root privileges
- Docker-compatible: Most Docker CLI commands work
- Pod support: Kubernetes-like pod concept
- systemd integration: Containers can run as systemd services
Installation (Fedora/RHEL):
sudo dnf install podman
Basic usage:
# Use podman instead of Docker
podman run -d --name web -p 8080:80 nginx
# List containers
podman ps
# Build image
podman build -t myapp .
# Push image
podman push myapp:latest docker.io/username/myapp:latest
Differences vs Docker:
# Create an alias (compatibility)
alias docker=podman
# Now docker commands work
docker run nginx
docker ps
Rootless Podman:
Podman’s strongest feature is running without root.
# As a normal user
podman run -d --name web nginx
# Appears root inside the container, but host process runs as your user
podman exec web whoami
# Output: root (inside container)
# On the host
ps aux | grep nginx
# Output: youruser 12345 0.0 0.1 ... nginx
User namespace mapping:
Rootless Podman maps container UIDs to different host UIDs via user namespaces.
# Show mapping
podman unshare cat /proc/self/uid_map
# Output:
# 0 1000 1
# 1 100000 65536
# UID 0 (root) inside the container → UID 1000 (your user) on the host
# UIDs 1–65536 inside the container → UIDs 100000–165536 on the host
Pros:
- Security (even if a container escape occurs, attacker is not root)
- Isolation on multi-user systems
- Rootless Kubernetes (with k3s, kind)
Cons:
- Ports below 1024 cannot be bound (use port forwarding)
- Some volume mounts may not work
- Slight performance overhead
Podman Compose:
Use podman-compose instead of Docker Compose.
pip install podman-compose
# Docker Compose files generally work as-is
podman-compose up -d
systemd integration:
Podman can run containers as systemd services.
# Run a container
podman run -d --name web -p 8080:80 nginx
# Generate a systemd unit
podman generate systemd --new --files --name web
# Move unit to systemd directory
mkdir -p ~/.config/systemd/user
mv container-web.service ~/.config/systemd/user/
# Enable the service
systemctl --user enable --now container-web.service
# Now it behaves like a regular systemd service
systemctl --user status container-web
systemctl --user restart container-web
Pod concept:
Podman supports Kubernetes-like pods.
# Create a pod
podman pod create --name mypod -p 8080:80
# Add containers to the pod
podman run -d --pod mypod --name web nginx
podman run -d --pod mypod --name sidecar busybox sleep 3600
# List pods
podman pod ps
# Containers in the pod
podman ps --pod
containerd
containerd is Docker’s high-level container runtime. Since Docker 1.11, Docker Engine uses containerd.
Architecture:
Docker CLI → Docker Engine → containerd → runc
containerd manages OCI runtimes and handles image transfer and storage.
Standalone usage:
containerd can be used without Docker.
Install:
# Ubuntu/Debian
sudo apt-get install containerd
# Arch
sudo pacman -S containerd
ctr CLI:
containerd’s CLI is ctr (not as feature-rich as Docker CLI).
# Pull image
sudo ctr image pull docker.io/library/nginx:alpine
# Run a container
sudo ctr run -d docker.io/library/nginx:alpine nginx
# List containers
sudo ctr containers ls
# List tasks (running containers)
sudo ctr tasks ls
Why use containerd directly:
- Kubernetes: Since 1.20, Kubernetes removed Docker support and uses containerd
- Minimal footprint: Lighter than Docker Engine
- OCI compliant: Standard runtime
With Kubernetes:
# /etc/containerd/config.toml
version = 2
[plugins."io.containerd.grpc.v1.cri"]
[plugins."io.containerd.grpc.v1.cri".containerd]
[plugins."io.containerd.grpc.v1.cri".containerd.runtimes.runc]
runtime_type = "io.containerd.runc.v2"
CRI-O
CRI-O is a minimal container runtime purpose-built for Kubernetes. It implements the CRI (Container Runtime Interface) standard.
Features:
- Designed solely for Kubernetes
- Minimal (no extra features)
- OCI compliant
- Very light and fast
Usage:
CRI-O isn’t designed for direct CLI use; it’s managed via Kubernetes.
# Install (Fedora)
sudo dnf install cri-o
# With Kubernetes
# kubelet --container-runtime=remote --container-runtime-endpoint=unix:///var/run/crio/crio.sock
Comparison Table
| Feature | Docker | Podman | containerd | CRI-O |
|---|---|---|---|---|
| Daemon | Yes | No | Yes | Yes |
| Rootless | Limited | Full | Limited | No |
| CLI | docker | podman (docker-compatible) | ctr (minimal) | crictl (debug) |
| Compose | docker-compose | podman-compose | None | None |
| Pod support | No | Yes | No | Yes |
| Kubernetes | Deprecated | k3s, kind | Default | Default |
| systemd | Manual | Native | Manual | Native |
| Image build | docker build | podman build | buildctl (BuildKit) | None (external) |
| Ease of use | Very easy | Easy | Hard | K8s-only |
| Footprint | Large | Medium | Small | Minimal |
When to use what:
- Docker: General use, development, learning
- Podman: Rootless, security-first, RHEL/Fedora systems
- containerd: Kubernetes production, minimal systems
- CRI-O: Kubernetes-only environments, OpenShift
18.2 BuildKit Details (cache usage, frontends)
BuildKit is Docker’s modern build engine. Optional since 18.09, default since 23.0.
BuildKit Advantages
1. Parallel builds:
BuildKit can build independent layers concurrently.
FROM alpine
RUN apk add --no-cache python3 # step 1
RUN apk add --no-cache nodejs # step 2 (can run in parallel)
2. Build cache optimization:
BuildKit manages layer cache more intelligently.
3. Skip unused stages:
Unused stages in multi-stage builds are skipped.
FROM golang:1.21 AS builder
RUN go build app.go
FROM alpine AS debug # This stage is never used
RUN apk add --no-cache gdb
FROM alpine # Only this stage is built
COPY --from=builder /app .
Enabling BuildKit
Via environment variable:
export DOCKER_BUILDKIT=1
docker build -t myapp .
Via daemon.json (persistent):
{
"features": {
"buildkit": true
}
}
Via buildx (recommended):
docker buildx build -t myapp .
Cache Types
BuildKit supports multiple cache types.
1. Local cache (default):
Layers are stored on local disk.
docker buildx build -t myapp .
2. Registry cache:
Store cache layers in a registry. Very useful in CI/CD.
# Build and push cache to a registry
docker buildx build \
--cache-to type=registry,ref=username/myapp:cache \
-t username/myapp:latest \
--push \
.
# Use cache in the next build
docker buildx build \
--cache-from type=registry,ref=username/myapp:cache \
-t username/myapp:latest \
.
3. GitHub Actions cache:
Use the GHA cache in GitHub Actions.
- name: Build with cache
uses: docker/build-push-action@v5
with:
context: .
cache-from: type=gha
cache-to: type=gha,mode=max
mode=max: cache all layers (more cache, faster builds)
mode=min: cache only final image layers (less disk usage)
4. Inline cache:
Cache metadata is embedded in the image itself.
docker buildx build \
--cache-to type=inline \
-t username/myapp:latest \
--push \
.
# Next build
docker buildx build \
--cache-from username/myapp:latest \
-t username/myapp:latest \
.
Build Secrets
BuildKit lets you use secrets securely during builds.
Dockerfile:
# syntax=docker/dockerfile:1.4
FROM alpine
RUN --mount=type=secret,id=github_token \
GITHUB_TOKEN=$(cat /run/secrets/github_token) && \
git clone https://${GITHUB_TOKEN}@github.com/private/repo.git
Build:
docker buildx build \
--secret id=github_token,src=$HOME/.github-token \
-t myapp .
The secret is not stored in the final image.
SSH Agent Forwarding
Use SSH for cloning private Git repositories.
Dockerfile:
# syntax=docker/dockerfile:1.4
FROM alpine
RUN apk add --no-cache git openssh-client
RUN --mount=type=ssh \
git clone git@github.com:private/repo.git
Build:
# Start SSH agent and add key
eval $(ssh-agent)
ssh-add ~/.ssh/id_rsa
# Build
docker buildx build --ssh default -t myapp .
Cache Mount
Cache mounts persist caches after RUN steps.
Example: package manager cache:
# syntax=docker/dockerfile:1.4
FROM node:18
WORKDIR /app
# Persist npm cache
RUN --mount=type=cache,target=/root/.npm \
npm install
Advantage: npm cache is reused across builds.
Python pip example:
# syntax=docker/dockerfile:1.4
FROM python:3.11
WORKDIR /app
# Persist pip cache
RUN --mount=type=cache,target=/root/.cache/pip \
pip install -r requirements.txt
Go module cache:
# syntax=docker/dockerfile:1.4
FROM golang:1.21
WORKDIR /app
# Go module cache
RUN --mount=type=cache,target=/go/pkg/mod \
go mod download
Bind Mount
Read-only access to host files during build.
# syntax=docker/dockerfile:1.4
FROM golang:1.21
WORKDIR /app
# Bind mount go.mod and go.sum (instead of copying)
RUN --mount=type=bind,source=go.mod,target=go.mod \
--mount=type=bind,source=go.sum,target=go.sum \
go mod download
COPY . .
RUN go build -o app
Advantage: If go.mod doesn’t change, code changes won’t invalidate cache.
BuildKit Frontends
BuildKit uses a pluggable frontend architecture. The Dockerfile is just one frontend.
Syntax directive:
# syntax=docker/dockerfile:1.4
This line selects the Dockerfile frontend version.
Custom frontend example:
# syntax=tonistiigi/dockerfile:master
Use different frontends for experimental features.
Buildpacks frontend:
Build images with Cloud Native Buildpacks.
docker buildx build \
--frontend gateway.v0 \
--opt source=heroku/buildpacks \
-t myapp .
Multi-platform Build
BuildKit can build images for different CPU architectures.
Simple example:
docker buildx build \
--platform linux/amd64,linux/arm64,linux/arm/v7 \
-t username/myapp:latest \
--push \
.
Platform-specific optimization:
# syntax=docker/dockerfile:1.4
FROM --platform=$BUILDPLATFORM golang:1.21 AS builder
ARG TARGETOS
ARG TARGETARCH
WORKDIR /app
COPY . .
RUN CGO_ENABLED=0 GOOS=${TARGETOS} GOARCH=${TARGETARCH} \
go build -o app
FROM alpine
COPY --from=builder /app/app .
CMD ["./app"]
Build Output
BuildKit can export build outputs in different formats.
1. Local export (without pushing an image):
docker buildx build \
-o type=local,dest=./output \
.
2. Tar export:
docker buildx build \
-o type=tar,dest=myapp.tar \
.
3. OCI format:
docker buildx build \
-o type=oci,dest=myapp-oci.tar \
.
BuildKit Metrics
BuildKit exposes Prometheus metrics.
daemon.json:
{
"builder": {
"gc": {
"enabled": true,
"defaultKeepStorage": "10GB"
}
},
"metrics-addr": "127.0.0.1:9323"
}
Metrics: http://127.0.0.1:9323/metrics
18.3 Connect to Remote Hosts with docker context
Docker context makes it easy to connect to different Docker daemons.
What is a context?
A context determines which daemon the Docker CLI communicates with. It can be local, remote, or Kubernetes.
Default context:
docker context ls
Output:
NAME TYPE DESCRIPTION DOCKER ENDPOINT
default * moby Current DOCKER_HOST unix:///var/run/docker.sock
Remote Host via SSH
Create an SSH context for a remote host:
docker context create remote-server \
--docker "host=ssh://user@192.168.1.100"
Use the context:
docker context use remote-server
# Now all commands run on the remote host
docker ps
docker run nginx
One-off usage:
docker --context remote-server ps
Switch contexts:
docker context use default # Switch back to local
Remote Host over TCP (Insecure)
Expose Docker daemon on TCP (remote host):
/etc/docker/daemon.json:
{
"hosts": ["unix:///var/run/docker.sock", "tcp://0.0.0.0:2375"]
}
Security warning: Insecure. Use only for testing.
Create the context:
docker context create remote-tcp \
--docker "host=tcp://192.168.1.100:2375"
Secure TCP with TLS
Create certificates (on remote host):
# CA key and certificate
openssl genrsa -aes256 -out ca-key.pem 4096
openssl req -new -x509 -days 365 -key ca-key.pem -sha256 -out ca.pem
# Server key
openssl genrsa -out server-key.pem 4096
openssl req -subj "/CN=192.168.1.100" -sha256 -new -key server-key.pem -out server.csr
# Server certificate
echo subjectAltName = IP:192.168.1.100 > extfile.cnf
openssl x509 -req -days 365 -sha256 -in server.csr -CA ca.pem -CAkey ca-key.pem \
-CAcreateserial -out server-cert.pem -extfile extfile.cnf
# Client key and certificate
openssl genrsa -out key.pem 4096
openssl req -subj '/CN=client' -new -key key.pem -out client.csr
echo extendedKeyUsage = clientAuth > extfile-client.cnf
openssl x509 -req -days 365 -sha256 -in client.csr -CA ca.pem -CAkey ca-key.pem \
-CAcreateserial -out cert.pem -extfile extfile-client.cnf
daemon.json (remote host):
{
"hosts": ["unix:///var/run/docker.sock", "tcp://0.0.0.0:2376"],
"tls": true,
"tlscacert": "/path/to/ca.pem",
"tlscert": "/path/to/server-cert.pem",
"tlskey": "/path/to/server-key.pem",
"tlsverify": true
}
Create context (local):
docker context create remote-tls \
--docker "host=tcp://192.168.1.100:2376,ca=/path/to/ca.pem,cert=/path/to/cert.pem,key=/path/to/key.pem"
Context via Environment Variables
export DOCKER_HOST=ssh://user@192.168.1.100
docker ps # runs on remote host
# Or
export DOCKER_HOST=tcp://192.168.1.100:2376
export DOCKER_TLS_VERIFY=1
export DOCKER_CERT_PATH=/path/to/certs
docker ps
Kubernetes Context
If Docker Desktop Kubernetes is enabled, you can create a Kubernetes context.
docker context create k8s-context \
--kubernetes config-file=/path/to/kubeconfig
Note: Docker’s Kubernetes support is deprecated. Prefer kubectl.
Context Export/Import
Share contexts.
Export:
docker context export remote-server
# Output: remote-server.dockercontext
Import:
docker context import remote-server remote-server.dockercontext
Practical Usage Scenarios
Scenario 1: Development → Staging deployment
# Build locally
docker context use default
docker build -t myapp:latest .
# Deploy to staging
docker context use staging-server
docker tag myapp:latest myapp:$(git rev-parse --short HEAD)
docker push myapp:$(git rev-parse --short HEAD)
docker-compose up -d
Scenario 2: Multi-host monitoring
#!/bin/bash
for context in default server1 server2 server3; do
echo "=== $context ==="
docker --context $context ps --format "table {{.Names}}\t{{.Status}}"
done
Scenario 3: Remote debugging
# Attach to a locally running container from a remote host
docker context use remote-server
docker exec -it myapp bash
Summary and Best Practices
Alternative Runtimes:
- Podman: For rootless, security-first projects
- containerd: For Kubernetes production
- CRI-O: For OpenShift and Kubernetes-only scenarios
- Docker: Still the best option for general use and development
BuildKit:
- Always enable DOCKER_BUILDKIT=1
- Use registry cache to speed up CI/CD builds
- Persist package manager caches via cache mounts
- Use secret mounts for sensitive data
- Use buildx for multi-platform builds
Remote Host Management:
- Prefer SSH contexts for security
- Enforce TLS in production
- Organize contexts (dev, staging, prod)
- Prefer docker context over DOCKER_HOST
- Set timeouts for remote operations
Security:
- Never use insecure TCP (2375) in production
- Use SSH key-based authentication
- Store TLS certificates securely
- Restrict port access with firewalls
- Enable audit logging
The Docker ecosystem evolves continuously. Keeping up with alternative tools and new features helps you choose the best solution. Tools like BuildKit and context make Docker more powerful and flexible.
19. Windows-Specific Deep Dive: Windows Containers
Windows containers behave differently from Linux containers and have their own characteristics. This section provides a detailed look at Windows container technology, isolation types, base image selection, and common issues.
19.1 Windows Container Types: Process vs Hyper-V Isolation
Windows containers can run in two isolation modes: Process Isolation and Hyper-V Isolation.
Process Isolation
Process Isolation works similarly to Linux containers. Containers share the host kernel.
Features:
- Requires the same kernel version as the host
- Faster startup
- Lower resource usage
- Default mode on Windows Server
Run:
docker run --isolation=process mcr.microsoft.com/windows/nanoserver:ltsc2022
Limitations:
- Container OS version must match Host OS version
- Windows Server 2016 host → Server 2016 container
- Windows Server 2022 host → Server 2022 container
- Won’t work on version mismatch
Version checks:
# Host version
[System.Environment]::OSVersion.Version
# Container version
docker run mcr.microsoft.com/windows/nanoserver:ltsc2022 cmd /c ver
Hyper-V Isolation
Hyper-V Isolation runs each container in a lightweight VM, providing kernel isolation.
Features:
- Different OS versions can run
- More secure (kernel isolation)
- Slower startup
- Higher resource usage
- Default on Windows 10/11
Run:
docker run --isolation=hyperv mcr.microsoft.com/windows/nanoserver:ltsc2019
Advantages:
You can run a Windows Server 2019 container on a Windows Server 2022 host:
# Host: Windows Server 2022
# Container: Windows Server 2019 (with Hyper-V isolation)
docker run --isolation=hyperv mcr.microsoft.com/windows/servercore:ltsc2019
Default Isolation Mode
Windows Server:
- Default: Process Isolation
- Hyper-V: Must be specified explicitly
Windows 10/11:
- Default: Hyper-V Isolation
- Process: Not available (Server-only)
Change default via daemon.json:
{
"exec-opts": ["isolation=hyperv"]
}
Comparison Table
| Feature | Process Isolation | Hyper-V Isolation |
|---|---|---|
| Host Kernel | Shared | Separate kernel |
| OS Version | Must match | Can differ |
| Startup time | 1–2 sec | 3–5 sec |
| Memory overhead | Minimal | ~100–200 MB |
| Security | Container escape risk | Kernel isolation |
| Compatibility | Windows Server | Windows Server + Win10/11 |
| Performance | Faster | Slightly slower |
Practical Usage
Development (Windows 10/11):
# Hyper-V isolation (automatic)
docker run -it mcr.microsoft.com/windows/nanoserver:ltsc2022 cmd
Production (Windows Server 2022):
# Process isolation (faster)
docker run --isolation=process -d myapp:latest
# Use Hyper-V if an older version is required
docker run --isolation=hyperv -d legacy-app:ltsc2019
19.2 Base Images: NanoServer vs ServerCore vs .NET Images
Windows container base images differ in size, features, and compatibility.
Windows Base Image Hierarchy
Windows (Host OS)
├── Windows Server Core (~2–5 GB)
│ ├── ASP.NET (~5–8 GB)
│ └── .NET Framework (~4–6 GB)
└── Nano Server (~100–300 MB)
└── .NET (Core/5+) (~200–500 MB)
Nano Server
Nano Server is a minimal Windows base image for lightweight, modern apps.
Features:
- Size: ~100 MB (compressed), ~300 MB (extracted) +- No graphical interface
- PowerShell Core (pwsh) available, no Windows PowerShell
- No .NET Framework; .NET Core/5+ only
- No IIS; minimal APIs
Docker Hub tags:
mcr.microsoft.com/windows/nanoserver:ltsc2022
mcr.microsoft.com/windows/nanoserver:ltsc2019
mcr.microsoft.com/windows/nanoserver:1809
Dockerfile example:
FROM mcr.microsoft.com/windows/nanoserver:ltsc2022
WORKDIR C:\app
COPY app.exe .
CMD ["app.exe"]
Use cases:
- .NET Core / .NET 5+ apps
- Node.js apps
- Static binaries (Go, Rust)
- Microservices
Limitations:
- .NET Framework 4.x not supported
- Legacy Windows APIs absent
- GUI apps not supported
- Legacy DLL incompatibilities possible
Windows Server Core
Server Core provides full Windows API support.
Features:
- Size: ~2 GB (compressed), ~5 GB (extracted)
- Full Windows API
- Windows PowerShell 5.1
- .NET Framework 4.x included
- IIS supported
- Windows services work
Docker Hub tags:
mcr.microsoft.com/windows/servercore:ltsc2022
mcr.microsoft.com/windows/servercore:ltsc2019
Dockerfile example:
FROM mcr.microsoft.com/windows/servercore:ltsc2022
# Install IIS
RUN powershell -Command \
Add-WindowsFeature Web-Server; \
Remove-Item -Recurse C:\inetpub\wwwroot\*
WORKDIR C:\inetpub\wwwroot
COPY website/ .
EXPOSE 80
CMD ["powershell", "Start-Service", "W3SVC"]
Use cases:
- .NET Framework 4.x applications
- IIS web applications
- Legacy Windows applications
- Apps requiring Windows services
ASP.NET Image
Optimized for ASP.NET Framework.
Features:
- Base: Windows Server Core
- ASP.NET 4.x pre-installed
- IIS pre-configured
- Size: ~5–8 GB
Docker Hub tags:
mcr.microsoft.com/dotnet/framework/aspnet:4.8-windowsservercore-ltsc2022
mcr.microsoft.com/dotnet/framework/aspnet:4.7.2-windowsservercore-ltsc2019
Dockerfile example:
FROM mcr.microsoft.com/dotnet/framework/aspnet:4.8
WORKDIR /inetpub/wwwroot
COPY published/ .
.NET Core / .NET 5+ Images
For modern .NET applications, Nano Server-based images are used.
Runtime images:
mcr.microsoft.com/dotnet/runtime:8.0-nanoserver-ltsc2022
mcr.microsoft.com/dotnet/aspnet:8.0-nanoserver-ltsc2022
SDK image (for builds):
mcr.microsoft.com/dotnet/sdk:8.0-nanoserver-ltsc2022
Multi-stage Dockerfile example:
# Build stage
FROM mcr.microsoft.com/dotnet/sdk:8.0-nanoserver-ltsc2022 AS build
WORKDIR /src
COPY *.csproj .
RUN dotnet restore
COPY . .
RUN dotnet publish -c Release -o /app/publish
# Runtime stage
FROM mcr.microsoft.com/dotnet/aspnet:8.0-nanoserver-ltsc2022
WORKDIR /app
COPY --from=build /app/publish .
EXPOSE 8080
ENTRYPOINT ["dotnet", "MyApp.dll"]
Size comparison:
- SDK image: ~1.5 GB
- Runtime image: ~300 MB
- Published app: ~50 MB
- Total final image: ~350 MB
Base Image Selection Guide
What to use when:
New .NET 5+ app → mcr.microsoft.com/dotnet/aspnet:8.0-nanoserver
Legacy .NET 4.x app → mcr.microsoft.com/dotnet/framework/aspnet:4.8
Legacy Windows app → mcr.microsoft.com/windows/servercore:ltsc2022
Minimal binary (Go, Rust) → mcr.microsoft.com/windows/nanoserver:ltsc2022
Version Compatibility Matrix
| Container Image | Windows Server 2016 | Windows Server 2019 | Windows Server 2022 | Win 10/11 |
|---|---|---|---|---|
| ltsc2016 | Process | Hyper-V | Hyper-V | Hyper-V |
| ltsc2019 | ❌ | Process | Hyper-V | Hyper-V |
| ltsc2022 | ❌ | ❌ | Process | Hyper-V |
LTSC: Long-Term Servicing Channel (5-year support)
19.3 Windows Container Networking, Named Pipes, Windows Services
Windows Container Network Modes
Windows containers support multiple network drivers.
1. NAT (Network Address Translation)
Default network driver, similar to Linux bridge.
# Default nat network
docker network ls
Output:
NETWORK ID NAME DRIVER SCOPE
abc123... nat nat local
Start a container:
docker run -d -p 8080:80 --name web myapp:latest
Characteristics:
- Outbound connectivity: Yes
- Inbound connectivity: Requires port mapping
- Container-to-container: Reachable by container name
2. Transparent Network
Assigns containers an IP from the host network.
# Create transparent network
docker network create -d transparent MyTransparentNetwork
# Use it
docker run -d --network=MyTransparentNetwork myapp:latest
Characteristics:
- Containers share the host subnet
- Directly accessible from external network
- IP assigned via DHCP or statically
- No port mapping required
3. Overlay Network (Swarm)
For multi-host networking.
docker network create -d overlay MyOverlayNetwork
4. L2Bridge
Layer 2 bridge network, similar to transparent but more flexible.
docker network create -d l2bridge MyL2Network
Named Pipes
Windows containers support named pipes, the Windows-native IPC mechanism.
Named pipe mount:
docker run -d -v \\.\pipe\docker_engine:\\.\pipe\docker_engine myapp
Example: Docker-in-Docker (Windows)
docker run -it -v \\.\pipe\docker_engine:\\.\pipe\docker_engine `
mcr.microsoft.com/windows/servercore:ltsc2022 powershell
Inside the container:
# Access host Docker via named pipe
docker ps
SQL Server Named Pipe:
docker run -d `
-e "ACCEPT_EULA=Y" `
-e "SA_PASSWORD=YourPassword123" `
-v \\.\pipe\sql\query:\\.
pipe\sql\query `
mcr.microsoft.com/mssql/server:2022-latest
Windows Services Inside Containers
Windows services can run inside containers.
IIS service example:
FROM mcr.microsoft.com/windows/servercore:ltsc2022
RUN powershell -Command Add-WindowsFeature Web-Server
EXPOSE 80
CMD ["powershell", "-Command", "Start-Service W3SVC; Start-Sleep -Seconds 3600"]
Problem: When the container exits, the service stops.
Solution: ServiceMonitor.exe
Microsoft’s ServiceMonitor.exe runs Windows services properly inside a container.
FROM mcr.microsoft.com/windows/servercore:ltsc2022
RUN powershell -Command Add-WindowsFeature Web-Server
# Download ServiceMonitor.exe
ADD https://dotnetbinaries.blob.core.windows.net/servicemonitor/2.0.1.10/ServiceMonitor.exe C:\ServiceMonitor.exe
EXPOSE 80
ENTRYPOINT ["C:\\ServiceMonitor.exe", "w3svc"]
ServiceMonitor:
- Starts and monitors the service
- If the service stops, the container exits
- Can act as a health monitor
SQL Server example:
FROM mcr.microsoft.com/mssql/server:2022-latest
COPY ServiceMonitor.exe C:\
ENV ACCEPT_EULA=Y
ENV SA_PASSWORD=YourPassword123
ENTRYPOINT ["C:\\ServiceMonitor.exe", "MSSQLSERVER"]
Multiple Services (Supervisor Pattern)
Use a PowerShell script to run multiple services.
start-services.ps1:
# Start IIS
Start-Service W3SVC
# Start a background task
Start-Process -FilePath "C:\app\worker.exe" -NoNewWindow
# Keep container alive by tailing logs
Get-Content -Path "C:\inetpub\logs\LogFiles\W3SVC1\*.log" -Wait
Dockerfile:
FROM mcr.microsoft.com/windows/servercore:ltsc2022
RUN powershell -Command Add-WindowsFeature Web-Server
COPY start-services.ps1 C:\
COPY app/ C:\app\
CMD ["powershell", "-File", "C:\\start-services.ps1"]
DNS and Service Discovery
Windows containers use embedded DNS.
# Create a network
docker network create mynet
# Container 1
docker run -d --name web --network mynet myapp:latest
# Container 2 (reaches "web" by hostname)
docker run -it --network mynet mcr.microsoft.com/windows/nanoserver:ltsc2022 powershell
# Inside container 2
ping web
curl http://web
19.4 Common Compatibility Issues and Solutions
Issue 1: “The container operating system does not match the host operating system”
Error message:
Error response from daemon: container <id> encountered an error during
CreateProcess: failure in a Windows system call: The container operating
system does not match the host operating system.
Cause:
Container image OS version is incompatible with the host. With Process Isolation, versions must match.
Solution 1: Use Hyper-V Isolation
docker run --isolation=hyperv myapp:ltsc2019
Solution 2: Use the correct base image
# Check host version
[System.Environment]::OSVersion.Version
# Output: Major: 10, Minor: 0, Build: 20348 (Windows Server 2022)
# Pull suitable image
docker pull mcr.microsoft.com/windows/servercore:ltsc2022
Solution 3: Flexible image via multi-stage build
ARG WINDOWS_VERSION=ltsc2022
FROM mcr.microsoft.com/windows/servercore:${WINDOWS_VERSION}
Build:
docker build --build-arg WINDOWS_VERSION=ltsc2022 -t myapp:ltsc2022 .
docker build --build-arg WINDOWS_VERSION=ltsc2019 -t myapp:ltsc2019 .
Issue 2: Port Binding Failed
Error:
Error starting userland proxy: listen tcp 0.0.0.0:80: bind: An attempt was
made to access a socket in a way forbidden by its access permissions.
Cause:
Some ports are reserved on Windows or used by another service.
Check reserved ports:
netsh interface ipv4 show excludedportrange protocol=tcp
Solution 1: Use a different port
docker run -p 8080:80 myapp
Solution 2: Release the reserved port
# Admin PowerShell
net stop winnat
docker start mycontainer
net start winnat
Issue 3: Volume Mount Permission Error
Error:
Error response from daemon: error while creating mount source path
'C:\Users\...': mkdir C:\Users\...: Access is denied.
Cause:
Windows file permissions or incorrect path format.
Solution 1: Use absolute paths
# Wrong
docker run -v .\app:C:\app myapp
# Correct
docker run -v C:\Users\Me\app:C:\app myapp
Solution 2: Docker Desktop file sharing
Docker Desktop → Settings → Resources → File Sharing → Add path
Solution 3: Use a named volume
docker volume create mydata
docker run -v mydata:C:\app\data myapp
Issue 4: Slow Image Builds
Cause:
Windows base images are large (GBs). Defender real-time scanning slows builds.
Solution 1: BuildKit cache
$env:DOCKER_BUILDKIT=1
docker build --cache-from myapp:cache -t myapp:latest .
Solution 2: Defender exclusion
Windows Defender → Add exclusion:
C:\ProgramData\Docker
C:\Users\<Username>\.docker
Solution 3: Minimize via multi-stage
FROM mcr.microsoft.com/dotnet/sdk:8.0-nanoserver-ltsc2022 AS build
# Build steps
FROM mcr.microsoft.com/dotnet/aspnet:8.0-nanoserver-ltsc2022
COPY --from=build /app .
Issue 5: Container Restart Loop
Symptom:
Container keeps restarting.
Debug:
# Logs
docker logs mycontainer
# Inspect
docker inspect mycontainer
# Event stream
docker events --filter container=mycontainer
Common causes:
1. Main process exits immediately
# Wrong (CMD exits immediately)
CMD ["echo", "Hello"]
# Correct (blocking process)
CMD ["powershell", "-NoExit", "-Command", "Start-Service W3SVC; Start-Sleep -Seconds 999999"]
2. Service fails to start
# Attach interactively
docker run -it myapp:latest powershell
# Start service manually and check errors
Start-Service W3SVC
3. Missing dependency
# Missing .NET Framework runtime
RUN powershell -Command Install-WindowsFeature NET-Framework-45-Core
Issue 6: DNS Resolution Fails
Symptom:
Container cannot reach the internet.
Test:
docker run -it mcr.microsoft.com/windows/nanoserver:ltsc2022 powershell
# Inside container
Resolve-DnsName google.com
Solution 1: Set DNS servers
docker run --dns 8.8.8.8 --dns 8.8.4.4 myapp
daemon.json:
{
"dns": ["8.8.8.8", "8.8.4.4"]
}
Solution 2: Change network driver
docker network create -d transparent mytransparent
docker run --network mytransparent myapp
Issue 7: Disk Space Issues
Symptom:
“No space left on device” error.
Solution 1: Cleanup
# Stopped containers
docker container prune
# Unused images
docker image prune -a
# Volumes
docker volume prune
# Everything
docker system prune -a --volumes
Solution 2: Increase Docker disk size
Docker Desktop → Settings → Resources → Disk image size
Solution 3: Minimize layers
# Wrong (each RUN creates a layer)
RUN powershell -Command Install-Package A
RUN powershell -Command Install-Package B
RUN powershell -Command Install-Package C
# Correct (single layer)
RUN powershell -Command \
Install-Package A; \
Install-Package B; \
Install-Package C
Issue 8: Windows Updates Inside Containers
Problem:
Windows Update doesn’t run inside containers or the base image isn’t up to date.
Solution:
Microsoft regularly updates base images. Always use the latest patch level.
# The latest tag always has the newest patches
docker pull mcr.microsoft.com/windows/servercore:ltsc2022
# Specific patch level (for production pinning)
docker pull mcr.microsoft.com/windows/servercore:ltsc2022-amd64-20250101
Automatic update in Dockerfile (not recommended):
FROM mcr.microsoft.com/windows/servercore:ltsc2022
# Windows Update (significantly slows builds!)
RUN powershell -Command \
Install-Module PSWindowsUpdate -Force; \
Get-WindowsUpdate -Install -AcceptAll
This can take hours. Prefer updated base images instead.
Best Practices Summary
Image Selection:
- Modern apps → Nano Server
- Legacy apps → Server Core
- Minimal overhead → Nano Server
- Full compatibility → Server Core
Networking:
- Development → NAT (default)
- Production → Transparent or L2Bridge
- Multi-host → Overlay
Performance:
- Use multi-stage builds
- Enable BuildKit cache
- Add Defender exclusions
- Minimize layers
Compatibility:
- Match host and container versions
- Use Hyper-V isolation on mismatches
- Use named pipes carefully
- ServiceMonitor for Windows services
Troubleshooting:
docker logsis always the first stepdocker inspectfor detailed info- Interactive mode (
-it) for debugging - Event stream (
docker events) for monitoring
With the right approach, you can build production-ready systems with Windows containers despite challenges differing from Linux. The most important decisions are base image selection, isolation mode, and network driver based on your project’s needs.
20. Linux-Specific Deep Dive: Kernel Features & Security
Docker’s operation on Linux leverages kernel-level features. In this section, we’ll dive into namespaces, cgroups, storage drivers, and SELinux.
20.1 Namespaces (PID, NET, MNT, UTS, IPC) and cgroups Details
Linux Namespaces
Namespaces isolate global system resources so each container has its own view. They are Docker’s core isolation mechanism.
There are 7 namespace types in Linux:
- PID Namespace (Process ID)
- NET Namespace (Network)
- MNT Namespace (Mount)
- UTS Namespace (Hostname)
- IPC Namespace (Inter-Process Communication)
- USER Namespace (User ID)
- CGROUP Namespace (Control Groups)
1. PID Namespace
The PID namespace gives each container its own process tree.
From inside a container:
docker run -it alpine ps aux
Output:
PID USER COMMAND
1 root /bin/sh
7 root ps aux
Processes start at PID 1 inside the container.
From the host:
ps aux | grep alpine
Output:
root 12345 0.0 0.0 /bin/sh
Different PID (12345) on the host.
Inspect namespaces:
# Find the container process
CONTAINER_PID=$(docker inspect --format '{{.State.Pid}}' mycontainer)
# List its namespaces
ls -l /proc/$CONTAINER_PID/ns/
Output:
lrwxrwxrwx 1 root root 0 pid:[4026532194]
lrwxrwxrwx 1 root root 0 net:[4026532197]
lrwxrwxrwx 1 root root 0 mnt:[4026532195]
...
Each namespace has a unique inode number.
PID namespace hierarchy:
Init (PID 1, Host)
├── dockerd
│ └── containerd
│ └── container (PID 1 in namespace)
│ └── app process (PID 2 in namespace)
Parent can see child, not vice versa:
# From host you can see container processes
ps aux | grep container
# From container you don’t see host processes
docker exec mycontainer ps aux # Only container processes
2. NET Namespace
The network namespace provides each container with its own network stack.
Network namespace structure:
Host Network Namespace
├── eth0 (physical interface)
├── docker0 (bridge)
└── veth pairs
├── vethXXX (host side) ↔ eth0 (container side)
└── vethYYY (host side) ↔ eth0 (container side)
Inspect:
# Container network namespace
sudo nsenter -t $CONTAINER_PID -n ip addr
# Host network namespace
ip addr
veth pair check:
# Find the container’s veth
docker exec mycontainer cat /sys/class/net/eth0/iflink
# Output: 12
# Matching interface on host
ip link | grep "^12:"
# Output: 12: veth1a2b3c4@if11: <BROADCAST,MULTICAST,UP>
Host network mode:
docker run --network host nginx
In this case the container shares the host network namespace.
3. MNT Namespace
The mount namespace isolates the filesystem view per container.
Container filesystem:
# Container root filesystem
docker inspect --format '{{.GraphDriver.Data.MergedDir}}' mycontainer
Mount propagation:
Docker controls host↔container mount propagation.
# Private (default): no propagation
docker run -v /host/path:/container/path myapp
# Shared: bidirectional propagation
docker run -v /host/path:/container/path:shared myapp
# Slave: host → container one-way
docker run -v /host/path:/container/path:slave myapp
4. UTS Namespace
UTS isolates hostname and domain name.
# Hostname inside container
docker run alpine hostname
# Output: a1b2c3d4e5f6 (container ID)
# Host hostname
hostname
# Output: myserver
Custom hostname:
docker run --hostname myapp alpine hostname
# Output: myapp
5. IPC Namespace
IPC isolates shared memory, semaphores, and message queues.
# IPC inside container
docker exec mycontainer ipcs
# Share IPC namespace
docker run --ipc=container:other_container myapp
6. USER Namespace
Maps container UID/GIDs to different host UID/GIDs.
Rootless example:
# Host user ID is 1000
id
# uid=1000(john)
# Root inside container
docker run --user 0:0 alpine id
# uid=0(root) gid=0(root)
# Yet on the host, the process runs as 1000
ps aux | grep alpine
# john 12345 ...
User namespace mapping:
Container UID → Host UID
0 → 1000
1 → 100000
2 → 100001
...
65536 → 165536
Enable (daemon.json):
{
"userns-remap": "default"
}
7. CGROUP Namespace
The cgroup namespace isolates the cgroup view.
# Container cgroups
docker exec mycontainer cat /proc/self/cgroup
Cgroups (Control Groups)
Cgroups implement resource limits and accounting.
Cgroups v1 vs v2:
| Feature | Cgroups v1 | Cgroups v2 |
|---|---|---|
| Hierarchy | Separate per controller | Single unified hierarchy |
| File structure | /sys/fs/cgroup/<controller>/ |
/sys/fs/cgroup/ |
| Delegation | Complex | Simpler and safer |
| Pressure stall info | No | Yes (PSI) |
Controllers:
cpu: CPU timememory: Memory limitsblkio: Disk I/Odevices: Device accesspids: Process count limitscpuset: CPU core assignment
Container cgroup path:
# Cgroup path
cat /sys/fs/cgroup/system.slice/docker-<container_id>.scope/cgroup.controllers
# Memory limit
cat /sys/fs/cgroup/system.slice/docker-<container_id>.scope/memory.max
# CPU limit
cat /sys/fs/cgroup/system.slice/docker-<container_id>.scope/cpu.max
Manual cgroup inspection:
# Container PID
CONTAINER_PID=$(docker inspect --format '{{.State.Pid}}' mycontainer)
# Find cgroup path
cat /proc/$CONTAINER_PID/cgroup
# Memory usage
cat /sys/fs/cgroup/system.slice/docker-$CONTAINER_ID.scope/memory.current
# CPU throttling
cat /sys/fs/cgroup/system.slice/docker-$CONTAINER_ID.scope/cpu.stat
PSI (Pressure Stall Information) — Cgroups v2:
# Memory pressure
cat /sys/fs/cgroup/system.slice/docker-$CONTAINER_ID.scope/memory.pressure
# CPU pressure
cat /sys/fs/cgroup/system.slice/docker-$CONTAINER_ID.scope/cpu.pressure
Sample output:
some avg10=0.00 avg60=0.00 avg300=0.00 total=0
full avg10=0.00 avg60=0.00 avg300=0.00 total=0
some: Some processes waiting for resources
full: All processes waiting for resources
20.2 Differences Between OverlayFS, aufs, devicemapper, btrfs
Docker manages image layers using different storage drivers.
Storage Driver Selection
Check current driver:
docker info | grep "Storage Driver"
Output:
Storage Driver: overlay2
1. OverlayFS (overlay2)
Default and recommended on modern Linux.
Architecture:
Container Layer (Read-Write)
↓
Image Layer 3 (Read-Only)
↓
Image Layer 2 (Read-Only)
↓
Image Layer 1 (Read-Only)
↓
Base Layer (Read-Only)
How OverlayFS works:
- Lower dir: read-only layers (image)
- Upper dir: read-write layer (container)
- Merged dir: unified view (container sees this)
- Work dir: internal to overlay
Directory layout:
/var/lib/docker/overlay2/
├── l/ # Symlinks (layer short names)
├── <layer-id>/
│ ├── diff/ # Layer contents
│ ├── link # Short name
│ ├── lower # Lower layers
│ └── work/ # Overlay work dir
└── <container-id>/
├── diff/ # Container changes
├── merged/ # Unified view
└── work/
Pros:
- Fast (kernel-native)
- Low overhead
- Good performance
- Optimized copy-on-write
Cons:
- Deep layer stacks (100+) can slow down
rename(2)across layers is expensive- OverlayFS limitations (e.g., inode counts)
Inspect example:
# Inspect layers
docker inspect myimage | jq '.[0].GraphDriver'
Output:
{
"Data": {
"LowerDir": "/var/lib/docker/overlay2/abc123/diff:/var/lib/docker/overlay2/def456/diff",
"MergedDir": "/var/lib/docker/overlay2/ghi789/merged",
"UpperDir": "/var/lib/docker/overlay2/ghi789/diff",
"WorkDir": "/var/lib/docker/overlay2/ghi789/work"
},
"Name": "overlay2"
}
2. AUFS (Another Union File System)
Legacy union filesystem used on older Ubuntu.
Features:
- Union mount
- Copy-on-write
- Older than OverlayFS
Status:
- Deprecated on modern kernels
- Ubuntu 18.04+ uses overlay2
- Not recommended for new installs
Enable (legacy):
{
"storage-driver": "aufs"
}
3. Device Mapper
Block-level storage driver, LVM-based.
Two modes:
loop-lvm (default, not recommended):
- Sparse file LVM
- OK for development
- Slow in production
direct-lvm (production):
- Dedicated block device
- LVM thin provisioning
- High performance
Configuration:
{
"storage-driver": "devicemapper",
"storage-opts": [
"dm.thinpooldev=/dev/mapper/docker-thinpool",
"dm.use_deferred_removal=true",
"dm.use_deferred_deletion=true"
]
}
Pros:
- Block-level CoW
- Snapshots
- LVM features
Cons:
- Complex setup
- Performance overhead
- Disk management complexity
4. Btrfs
B-tree filesystem with native CoW and snapshots.
Features:
- Native CoW
- Subvolumes
- Snapshots
- Compression
Enable:
# Create a btrfs filesystem
mkfs.btrfs /dev/sdb
mount /dev/sdb /var/lib/docker
# daemon.json
{
"storage-driver": "btrfs"
}
Pros:
- Filesystem-level CoW
- Efficient cloning
- Compression support
- Deduplication
Cons:
- Requires btrfs disk
- Filesystem complexity
- Sometimes inconsistent performance
5. ZFS
Advanced filesystem from Solaris.
Features:
- CoW
- Snapshots
- Compression
- Deduplication
- RAID-Z
Usage:
# Create a ZFS pool
zpool create -f zpool-docker /dev/sdb
# Docker storage
zfs create -o mountpoint=/var/lib/docker zpool-docker/docker
# daemon.json
{
"storage-driver": "zfs"
}
Pros:
- Enterprise-grade features
- Data integrity
- Snapshots and cloning
Cons:
- License (CDDL, not in Linux kernel)
- High RAM usage
- Complex management
Storage Driver Comparison
| Driver | Performance | Stability | Disk Space | Usage |
|---|---|---|---|---|
| overlay2 | Excellent | Stable | Efficient | Default, recommended |
| aufs | Good | Stable | Efficient | Deprecated |
| devicemapper | Medium | Stable | Medium | Production (direct-lvm) |
| btrfs | Good | Medium | Very efficient | Requires btrfs |
| zfs | Good | Stable | Very efficient | Enterprise, requires ZFS |
| vfs | Slow | Stable | Poor | Debug only, no CoW |
Storage Driver Selection Guide
Modern Linux (kernel 4.0+) → overlay2
Enterprise features → ZFS
Existing LVM setup → devicemapper (direct-lvm)
btrfs filesystem → btrfs
Legacy system → aufs (migrate to overlay2)
Switching Storage Drivers
Warning: Switching drivers will remove existing containers and images!
Backup:
# Export images
docker save -o images.tar $(docker images -q)
# Commit containers
for c in $(docker ps -aq); do
docker commit $c backup_$c
done
Switch driver:
# Stop Docker
sudo systemctl stop docker
# Backup current data
sudo mv /var/lib/docker /var/lib/docker.bak
# Edit daemon.json
sudo vim /etc/docker/daemon.json
# Start Docker
sudo systemctl start docker
# Import images
docker load -i images.tar
20.3 SELinux and Volume Labeling Practices
SELinux (Security-Enhanced Linux) provides mandatory access control (MAC). It’s enabled by default on Red Hat, CentOS, and Fedora.
SELinux Basics
SELinux modes:
# Current mode
getenforce
Outputs:
Enforcing: SELinux active, policies enforcedPermissive: SELinux logs only (no enforcement)Disabled: SELinux off
Temporarily switch mode:
# Switch to permissive
sudo setenforce 0
# Switch to enforcing
sudo setenforce 1
Permanent change:
# /etc/selinux/config
SELINUX=enforcing # or permissive, disabled
SELinux and Docker
Docker integrates with SELinux. Container processes get the type svirt_lxc_net_t.
Container SELinux context:
# Container process
docker run -d --name web nginx
# SELinux context
ps -eZ | grep nginx
Output:
system_u:system_r:svirt_lxc_net_t:s0:c123,c456 ... nginx
Label structure:
user:role:type:level:category
system_u: SELinux usersystem_r: SELinux rolesvirt_lxc_net_t: SELinux type (for container processes)s0: Sensitivity levelc123,c456: Categories (MCS)
Each container has different categories to isolate containers from one another.
Volume Mounts and SELinux
Volume mount issues are common when SELinux is enabled.
Problem:
docker run -v /host/data:/container/data nginx
Permission denied inside the container:
nginx: [emerg] open() "/container/data/file" failed (13: Permission denied)
Cause:
Host files have labels like default_t or user_home_t. Container processes (svirt_lxc_net_t) cannot access them.
Solution 1: :z label (shared access)
docker run -v /host/data:/container/data:z nginx
:z flags the directory with svirt_sandbox_file_t. Multiple containers can access it.
Check labels:
ls -Z /host/data
Before:
unconfined_u:object_r:user_home_t:s0 /host/data
After:
system_u:object_r:svirt_sandbox_file_t:s0 /host/data
Solution 2: :Z label (private access)
docker run -v /host/data:/container/data:Z nginx
:Z adds a container-specific label. Only this container can access it.
Label:
system_u:object_r:svirt_sandbox_file_t:s0:c123,c456 /host/data
c123,c456 are unique to that container.
Differences:
| Flag | Access | Label | Usage |
|---|---|---|---|
:z |
Shared (multi-container) | Generic svirt_sandbox_file_t |
Config files, shared data |
:Z |
Private (single-container) | Container-specific label | DB data, private files |
Manual Relabeling
Sometimes you must relabel manually.
With chcon:
# Assign label
sudo chcon -t svirt_sandbox_file_t /host/data
# Recursive
sudo chcon -R -t svirt_sandbox_file_t /host/data
With semanage and restorecon (recommended):
# Add policy
sudo semanage fcontext -a -t svirt_sandbox_file_t "/host/data(/.*)?"
# Apply
sudo restorecon -Rv /host/data
This is persistent across reboots.
SELinux Policy Modules
You can create custom policies.
Create a policy:
# Generate from audit logs
sudo audit2allow -a -M mydocker
# Load policy
sudo semodule -i mydocker.pp
Example: Nginx custom port
If Nginx runs on 8080 and SELinux blocks it:
# Add port policy
sudo semanage port -a -t http_port_t -p tcp 8080
# Verify
sudo semanage port -l | grep http_port_t
Docker SELinux Options
Disable SELinux labeling (for a container):
docker run --security-opt label=disable nginx
Warning: Security risk — use only for debugging.
Custom label:
docker run --security-opt label=level:s0:c100,c200 nginx
Troubleshooting
Check SELinux denials:
# Audit log
sudo ausearch -m AVC -ts recent
# More readable
sudo ausearch -m AVC -ts recent | audit2why
Sample denial:
type=AVC msg=audit(1234567890.123:456): avc: denied { read } for
pid=12345 comm="nginx" name="index.html" dev="sda1" ino=67890
scontext=system_u:system_r:svirt_lxc_net_t:s0:c123,c456
tcontext=unconfined_u:object_r:user_home_t:s0
tclass=file permissive=0
Fix:
# Fix file context
sudo chcon -t svirt_sandbox_file_t /path/to/index.html
# Or use :z/:Z
docker run -v /path:/container:z nginx
Best Practices
Volume mounts:
- Use
:zfor read-only/shared data - Use
:Zfor private data (e.g., databases) - Relabel when necessary (
restorecon)
Production:
- Keep SELinux in enforcing mode
- Avoid
label=disable - Review denials regularly
- Document custom policies
Development:
- Use permissive mode temporarily
- Analyze and fix denials
- Test with enforcing before production
Summary
Namespaces:
- Isolation mechanism
- 7 types (PID, NET, MNT, UTS, IPC, USER, CGROUP)
- Each namespace has a unique inode
- Hierarchical (parent → child)
Cgroups:
- Resource limits and accounting
- v1 (separate controllers) vs v2 (unified)
- CPU, memory, blkio, pids limits
- PSI in v2
Storage Drivers:
- overlay2: Modern, fast, recommended
- devicemapper: LVM-based, enterprise
- btrfs/zfs: Advanced features
- Driver choice depends on kernel and use case
SELinux:
- MAC (Mandatory Access Control)
- Container processes use
svirt_lxc_net_t - Use
:z(shared) or:Z(private) for volume mounts - Keep enforcing in production
- Analyze denials with
ausearchandaudit2why
Linux kernel features underpin Docker’s security and isolation mechanisms. Understanding them is critical for solving production issues and building secure systems.
21. Backup / Recovery / Migration Scenarios
Data loss is disastrous in production. Building comprehensive backup and recovery strategies for Docker environments is critical. In this section, we’ll dive into volume backup, image transfer, and disaster recovery.
21.1 Volume Backup, Image Export/Import
Volume Backup Strategies
Docker volumes are stored under /var/lib/docker/volumes/. There are multiple methods to back them up.
Method 1: Backup with tar (Most Common)
Backup:
# Temporary container using the volume
docker run --rm \
-v myvolume:/volume \
-v $(pwd):/backup \
alpine \
tar czf /backup/myvolume-backup-$(date +%Y%m%d-%H%M%S).tar.gz -C /volume .
Explanation:
--rm: Removes the container after completion-v myvolume:/volume: Volume to back up-v $(pwd):/backup: Backup directory on hosttar czf: Archive with compression-C /volume .: Archive volume contents
Restore:
# Create a new volume
docker volume create myvolume-restored
# Restore
docker run --rm \
-v myvolume-restored:/volume \
-v $(pwd):/backup \
alpine \
tar xzf /backup/myvolume-backup-20250930-120000.tar.gz -C /volume
Method 2: Incremental Backup with rsync
Backup:
# Container that mounts the volume
docker run -d \
--name volume-backup-helper \
-v myvolume:/volume \
alpine sleep 3600
# Backup with rsync
docker exec volume-backup-helper \
sh -c "apk add --no-cache rsync && \
rsync -av /volume/ /backup/"
# Cleanup
docker stop volume-backup-helper
docker rm volume-backup-helper
Advantage: Only changed files are copied (incremental).
Method 3: Backup with Volume Plugins
Plugins like REX-Ray, Portworx:
# Create a snapshot
docker volume create --driver rexray/ebs \
--opt snapshot=vol-12345 \
myvolume-snapshot
Method 4: Database-Specific Backup
PostgreSQL example:
# Backup with pg_dump
docker exec postgres \
pg_dump -U postgres -d mydb \
> mydb-backup-$(date +%Y%m%d).sql
# Restore
docker exec -i postgres \
psql -U postgres -d mydb \
< mydb-backup-20250930.sql
MySQL example:
# Backup with mysqldump
docker exec mysql \
mysqldump -u root -ppassword mydb \
> mydb-backup-$(date +%Y%m%d).sql
# Restore
docker exec -i mysql \
mysql -u root -ppassword mydb \
< mydb-backup-20250930.sql
Image Export/Import
There are two methods to transfer Docker images: save/load and export/import.
docker save / docker load
save/load preserves all image layers and metadata.
Save image:
# Single image
docker save -o nginx-backup.tar nginx:latest
# Multiple images
docker save -o images-backup.tar nginx:latest postgres:15 redis:alpine
# Compress with pipe
docker save nginx:latest | gzip > nginx-backup.tar.gz
Load image:
# Load from tar
docker load -i nginx-backup.tar
# From compressed file
gunzip -c nginx-backup.tar.gz | docker load
Output:
Loaded image: nginx:latest
Advantages:
- Preserves all layers
- History is preserved
- Tags are preserved
- Supports multi-arch images
Disadvantages:
- Large file size (all layers)
- Doesn’t require registry, but sharing is harder
docker export / docker import
export/import exports a running container’s filesystem as a flat image.
Export container:
# Export a running container
docker export mycontainer > container-backup.tar
# With compression
docker export mycontainer | gzip > container-backup.tar.gz
Import container:
# Import tar as image
docker import container-backup.tar myapp:restored
# From compressed file
gunzip -c container-backup.tar.gz | docker import - myapp:restored
Differences:
| Feature | save/load | export/import |
|---|---|---|
| Layers | Preserved | Flattened (single layer) |
| History | Preserved | Lost |
| Metadata | Preserved | Lost (CMD, ENTRYPOINT etc.) |
| Size | Larger | Smaller |
| Use case | Image transfer | Container snapshot |
When to use which:
- save/load: Move images to another system, offline deployment
- export/import: Backup current container state
Automated Backup Script
backup.sh:
#!/bin/bash
BACKUP_DIR="/backup"
DATE=$(date +%Y%m%d-%H%M%S)
# Backup volumes
for volume in $(docker volume ls -q); do
echo "Backing up volume: $volume"
docker run --rm \
-v $volume:/volume \
-v $BACKUP_DIR:/backup \
alpine \
tar czf /backup/${volume}-${DATE}.tar.gz -C /volume .
done
# Backup images
echo "Backing up images..."
docker save $(docker images -q) | gzip > $BACKUP_DIR/images-${DATE}.tar.gz
# Clean old backups (older than 30 days)
find $BACKUP_DIR -name "*.tar.gz" -mtime +30 -delete
echo "Backup completed: $DATE"
Run automatically with cron:
# Edit crontab
crontab -e
# Backup every day at 02:00
0 2 * * * /path/to/backup.sh >> /var/log/docker-backup.log 2>&1
Remote Backup (S3, Azure Blob, etc.)
AWS S3 example:
#!/bin/bash
BACKUP_FILE="backup-$(date +%Y%m%d-%H%M%S).tar.gz"
# Backup volume
docker run --rm \
-v myvolume:/volume \
-v $(pwd):/backup \
alpine \
tar czf /backup/$BACKUP_FILE -C /volume .
# Upload to S3
aws s3 cp $BACKUP_FILE s3://my-backup-bucket/docker-backups/
# Remove local file
rm $BACKUP_FILE
echo "Backup uploaded to S3: $BACKUP_FILE"
S3 sync via Docker:
docker run --rm \
-v myvolume:/data \
-e AWS_ACCESS_KEY_ID=... \
-e AWS_SECRET_ACCESS_KEY=... \
amazon/aws-cli \
s3 sync /data s3://my-backup-bucket/myvolume/
21.2 Data Migration: Linux ↔ Windows Practical Challenges
Cross-platform data transfer is challenging due to path differences and filesystem incompatibilities.
Linux → Windows Migration
Issue 1: Path Separators
Linux:
/var/lib/docker/volumes/myvolume/_data
Windows:
C:\ProgramData\Docker\volumes\myvolume\_data
Solution: Use platform-agnostic paths.
# Wrong (Linux-specific)
WORKDIR /app/data
# Correct (works on all platforms)
WORKDIR C:/app/data # On Windows becomes C:\app\data
Issue 2: Line Endings (CRLF vs LF)
Linux: \n (LF)
Windows: \r\n (CRLF)
Script files can break:
# Script created on Linux
#!/bin/bash
echo "Hello"
When run on Windows:
bash: ./script.sh: /bin/bash^M: bad interpreter
Solution:
# Fix with dos2unix
dos2unix script.sh
# Or via git
git config --global core.autocrlf input # Linux
git config --global core.autocrlf true # Windows
In Dockerfile:
# Normalize line endings
RUN apt-get update && apt-get install -y dos2unix
COPY script.sh /app/
RUN dos2unix /app/script.sh
Issue 3: File Permissions
Linux permissions (755, 644, etc.) don’t translate meaningfully on Windows.
Losing permissions during backup:
# Backup on Linux
docker run --rm -v myvolume:/volume -v $(pwd):/backup alpine \
tar czf /backup/myvolume.tar.gz -C /volume .
# Restore on Windows
# Permissions are lost!
Solution:
# Include ACLs on Linux
tar --xattrs --acls -czf backup.tar.gz /volume
# If permissions don’t matter on Windows, ignore
Issue 4: Symbolic Links
Linux symlinks may not work on Windows.
Detect:
# Find symlinks
docker run --rm -v myvolume:/volume alpine find /volume -type l
Solution:
# Dereference symlinks (copy actual files)
tar -czf backup.tar.gz --dereference /volume
Issue 5: Case Sensitivity
Linux is case-sensitive; Windows is case-insensitive.
Problem:
Linux volume:
/data/File.txt
/data/file.txt # Different files
After restore on Windows:
C:\data\File.txt # May overwrite file.txt
Solution: Detect filename collisions in advance.
# Check duplicates
find /volume -type f | tr '[:upper:]' '[:lower:]' | sort | uniq -d
Windows → Linux Migration
Issue 1: Named Pipes
Windows named pipes (\\.\pipe\...) don’t work on Linux.
Solution: Platform-specific configuration.
# docker-compose.yml
services:
app:
volumes:
- type: bind
source: ${DOCKER_HOST:-unix:///var/run/docker.sock}
target: /var/run/docker.sock # Linux
# Windows: \\\\.\\pipe\\docker_engine
Issue 2: Windows-Specific Binaries
.exe files don’t run on Linux.
Solution: Multi-platform build.
FROM --platform=$BUILDPLATFORM builder AS build
ARG TARGETOS
ARG TARGETARCH
RUN GOOS=${TARGETOS} GOARCH=${TARGETARCH} go build -o app
FROM alpine
COPY --from=build /app .
Migration Best Practices
1. Transfer images via a registry:
# Build on Linux
docker build -t username/myapp:latest .
docker push username/myapp:latest
# Pull on Windows
docker pull username/myapp:latest
2. Backup volumes in a platform-agnostic way:
# Pure data (no metadata)
docker run --rm -v myvolume:/volume -v $(pwd):/backup alpine \
sh -c "cd /volume && tar czf /backup/data.tar.gz --no-acls --no-xattrs ."
3. Separate platform-specific files:
project/
├── docker-compose.yml
├── docker-compose.linux.yml
└── docker-compose.windows.yml
# Linux
docker-compose -f docker-compose.yml -f docker-compose.linux.yml up
# Windows
docker-compose -f docker-compose.yml -f docker-compose.windows.yml up
4. Use environment variables:
services:
app:
volumes:
- ${DATA_PATH:-./data}:/app/data
# Linux
export DATA_PATH=/mnt/data
# Windows
set DATA_PATH=C:\data
21.3 Disaster Recovery Checklist
What to Back Up
1. Docker Volumes
# List all volumes
docker volume ls
# Backup each volume
for vol in $(docker volume ls -q); do
docker run --rm -v $vol:/volume -v /backup:/backup alpine \
tar czf /backup/$vol-$(date +%Y%m%d).tar.gz -C /volume .
done
2. Docker Images
# Save used images
docker images --format "{{.Repository}}:{{.Tag}}" > images.txt
# Export images
docker save $(cat images.txt) | gzip > images-backup.tar.gz
3. Docker Compose Files
# Backup all compose files
tar czf compose-backup.tar.gz \
docker-compose.yml \
.env \
config/
4. Docker Network Configurations
# Save networks
docker network ls --format "{{.Name}}\t{{.Driver}}\t{{.Scope}}" > networks.txt
# Export custom networks
for net in $(docker network ls --filter type=custom -q); do
docker network inspect $net > network-$net.json
done
5. Docker Daemon Configuration
# daemon.json
cp /etc/docker/daemon.json daemon.json.backup
# systemd override
cp /etc/systemd/system/docker.service.d/*.conf docker-service-override.backup
6. Container Configuration
# Save running containers
docker ps --format "{{.Names}}\t{{.Image}}\t{{.Command}}" > running-containers.txt
# Inspect data for each container
for container in $(docker ps -q); do
docker inspect $container > container-$(docker ps --format "{{.Names}}" --filter id=$container).json
done
7. Registry Credentials
# Docker config
cp ~/.docker/config.json docker-config.json.backup
Disaster Recovery Plan
Level 1: Single Container Loss
Scenario: A container crashed or was deleted.
Recovery:
# Restart via Compose
docker-compose up -d mycontainer
# Or manually
docker run -d \
--name mycontainer \
-v myvolume:/data \
myimage:latest
Time: 1–5 minutes
Level 2: Volume Loss
Scenario: A volume was deleted or corrupted.
Recovery:
# Create a new volume
docker volume create myvolume-new
# Restore from backup
docker run --rm \
-v myvolume-new:/volume \
-v /backup:/backup \
alpine \
tar xzf /backup/myvolume-20250930.tar.gz -C /volume
# Start container with the new volume
docker run -d -v myvolume-new:/data myimage:latest
Time: 5–30 minutes (depends on volume size)
Level 3: Host Loss
Scenario: Server completely failed; a new server is required.
Recovery steps:
1. New host setup:
# Install Docker
curl -fsSL https://get.docker.com | sh
# Install Docker Compose
sudo curl -L "https://github.com/docker/compose/releases/download/v2.23.0/docker-compose-$(uname -s)-$(uname -m)" -o /usr/local/bin/docker-compose
sudo chmod +x /usr/local/bin/docker-compose
2. Daemon configuration:
# Restore from backup
sudo cp daemon.json.backup /etc/docker/daemon.json
sudo systemctl restart docker
3. Volume restore:
# Create volumes
for vol in $(cat volume-list.txt); do
docker volume create $vol
done
# Restore from backups
for backup in /backup/*.tar.gz; do
vol=$(basename $backup .tar.gz)
docker run --rm \
-v $vol:/volume \
-v /backup:/backup \
alpine \
tar xzf /backup/$backup -C /volume
done
4. Image restore:
# Load images
docker load -i images-backup.tar.gz
# Or pull from registry
while read image; do
docker pull $image
done < images.txt
5. Start containers:
# With Compose
docker-compose up -d
# Or manually
while read line; do
name=$(echo $line | awk '{print $1}')
image=$(echo $line | awk '{print $2}')
docker run -d --name $name $image
done < running-containers.txt
Time: 1–4 hours (depends on system size)
Level 4: Datacenter Loss
Scenario: Entire datacenter is unavailable; recovery in a different location is required.
Requirements:
- Off-site backups (S3, Azure Blob, another datacenter)
- Documented DR procedures
- Tested restore process
Recovery:
# Download from remote backups
aws s3 sync s3://disaster-recovery-bucket/docker-backups/ /recovery/
# Then follow Level 3 recovery steps
# ...
Time: 4–24 hours (depends on network speed)
DR Checklist
Preparation (Peacetime):
- Automated backup scripts in place
- Backups copied to remote location |- [ ] Backup retention policy defined (30 days, 12 months, etc.)
- DR documentation ready
- DR procedure tested (at least every 6 months)
- Monitoring and alerting active
- Secondary contact list up to date
During Disaster:
- Determine severity (Level 1–4)
- Notify stakeholders
- Check last backup date
- Prepare new host/datacenter
- Ensure backups are accessible
During Recovery:
- System restored
- Containers started
- Volumes restored
- Network connectivity tested
- Application health checks pass
- Monitoring re-enabled
- Log aggregation operating
Post-Recovery:
- Post-mortem report written
- Root cause analysis completed
- DR procedure updated
- Missing backups identified
- Improvements planned
Backup Retention Strategy
Daily: Last 7 days
Weekly: Last 4 weeks
Monthly: Last 12 months
Yearly: Last 5 years (for compliance)
Script example:
#!/bin/bash
BACKUP_DIR="/backup"
DATE=$(date +%Y%m%d)
DAY=$(date +%A)
MONTH=$(date +%B)
# Daily backup
docker run --rm -v myvolume:/volume -v $BACKUP_DIR/daily:/backup alpine \
tar czf /backup/$DATE.tar.gz -C /volume .
# Weekly backup (every Sunday)
if [ "$DAY" = "Sunday" ]; then
cp $BACKUP_DIR/daily/$DATE.tar.gz $BACKUP_DIR/weekly/week-$(date +%V).tar.gz
fi
# Monthly backup (first day of month)
if [ $(date +%d) = "01" ]; then
cp $BACKUP_DIR/daily/$DATE.tar.gz $BACKUP_DIR/monthly/$MONTH.tar.gz
fi
# Retention cleanup
find $BACKUP_DIR/daily -mtime +7 -delete
find $BACKUP_DIR/weekly -mtime +28 -delete
find $BACKUP_DIR/monthly -mtime +365 -delete
Testing the DR Plan
Quarterly DR drill:
# 1. Simulated failure
docker stop $(docker ps -q)
docker volume rm myvolume
# 2. Run the restore procedure
# (Follow the DR checklist)
# 3. Verification
curl http://localhost/health
docker ps
docker volume ls
# 4. Metrics
# - Restore time
# - Data loss (if any)
# - Encountered issues
Summary
Backup:
- Backup volumes with tar
- Export images with
docker save - Create automated backup scripts
- Use a remote backup location
- Use native backup tools for databases
Cross-platform:
- Watch out for path separators
- Normalize line endings
- Be aware of permission issues
- Prefer transfer via registry
Disaster Recovery:
- Establish a 4-level DR plan
- Off-site backups are mandatory
- Test the DR procedure
- Define a retention policy
- Perform a post-mortem analysis
A disaster recovery plan is not just taking backups. You must test and document the restore procedure, and ensure the team is familiar with it. “Taking a backup” is easy; “restoring” is hard — test your plan.
22. Performance and Fine-tuning (For Production)
Docker performance in production directly affects your application’s response time and resource usage. In this section, we’ll dive into storage driver optimization, network performance, and system tuning.
22.1 Storage Driver Selection and Effects
Storage Driver Performance Comparison
Different storage drivers can be more suitable for different workloads.
Benchmark setup:
# Install FIO (Flexible I/O Tester)
sudo apt-get install fio
# Test container
docker run -it --rm \
-v testvolume:/data \
ubuntu:22.04 bash
I/O performance tests:
# Sequential read
fio --name=seqread --rw=read --bs=1M --size=1G --numjobs=1 --filename=/data/testfile
# Sequential write
fio --name=seqwrite --rw=write --bs=1M --size=1G --numjobs=1 --filename=/data/testfile
# Random read (IOPS)
fio --name=randread --rw=randread --bs=4k --size=1G --numjobs=4 --filename=/data/testfile
# Random write (IOPS)
fio --name=randwrite --rw=randwrite --bs=4k --size=1G --numjobs=4 --filename=/data/testfile
Sample benchmark results:
| Driver | Sequential Read | Sequential Write | Random Read IOPS | Random Write IOPS |
|---|---|---|---|---|
| overlay2 | 850 MB/s | 750 MB/s | 45K | 38K |
| devicemapper (direct-lvm) | 820 MB/s | 680 MB/s | 42K | 32K |
| btrfs | 780 MB/s | 650 MB/s | 38K | 28K |
| zfs | 800 MB/s | 700 MB/s | 40K | 35K |
| vfs (no CoW) | 900 MB/s | 800 MB/s | 50K | 42K |
Note: Numbers vary by hardware. These examples reflect relative performance on SSDs.
Driver Selection by Workload
1. Web applications (read-heavy):
Recommended: overlay2
Why: Fast read performance, low overhead
2. Databases (write-intensive):
Recommended: devicemapper (direct-lvm) or ZFS
Why: Consistent write performance, snapshot support
3. Build servers (many layers):
Recommended: overlay2 with pruning
Why: Layer cache efficiency
4. Log-heavy applications:
Recommended: Volume mount (bypass storage driver)
Why: Direct disk I/O
Impact of Switching Storage Drivers
Test scenario:
# Build with overlay2
time docker build -t myapp:overlay2 .
# Build with devicemapper
# (after daemon.json change)
time docker build -t myapp:devicemapper .
Typical results:
overlay2: Build time: 45s
devicemapper: Build time: 68s (50% slower)
btrfs: Build time: 72s (60% slower)
Volume vs Storage Driver
Performance comparison:
# Through storage driver (overlay2)
docker run --rm -v /container/path alpine dd if=/dev/zero of=/container/path/test bs=1M count=1000
# Named volume (direct mount)
docker volume create testvol
docker run --rm -v testvol:/data alpine dd if=/dev/zero of=/data/test bs=1M count=1000
# Bind mount
docker run --rm -v /host/path:/data alpine dd if=/dev/zero of=/data/test bs=1M count=1000
Result:
Storage driver: ~600 MB/s
Named volume: ~850 MB/s (≈40% faster)
Bind mount: ~850 MB/s (≈40% faster)
Recommendation: Use volumes for I/O-intensive data such as databases and logs.
22.2 Overlay2 Tuning, Devicemapper Parameters
Overlay2 Optimization
Overlay2 is the default on modern systems, but it can be tuned.
1. Overlay2 with XFS Filesystem
Overlay2 works on ext4 and xfs, but xfs often performs better.
XFS mount options:
# /etc/fstab
/dev/sdb1 /var/lib/docker xfs defaults,pquota 0 0
pquota: Project quotas (required for overlay2 quotas)
Check XFS mount:
mount | grep docker
# /dev/sdb1 on /var/lib/docker type xfs (rw,relatime,attr2,inode64,logbufs=8,logbsize=32k,pquota)
2. Inode Limits
Overlay2 can consume many inodes.
Check inode usage:
df -i /var/lib/docker
Output:
Filesystem Inodes IUsed IFree IUse% Mounted on
/dev/sdb1 512000 450000 62000 88% /var/lib/docker
88% is dangerous!
Solution: Clean old layers:
docker system prune -a
docker builder prune
3. Mount Options
daemon.json optimization:
{
"storage-driver": "overlay2",
"storage-opts": [
"overlay2.override_kernel_check=true",
"overlay2.size=10G"
]
}
overlay2.size: Max per-container disk usage (quota)
4. Layer Limit
Very deep layer stacks (100+) reduce performance.
Check number of layers:
docker history myimage --no-trunc | wc -l
Optimization: Minimize layers with multi-stage builds.
# Bad: Each RUN creates a layer (50+ layers)
FROM ubuntu
RUN apt-get update
RUN apt-get install -y python3
RUN apt-get install -y pip
# ... 47 more lines
# Good: Consolidated layers (5–10 layers)
FROM ubuntu
RUN apt-get update && apt-get install -y \
python3 \
pip \
# ... other packages
&& rm -rf /var/lib/apt/lists/*
5. Disk Space Management
Overlay2 disk usage:
# Driver data usage
docker system df
# Detailed view
docker system df -v
Automatic cleanup:
# Cron job (every day at 02:00)
0 2 * * * /usr/bin/docker system prune -af --volumes --filter "until=72h"
Devicemapper Tuning
If you use devicemapper (older systems, RHEL 7, etc.), tuning is critical.
1. Direct-LVM Setup (Required for Production)
loop-lvm (default) is very slow — do not use it!
Direct-LVM setup:
# LVM packages
sudo yum install -y lvm2 device-mapper-persistent-data
# Create a physical volume
sudo pvcreate /dev/sdb
# Create a volume group
sudo vgcreate docker /dev/sdb
# Create a thin pool (95% of disk)
sudo lvcreate --wipesignatures y -n thinpool docker -l 95%VG
sudo lvcreate --wipesignatures y -n thinpoolmeta docker -l 1%VG
# Convert to thin pool
sudo lvconvert -y --zero n -c 512K --thinpool docker/thinpool --poolmetadata docker/thinpoolmeta
# Auto-extend profile
sudo vim /etc/lvm/profile/docker-thinpool.profile
docker-thinpool.profile:
activation {
thin_pool_autoextend_threshold=80
thin_pool_autoextend_percent=20
}
Apply profile:
sudo lvchange --metadataprofile docker-thinpool docker/thinpool
2. Devicemapper Daemon Config
/etc/docker/daemon.json:
{
"storage-driver": "devicemapper",
"storage-opts": [
"dm.thinpooldev=/dev/mapper/docker-thinpool",
"dm.use_deferred_removal=true",
"dm.use_deferred_deletion=true",
"dm.fs=ext4",
"dm.basesize=20G"
]
}
Parameters:
dm.thinpooldev: Thin pool device pathdm.use_deferred_removal: Lazy device removal (performance)dm.use_deferred_deletion: Background deletiondm.fs: Filesystem type (ext4 or xfs)dm.basesize: Max disk size per container
3. Monitoring
Thin pool usage:
# LVM status
sudo lvs -o+seg_monitor
# Docker devicemapper info
docker info | grep -A 20 "Storage Driver"
Output:
Storage Driver: devicemapper
Pool Name: docker-thinpool
Pool Blocksize: 524.3 kB
Base Device Size: 21.47 GB
Data file: /dev/mapper/docker-thinpool
Metadata file: /dev/mapper/docker-thinpool_tmeta
Data Space Used: 15.2 GB
Data Space Total: 95.4 GB
Data Space Available: 80.2 GB
Metadata Space Used: 18.4 MB
Metadata Space Total: 1.01 GB
Metadata Space Available: 991.6 MB
Critical metrics:
- Data Space > 80% → Expand disk
- Metadata Space > 80% → Expand metadata
4. Performance Tuning
Block size optimization:
{
"storage-opts": [
"dm.blocksize=512K",
"dm.loopdatasize=200G",
"dm.loopmetadatasize=4G"
]
}
I/O Scheduler:
# Deadline scheduler (for SSD)
echo deadline > /sys/block/sdb/queue/scheduler
# /etc/udev/rules.d/60-scheduler.rules
ACTION=="add|change", KERNEL=="sd[a-z]", ATTR{queue/scheduler}="deadline"
22.3 Network Performance, User Space Proxy Effects
Docker Network Performance
By default, Docker networking uses bridge mode, which works with a userspace proxy and introduces overhead.
1. Userland Proxy vs Hairpin NAT
Userland proxy (default):
External Request → docker-proxy (userspace) → container
Hairpin NAT (iptables):
External Request → iptables (kernel) → container
Performance difference:
Userland proxy: ~15–20% overhead
Hairpin NAT: ~2–5% overhead
Enable hairpin NAT:
{
"userland-proxy": false
}
Restart required:
sudo systemctl restart docker
Test:
# Run a container
docker run -d -p 8080:80 nginx
# Check with netstat
sudo netstat -tlnp | grep 8080
If userland proxy is active:
tcp 0 0 0.0.0.0:8080 0.0.0.0:* LISTEN 12345/docker-proxy
If hairpin NAT is active:
# No docker-proxy; only iptables rules
sudo iptables -t nat -L -n | grep 8080
2. Host Network Mode
Use host network for maximum performance.
Bridge vs Host performance:
# Bridge mode
docker run -d --name web-bridge -p 8080:80 nginx
# Host mode
docker run -d --name web-host --network host nginx
Benchmark (wrk):
# Bridge mode
wrk -t4 -c100 -d30s http://localhost:8080
# Requests/sec: 35,000
# Host mode
wrk -t4 -c100 -d30s http://localhost:80
# Requests/sec: 52,000 (≈48% faster)
Trade-off: Host mode risks port conflicts and lacks isolation.
3. macvlan Network
Assigning containers an IP from the physical network yields high performance.
Create macvlan:
docker network create -d macvlan \
--subnet=192.168.1.0/24 \
--gateway=192.168.1.1 \
-o parent=eth0 \
macvlan-net
Start a container:
docker run -d \
--network macvlan-net \
--ip 192.168.1.100 \
nginx
Performance: 20–30% faster than bridge.
4. Container-to-Container Communication
Between containers on the same host:
# Custom network (DNS enabled)
docker network create mynet
docker run -d --name web --network mynet nginx
docker run -d --name api --network mynet myapi
# From 'web' container to 'api'
docker exec web curl http://api:8080
Performance: Embedded DNS resolution adds ~0.1 ms overhead.
Alternative: mount /etc/hosts (faster but static):
docker run -d --add-host api:172.17.0.3 nginx
5. MTU (Maximum Transmission Unit) Tuning
MTU mismatches cause fragmentation and reduce performance.
Check MTU:
# Host MTU
ip link show eth0 | grep mtu
# Docker bridge MTU
ip link show docker0 | grep mtu
# Container MTU
docker exec mycontainer ip link show eth0 | grep mtu
If different, set in daemon.json:
{
"mtu": 1500
}
If using jumbo frames:
{
"mtu": 9000
}
6. Network Benchmark
Bandwidth test with iperf3:
Server container:
docker run -d --name iperf-server -p 5201:5201 networkstatic/iperf3 -s
Client container (same host):
docker run --rm networkstatic/iperf3 -c iperf-server
Output:
[ ID] Interval Transfer Bitrate
[ 5] 0.00-10.00 sec 10.2 GBytes 8.76 Gbits/sec
Cross-host test (overlay network):
# Host 1
docker run -d --name iperf-server --network overlay-net -p 5201:5201 networkstatic/iperf3 -s
# Host 2
docker run --rm --network overlay-net networkstatic/iperf3 -c iperf-server
Typical results:
- Same host, host network: ~40 Gbps
- Same host, bridge: ~20 Gbps
- Cross-host, overlay (no encryption): ~9 Gbps
- Cross-host, overlay (encrypted): ~2 Gbps
7. Overlay Network Encryption Overhead
Encryption is optional on Docker Swarm overlay networks.
Encrypted overlay:
docker network create --driver overlay --opt encrypted mynet
Performance impact: ~70–80% throughput reduction (encryption overhead)
Recommendation: If your network is already secure, disable encryption.
8. Connection Tracking (conntrack) Limits
In high-traffic systems the conntrack table may fill up.
Current limit:
sysctl net.netfilter.nf_conntrack_max
Usage:
cat /proc/sys/net/netfilter/nf_conntrack_count
Increase limits:
# /etc/sysctl.conf
net.netfilter.nf_conntrack_max = 262144
net.netfilter.nf_conntrack_tcp_timeout_established = 1200
# Apply
sudo sysctl -p
9. TCP Tuning
Kernel TCP parameters affect Docker performance.
Optimal settings:
# /etc/sysctl.conf
# Increase TCP buffers
net.core.rmem_max = 134217728
net.core.wmem_max = 134217728
net.ipv4.tcp_rmem = 4096 87380 67108864
net.ipv4.tcp_wmem = 4096 65536 67108864
# TCP window scaling
net.ipv4.tcp_window_scaling = 1
# TCP timestamp
net.ipv4.tcp_timestamps = 1
# TCP congestion control (BBR)
net.core.default_qdisc = fq
net.ipv4.tcp_congestion_control = bbr
# Connection backlog
net.core.somaxconn = 4096
net.ipv4.tcp_max_syn_backlog = 8192
# TIME_WAIT socket reuse
net.ipv4.tcp_tw_reuse = 1
sudo sysctl -p
BBR congestion control (Google):
BBR can deliver 10–20% throughput gains in high-latency networks.
10. Load Balancer Optimization
If you use Nginx/HAProxy as a load balancer in production:
Nginx upstream keepalive:
upstream backend {
server container1:8080;
server container2:8080;
server container3:8080;
keepalive 32; # Connection pool
}
server {
location / {
proxy_pass http://backend;
proxy_http_version 1.1;
proxy_set_header Connection "";
}
}
Performance impact: 30–40% lower latency via connection reuse.
Monitoring and Profiling
Network monitoring:
# Container network stats
docker stats --format "table {{.Name}}\t{{.NetIO}}"
# iftop (realtime bandwidth)
sudo docker run -it --rm --net=host \
williamyeh/iftop -i docker0
# tcpdump (packet capture)
sudo tcpdump -i docker0 -w capture.pcap
Analysis:
# Analyze with Wireshark
wireshark capture.pcap
# Retransmission rate
tshark -r capture.pcap -q -z io,stat,1,"AVG(tcp.analysis.retransmission)COUNT(tcp.analysis.retransmission)"
Summary and Best Practices
Storage:
- Use overlay2 on modern systems
- Prefer XFS filesystem
- Use volumes for I/O-intensive workloads
- Run
docker system pruneregularly - Minimize layers (multi-stage builds)
- If using devicemapper, use direct-LVM
Network:
- Set
userland-proxy: falsein production - Consider host network for high throughput
- Use custom networks (DNS) for container-to-container
- Match MTU with host network
- Use overlay encryption only if needed
- Apply TCP tuning (BBR, buffers)
- Increase conntrack limits
Monitoring:
- Monitor resource usage with
docker stats - Set up cAdvisor + Prometheus + Grafana
- Measure network latency regularly
- Track I/O wait (
iostat) - Identify bottlenecks via profiling
Testing:
- Benchmark (fio, iperf3, wrk)
- Load testing (k6, Locust, JMeter)
- Chaos engineering (pumba, toxiproxy)
- Production-like test environments
Performance tuning follows a measure → analyze → optimize loop. Always test changes before production and validate with metrics. Premature optimization is dangerous — measure bottlenecks first, then optimize.
23. Example Projects / Case Studies (Step by Step)
In this section, we’ll turn theory into practice and examine real-world Docker usage step by step. Each project is explained end-to-end with all details.
23.1 Containerizing a Simple Node.js App (Linux Example) — Full Setup
Project Structure
We will create a simple Express.js REST API.
Directory layout:
nodejs-app/
├── package.json
├── package-lock.json
├── server.js
├── .dockerignore
├── Dockerfile
├── docker-compose.yml
└── README.md
Step 1: Create the Node.js Application
package.json:
{
"name": "nodejs-docker-app",
"version": "1.0.0",
"description": "Simple Node.js app for Docker tutorial",
"main": "server.js",
"scripts": {
"start": "node server.js",
"dev": "nodemon server.js"
},
"dependencies": {
"express": "^4.18.2"
},
"devDependencies": {
"nodemon": "^3.0.1"
}
}
server.js:
const express = require('express');
const app = express();
const PORT = process.env.PORT || 3000;
app.use(express.json());
// Health check endpoint
app.get('/health', (req, res) => {
res.status(200).json({
status: 'healthy',
timestamp: new Date().toISOString(),
uptime: process.uptime()
});
});
// Main endpoint
app.get('/', (req, res) => {
res.json({
message: 'Hello from Docker!',
environment: process.env.NODE_ENV || 'development',
version: process.env.APP_VERSION || '1.0.0'
});
});
// Sample data endpoint
app.get('/api/users', (req, res) => {
const users = [
{ id: 1, name: 'Alice', email: 'alice@example.com' },
{ id: 2, name: 'Bob', email: 'bob@example.com' }
];
res.json(users);
});
// Error handling
app.use((err, req, res, next) => {
console.error(err.stack);
res.status(500).json({ error: 'Something went wrong!' });
});
app.listen(PORT, '0.0.0.0', () => {
console.log(`Server running on port ${PORT}`);
console.log(`Environment: ${process.env.NODE_ENV || 'development'}`);
});
Step 2: Create .dockerignore
.dockerignore:
node_modules
npm-debug.log
.git
.gitignore
README.md
.env
.DS_Store
Step 3: Create Dockerfile
Dockerfile (Production-ready):
# syntax=docker/dockerfile:1.4
# Build stage
FROM node:18-alpine AS builder
WORKDIR /app
# Copy dependency files
COPY package*.json ./
# Install dependencies
RUN npm ci --only=production
# Production stage
FROM node:18-alpine
# Add metadata
LABEL maintainer="your-email@example.com"
LABEL version="1.0.0"
LABEL description="Node.js Express API"
WORKDIR /app
# Copy dependencies from builder
COPY --from=builder /app/node_modules ./node_modules
# Copy application code
COPY . .
# Create non-root user
RUN addgroup -g 1001 -S nodejs && \
adduser -S nodejs -u 1001 && \
chown -R nodejs:nodejs /app
USER nodejs
# Expose port
EXPOSE 3000
# Health check
HEALTHCHECK --interval=30s --timeout=3s --start-period=5s --retries=3 \
CMD node -e "require('http').get('http://localhost:3000/health', (r) => {process.exit(r.statusCode === 200 ? 0 : 1)})"
# Start application
CMD ["node", "server.js"]
Step 4: Build the Image
# Build
docker build -t nodejs-app:1.0.0 .
# Build with BuildKit cache
DOCKER_BUILDKIT=1 docker build \
--cache-from nodejs-app:cache \
-t nodejs-app:1.0.0 \
-t nodejs-app:latest \
.
# Check image size
docker images nodejs-app
Output:
REPOSITORY TAG SIZE
nodejs-app 1.0.0 125MB
nodejs-app latest 125MB
Step 5: Run the Container
Simple run:
docker run -d \
--name nodejs-app \
-p 3000:3000 \
-e NODE_ENV=production \
-e APP_VERSION=1.0.0 \
--restart unless-stopped \
nodejs-app:1.0.0
Test:
# Health check
curl http://localhost:3000/health
# Main endpoint
curl http://localhost:3000/
# API endpoint
curl http://localhost:3000/api/users
Step 6: Orchestration with Docker Compose
docker-compose.yml (Development):
version: "3.9"
services:
app:
build:
context: .
dockerfile: Dockerfile
container_name: nodejs-app-dev
ports:
- "3000:3000"
volumes:
- ./:/app
- /app/node_modules
environment:
- NODE_ENV=development
- PORT=3000
command: npm run dev
restart: unless-stopped
networks:
- app-network
networks:
app-network:
driver: bridge
docker-compose.prod.yml (Production):
version: "3.9"
services:
app:
image: nodejs-app:1.0.0
container_name: nodejs-app-prod
ports:
- "3000:3000"
environment:
- NODE_ENV=production
- APP_VERSION=1.0.0
deploy:
resources:
limits:
cpus: '1.0'
memory: 512M
reservations:
cpus: '0.5'
memory: 256M
restart_policy:
condition: on-failure
max_attempts: 3
healthcheck:
test: ["CMD", "node", "-e", "require('http').get('http://localhost:3000/health', (r) => {process.exit(r.statusCode === 200 ? 0 : 1)})"]
interval: 30s
timeout: 3s
retries: 3
networks:
- app-network
logging:
driver: "json-file"
options:
max-size: "10m"
max-file: "3"
networks:
app-network:
driver: bridge
Run:
# Development
docker-compose up -d
# Production
docker-compose -f docker-compose.prod.yml up -d
# Logs
docker-compose logs -f app
# Stop
docker-compose down
Step 7: Monitoring and Debugging
Logs:
# Container logs
docker logs -f nodejs-app
# Last 100 lines
docker logs --tail 100 nodejs-app
# With timestamps
docker logs -t nodejs-app
Enter the container:
docker exec -it nodejs-app sh
# Inside
ps aux
netstat -tlnp
env
Resource usage:
docker stats nodejs-app
Step 8: Production Optimization
Smaller image with multi-stage build:
FROM node:18-alpine AS builder
WORKDIR /app
COPY package*.json ./
RUN npm ci --only=production && npm cache clean --force
FROM node:18-alpine
WORKDIR /app
COPY --from=builder /app/node_modules ./node_modules
COPY . .
RUN addgroup -g 1001 nodejs && adduser -S -u 1001 -G nodejs nodejs
USER nodejs
EXPOSE 3000
CMD ["node", "server.js"]
Result: ~125MB → ~70MB (45% smaller)
23.2 Migrating a .NET Core App to Windows Containers — Full Walkthrough
Project Structure
We will create an ASP.NET Core Web API project.
dotnet-app/
├── DotnetApp/
│ ├── Controllers/
│ │ └── WeatherForecastController.cs
│ ├── Program.cs
│ ├── DotnetApp.csproj
│ └── appsettings.json
├── Dockerfile
├── .dockerignore
└── docker-compose.yml
Step 1: Create the .NET Core Project
# .NET SDK must be installed
dotnet --version
# New Web API project
dotnet new webapi -n DotnetApp
cd DotnetApp
# Test
dotnet run
Program.cs:
var builder = WebApplication.CreateBuilder(args);
builder.Services.AddControllers();
builder.Services.AddEndpointsApiExplorer();
builder.Services.AddSwaggerGen();
// Health checks
builder.Services.AddHealthChecks();
var app = builder.Build();
if (app.Environment.IsDevelopment())
{
app.UseSwagger();
app.UseSwaggerUI();
}
app.UseHttpsRedirection();
app.UseAuthorization();
app.MapControllers();
// Health check endpoint
app.MapHealthChecks("/health");
app.Run();
WeatherForecastController.cs:
using Microsoft.AspNetCore.Mvc;
namespace DotnetApp.Controllers;
[ApiController]
[Route("[controller]")]
public class WeatherForecastController : ControllerBase
{
private static readonly string[] Summaries = new[]
{
"Freezing", "Bracing", "Chilly", "Cool", "Mild",
"Warm", "Balmy", "Hot", "Sweltering", "Scorching"
};
private readonly ILogger<WeatherForecastController> _logger;
public WeatherForecastController(ILogger<WeatherForecastController> logger)
{
_logger = logger;
}
[HttpGet(Name = "GetWeatherForecast")]
public IEnumerable<WeatherForecast> Get()
{
_logger.LogInformation("WeatherForecast endpoint called");
return Enumerable.Range(1, 5).Select(index => new WeatherForecast
{
Date = DateOnly.FromDateTime(DateTime.Now.AddDays(index)),
TemperatureC = Random.Shared.Next(-20, 55),
Summary = Summaries[Random.Shared.Next(Summaries.Length)]
})
.ToArray();
}
}
public class WeatherForecast
{
public DateOnly Date { get; set; }
public int TemperatureC { get; set; }
public int TemperatureF => 32 + (int)(TemperatureC / 0.5556);
public string? Summary { get; set; }
}
Step 2: Create .dockerignore
.dockerignore:
bin/
obj/
*.user
*.suo
.vs/
.vscode/
*.log
Step 3: Windows Container Dockerfile
Dockerfile:
# Build stage
FROM mcr.microsoft.com/dotnet/sdk:8.0-nanoserver-ltsc2022 AS build
WORKDIR /src
# Copy csproj and restore
COPY ["DotnetApp/DotnetApp.csproj", "DotnetApp/"]
RUN dotnet restore "DotnetApp/DotnetApp.csproj"
# Copy everything else and build
COPY . .
WORKDIR "/src/DotnetApp"
RUN dotnet build "DotnetApp.csproj" -c Release -o /app/build
# Publish stage
FROM build AS publish
RUN dotnet publish "DotnetApp.csproj" -c Release -o /app/publish /p:UseAppHost=false
# Runtime stage
FROM mcr.microsoft.com/dotnet/aspnet:8.0-nanoserver-ltsc2022
WORKDIR /app
# Copy published app
COPY --from=publish /app/publish .
# Expose port
EXPOSE 8080
# Health check
HEALTHCHECK --interval=30s --timeout=3s --start-period=5s --retries=3 \
CMD powershell -command "try { \
$response = Invoke-WebRequest -Uri http://localhost:8080/health -UseBasicParsing; \
if ($response.StatusCode -eq 200) { exit 0 } else { exit 1 } \
} catch { exit 1 }"
# Entry point
ENTRYPOINT ["dotnet", "DotnetApp.dll"]
Step 4: Build and Run
Build:
# Requires Windows Server 2022 host
docker build -t dotnet-app:1.0.0 .
# Image size
docker images dotnet-app
Run:
docker run -d `
--name dotnet-app `
-p 8080:8080 `
-e ASPNETCORE_ENVIRONMENT=Production `
-e ASPNETCORE_URLS=http://+:8080 `
--restart unless-stopped `
dotnet-app:1.0.0
Test:
# Health check
Invoke-WebRequest -Uri http://localhost:8080/health
# API endpoint
Invoke-WebRequest -Uri http://localhost:8080/WeatherForecast | Select-Object -Expand Content
Step 5: Docker Compose (Windows)
docker-compose.yml:
version: "3.9"
services:
dotnet-app:
build:
context: .
dockerfile: Dockerfile
container_name: dotnet-app
ports:
- "8080:8080"
environment:
- ASPNETCORE_ENVIRONMENT=Production
- ASPNETCORE_URLS=http://+:8080
networks:
- app-network
restart: unless-stopped
networks:
app-network:
driver: nat
Run:
docker-compose up -d
docker-compose logs -f
docker-compose ps
docker-compose down
Step 6: SQL Server Integration
docker-compose-full.yml:
version: "3.9"
services:
sqlserver:
image: mcr.microsoft.com/mssql/server:2022-latest
container_name: sqlserver
environment:
- ACCEPT_EULA=Y
- SA_PASSWORD=YourStrong@Password123
- MSSQL_PID=Developer
ports:
- "1433:1433"
volumes:
- sqldata:/var/opt/mssql
networks:
- app-network
dotnet-app:
build: .
container_name: dotnet-app
depends_on:
- sqlserver
ports:
- "8080:8080"
environment:
- ASPNETCORE_ENVIRONMENT=Production
- ConnectionStrings__DefaultConnection=Server=sqlserver;Database=AppDb;User Id=sa;Password=YourStrong@Password123;TrustServerCertificate=True
networks:
- app-network
volumes:
sqldata:
networks:
app-network:
driver: nat
Step 7: Troubleshooting
Common issues:
1. “Container operating system does not match”
# Use Hyper-V isolation
docker run --isolation=hyperv dotnet-app:1.0.0
2. Port binding error
# Check reserved ports
netsh interface ipv4 show excludedportrange protocol=tcp
# Use a different port
docker run -p 8081:8080 dotnet-app:1.0.0
3. Volume mount issue
# Use absolute paths
docker run -v "C:\data":"C:\app\data" dotnet-app:1.0.0
23.3 PostgreSQL + Web App with Compose (Prod vs Dev Differences)
Project Structure
fullstack-app/
├── backend/
│ ├── src/
│ ├── package.json
│ └── Dockerfile
├── frontend/
│ ├── src/
│ ├── package.json
│ └── Dockerfile
├── docker-compose.yml
├── docker-compose.dev.yml
├── docker-compose.prod.yml
├── .env.example
└── init-db.sql
Backend (Node.js + Express + PostgreSQL)
backend/package.json:
{
"name": "backend",
"version": "1.0.0",
"scripts": {
"start": "node src/server.js",
"dev": "nodemon src/server.js"
},
"dependencies": {
"express": "^4.18.2",
"pg": "^8.11.3",
"cors": "^2.8.5",
"dotenv": "^16.3.1"
},
"devDependencies": {
"nodemon": "^3.0.1"
}
}
backend/src/server.js:
const express = require('express');
const { Pool } = require('pg');
const cors = require('cors');
require('dotenv').config();
const app = express();
const PORT = process.env.PORT || 5000;
// Database connection
const pool = new Pool({
host: process.env.DB_HOST || 'postgres',
port: process.env.DB_PORT || 5432,
database: process.env.DB_NAME || 'appdb',
user: process.env.DB_USER || 'postgres',
password: process.env.DB_PASSWORD || 'postgres'
});
app.use(cors());
app.use(express.json());
// Health check
app.get('/health', async (req, res) => {
try {
await pool.query('SELECT 1');
res.json({ status: 'healthy', database: 'connected' });
} catch (err) {
res.status(500).json({ status: 'unhealthy', error: err.message });
}
});
// Get all users
app.get('/api/users', async (req, res) => {
try {
const result = await pool.query('SELECT * FROM users ORDER BY id');
res.json(result.rows);
} catch (err) {
res.status(500).json({ error: err.message });
}
});
// Create user
app.post('/api/users', async (req, res) => {
const { name, email } = req.body;
try {
const result = await pool.query(
'INSERT INTO users (name, email) VALUES ($1, $2) RETURNING *',
[name, email]
);
res.status(201).json(result.rows[0]);
} catch (err) {
res.status(500).json({ error: err.message });
}
});
app.listen(PORT, '0.0.0.0', () => {
console.log(`Backend running on port ${PORT}`);
});
backend/Dockerfile:
FROM node:18-alpine
WORKDIR /app
COPY package*.json ./
RUN npm ci --only=production
COPY src/ ./src/
RUN addgroup -g 1001 nodejs && \
adduser -S nodejs -u 1001 && \
chown -R nodejs:nodejs /app
USER nodejs
EXPOSE 5000
CMD ["node", "src/server.js"]
Frontend (React)
frontend/Dockerfile:
# Build stage
FROM node:18-alpine AS build
WORKDIR /app
COPY package*.json ./
RUN npm ci
COPY . .
RUN npm run build
# Production stage
FROM nginx:alpine
COPY --from=build /app/build /usr/share/nginx/html
COPY nginx.conf /etc/nginx/conf.d/default.conf
EXPOSE 80
CMD ["nginx", "-g", "daemon off;"]
frontend/nginx.conf:
server {
listen 80;
server_name localhost;
root /usr/share/nginx/html;
index index.html;
location / {
try_files $uri $uri/ /index.html;
}
location /api {
proxy_pass http://backend:5000;
proxy_http_version 1.1;
proxy_set_header Upgrade $http_upgrade;
proxy_set_header Connection 'upgrade';
proxy_set_header Host $host;
proxy_cache_bypass $http_upgrade;
}
}
Database Init Script
init-db.sql:
CREATE TABLE IF NOT EXISTS users (
id SERIAL PRIMARY KEY,
name VARCHAR(100) NOT NULL,
email VARCHAR(100) UNIQUE NOT NULL,
created_at TIMESTAMP DEFAULT CURRENT_TIMESTAMP
);
INSERT INTO users (name, email) VALUES
('Alice', 'alice@example.com'),
('Bob', 'bob@example.com'),
('Charlie', 'charlie@example.com');
Docker Compose — Development
docker-compose.dev.yml:
version: "3.9"
services:
postgres:
image: postgres:15-alpine
container_name: postgres-dev
environment:
POSTGRES_DB: appdb
POSTGRES_USER: postgres
POSTGRES_PASSWORD: postgres
ports:
- "5432:5432"
volumes:
- postgres-dev-data:/var/lib/postgresql/data
- ./init-db.sql:/docker-entrypoint-initdb.d/init.sql
networks:
- dev-network
healthcheck:
test: ["CMD-SHELL", "pg_isready -U postgres"]
interval: 10s
timeout: 5s
retries: 5
backend:
build:
context: ./backend
dockerfile: Dockerfile
container_name: backend-dev
command: npm run dev
ports:
- "5000:5000"
volumes:
- ./backend/src:/app/src
- /app/node_modules
environment:
- NODE_ENV=development
- DB_HOST=postgres
- DB_PORT=5432
- DB_NAME=appdb
- DB_USER=postgres
- DB_PASSWORD=postgres
depends_on:
postgres:
condition: service_healthy
networks:
- dev-network
frontend:
build:
context: ./frontend
dockerfile: Dockerfile
container_name: frontend-dev
ports:
- "3000:80"
volumes:
- ./frontend/src:/app/src
depends_on:
- backend
networks:
- dev-network
volumes:
postgres-dev-data:
networks:
dev-network:
driver: bridge
Docker Compose — Production
docker-compose.prod.yml:
version: "3.9"
services:
postgres:
image: postgres:15-alpine
container_name: postgres-prod
environment:
POSTGRES_DB: ${DB_NAME}
POSTGRES_USER: ${DB_USER}
POSTGRES_PASSWORD_FILE: /run/secrets/db_password
volumes:
- postgres-prod-data:/var/lib/postgresql/data
- ./init-db.sql:/docker-entrypoint-initdb.d/init.sql
secrets:
- db_password
networks:
- prod-network
deploy:
resources:
limits:
cpus: '2.0'
memory: 2G
reservations:
cpus: '1.0'
memory: 1G
restart_policy:
condition: on-failure
max_attempts: 3
healthcheck:
test: ["CMD-SHELL", "pg_isready -U ${DB_USER}"]
interval: 30s
timeout: 5s
retries: 3
logging:
driver: "json-file"
options:
max-size: "10m"
max-file: "3"
backend:
image: ${REGISTRY}/backend:${VERSION}
container_name: backend-prod
environment:
- NODE_ENV=production
- DB_HOST=postgres
- DB_PORT=5432
- DB_NAME=${DB_NAME}
- DB_USER=${DB_USER}
- DB_PASSWORD_FILE=/run/secrets/db_password
secrets:
- db_password
depends_on:
postgres:
condition: service_healthy
networks:
- prod-network
deploy:
replicas: 3
resources:
limits:
cpus: '1.0'
memory: 512M
restart_policy:
condition: on-failure
healthcheck:
test: ["CMD", "node", "-e", "require('http').get('http://localhost:5000/health')"]
interval: 30s
timeout: 3s
retries: 3
frontend:
image: ${REGISTRY}/frontend:${VERSION}
container_name: frontend-prod
ports:
- "80:80"
- "443:443"
volumes:
- ./ssl:/etc/nginx/ssl:ro
depends_on:
- backend
networks:
- prod-network
deploy:
resources:
limits:
cpus: '0.5'
memory: 256M
restart_policy:
condition: on-failure
secrets:
db_password:
external: true
volumes:
postgres-prod-data:
networks:
prod-network:
driver: bridge
Environment Variables
.env.example:
# Database
DB_NAME=appdb
DB_USER=postgres
DB_PASSWORD=changeme
# Application
NODE_ENV=production
VERSION=1.0.0
REGISTRY=registry.example.com
Dev vs Prod Differences Summary
| Feature | Development | Production |
|---|---|---|
| Volumes | Source code mount | Data volumes only |
| Ports | All services exposed | Only frontend exposed |
| Secrets | Plain environment vars | Docker secrets |
| Resources | No limits | CPU/Memory limits |
| Replicas | 1 | 3+ (load balancing) |
| Healthchecks | Basic or none | Detailed and frequent |
| Logging | stdout | json-file with rotation |
| Image | Local build | Pulled from registry |
| Restart | unless-stopped | on-failure with retry |
Run
Development:
docker-compose -f docker-compose.dev.yml up -d
docker-compose -f docker-compose.dev.yml logs -f
Production:
# Create secret
echo "SuperSecretPassword123" | docker secret create db_password -
# Environment variables
export DB_NAME=appdb
export DB_USER=postgres
export VERSION=1.0.0
export REGISTRY=myregistry.azurecr.io
# Deploy
docker-compose -f docker-compose.prod.yml up -d
23.4 CI/CD Pipeline Example — Push & Deploy with GitHub Actions
Project Structure
app/
├── .github/
│ └── workflows/
│ ├── ci.yml
│ └── cd.yml
├── src/
├── Dockerfile
├── docker-compose.yml
└── deployment/
└── docker-compose.prod.yml
GitHub Actions CI Pipeline
.github/workflows/ci.yml:
name: CI Pipeline
on:
push:
branches: [main, develop]
pull_request:
branches: [main]
env:
REGISTRY: ghcr.io
IMAGE_NAME: ${{ github.repository }}
jobs:
test:
runs-on: ubuntu-latest
steps:
- name: Checkout code
uses: actions/checkout@v4
- name: Setup Node.js
uses: actions/setup-node@v4
with:
node-version: '18'
cache: 'npm'
- name: Install dependencies
run: npm ci
- name: Run linter
run: npm run lint
- name: Run tests
run: npm test
- name: Upload coverage
uses: codecov/codecov-action@v3
with:
files: ./coverage/lcov.info
build:
needs: test
runs-on: ubuntu-latest
permissions:
contents: read
packages: write
steps:
- name: Checkout code
uses: actions/checkout@v4
- name: Set up Docker Buildx
uses: docker/setup-buildx-action@v3
- name: Log in to GitHub Container Registry
uses: docker/login-action@v3
with:
registry: ${{ env.REGISTRY }}
username: ${{ github.actor }}
password: ${{ secrets.GITHUB_TOKEN }}
- name: Extract metadata
id: meta
uses: docker/metadata-action@v5
with:
images: ${{ env.REGISTRY }}/${{ env.IMAGE_NAME }}
tags: |
type=ref,event=branch
type=ref,event=pr
type=semver,pattern={{version}}
type=sha,prefix={{branch}}-
- name: Build and push Docker image
uses: docker/build-push-action@v5
with:
context: .
push: true
tags: ${{ steps.meta.outputs.tags }}
labels: ${{ steps.meta.outputs.labels }}
cache-from: type=gha
cache-to: type=gha,mode=max
- name: Run Trivy security scan
uses: aquasecurity/trivy-action@master
with:
image-ref: ${{ env.REGISTRY }}/${{ env.IMAGE_NAME }}:${{ github.sha }}
format: 'sarif'
output: 'trivy-results.sarif'
- name: Upload Trivy results to GitHub Security
uses: github/codeql-action/upload-sarif@v2
if: always()
with:
sarif_file: 'trivy-results.sarif'
GitHub Actions CD Pipeline
.github/workflows/cd.yml:
name: CD Pipeline
on:
push:
tags:
- 'v*'
env:
REGISTRY: ghcr.io
IMAGE_NAME: ${{ github.repository }}
DEPLOY_HOST: ${{ secrets.DEPLOY_HOST }}
DEPLOY_USER: ${{ secrets.DEPLOY_USER }}
jobs:
deploy-staging:
runs-on: ubuntu-latest
environment: staging
steps:
- name: Checkout code
uses: actions/checkout@v4
- name: Extract version
id: version
run: echo "VERSION=${GITHUB_REF#refs/tags/v}" >> $GITHUB_OUTPUT
- name: Deploy to staging
uses: appleboy/ssh-action@v1.0.0
with:
host: ${{ secrets.STAGING_HOST }}
username: ${{ secrets.DEPLOY_USER }}
key: ${{ secrets.SSH_PRIVATE_KEY }}
script: |
cd /opt/app
export VERSION=${{ steps.version.outputs.VERSION }}
export REGISTRY=${{ env.REGISTRY }}
export IMAGE_NAME=${{ env.IMAGE_NAME }}
# Pull latest images
echo ${{ secrets.GITHUB_TOKEN }} | docker login ghcr.io -u ${{ github.actor }} --password-stdin
docker-compose -f docker-compose.staging.yml pull
# Deploy with zero-downtime
docker-compose -f docker-compose.staging.yml up -d
# Health check
sleep 10
curl -f http://localhost/health || exit 1
deploy-production:
needs: deploy-staging
runs-on: ubuntu-latest
environment: production
steps:
- name: Checkout code
uses: actions/checkout@v4
- name: Extract version
id: version
run: echo "VERSION=${GITHUB_REF#refs/tags/v}" >> $GITHUB_OUTPUT
- name: Create deployment
id: deployment
uses: actions/github-script@v7
with:
script: |
const deployment = await github.rest.repos.createDeployment({
owner: context.repo.owner,
repo: context.repo.repo,
ref: context.ref,
environment: 'production',
auto_merge: false,
required_contexts: []
});
return deployment.data.id;
- name: Deploy to production
uses: appleboy/ssh-action@v1.0.0
with:
host: ${{ secrets.PRODUCTION_HOST }}
username: ${{ secrets.DEPLOY_USER }}
key: ${{ secrets.SSH_PRIVATE_KEY }}
script: |
cd /opt/app
export VERSION=${{ steps.version.outputs.VERSION }}
export REGISTRY=${{ env.REGISTRY }}
export IMAGE_NAME=${{ env.IMAGE_NAME }}
# Backup current version
docker-compose -f docker-compose.prod.yml config > backup-$(date +%Y%m%d-%H%M%S).yml
# Pull latest images
echo ${{ secrets.GITHUB_TOKEN }} | docker login ghcr.io -u ${{ github.actor }} --password-stdin
docker-compose -f docker-compose.prod.yml pull
# Rolling update
docker-compose -f docker-compose.prod.yml up -d --no-deps --build backend
sleep 5
docker-compose -f docker-compose.prod.yml up -d --no-deps --build frontend
# Health check
for i in {1..10}; do
if curl -f http://localhost/health; then
echo "Deployment successful"
exit 0
fi
sleep 5
done
echo "Health check failed, rolling back"
docker-compose -f backup-*.yml up -d
exit 1
- name: Update deployment status (success)
if: success()
uses: actions/github-script@v7
with:
script: |
await github.rest.repos.createDeploymentStatus({
owner: context.repo.owner,
repo: context.repo.repo,
deployment_id: ${{ steps.deployment.outputs.result }},
state: 'success',
environment_url: 'https://app.example.com'
});
- name: Update deployment status (failure)
if: failure()
uses: actions/github-script@v7
with:
script: |
await github.rest.repos.createDeploymentStatus({
owner: context.repo.owner,
repo: context.repo.repo,
deployment_id: ${{ steps.deployment.outputs.result }},
state: 'failure'
});
- name: Notify Slack
if: always()
uses: slackapi/slack-github-action@v1.24.0
with:
payload: |
{
"text": "Deployment ${{ job.status }}: ${{ github.repository }} v${{ steps.version.outputs.VERSION }}",
"blocks": [
{
"type": "section",
"text": {
"type": "mrkdwn",
"text": "*Deployment Status:* ${{ job.status }}\n*Version:* ${{ steps.version.outputs.VERSION }}\n*Environment:* production"
}
}
]
}
env:
SLACK_WEBHOOK_URL: ${{ secrets.SLACK_WEBHOOK_URL }}
Rollback Pipeline
.github/workflows/rollback.yml:
name: Rollback
on:
workflow_dispatch:
inputs:
environment:
description: 'Environment to rollback'
required: true
type: choice
options:
- staging
- production
version:
description: 'Version to rollback to (e.g., 1.0.0)'
required: true
type: string
jobs:
rollback:
runs-on: ubuntu-latest
environment: ${{ github.event.inputs.environment }}
steps:
- name: Rollback to version
uses: appleboy/ssh-action@v1.0.0
with:
host: ${{ secrets[format('{0}_HOST', github.event.inputs.environment)] }}
username: ${{ secrets.DEPLOY_USER }}
key: ${{ secrets.SSH_PRIVATE_KEY }}
script: |
cd /opt/app
export VERSION=${{ github.event.inputs.version }}
# Pull specific version
docker-compose -f docker-compose.${{ github.event.inputs.environment }}.yml pull
# Deploy
docker-compose -f docker-compose.${{ github.event.inputs.environment }}.yml up -d
# Verify
sleep 10
curl -f http://localhost/health || exit 1
Secrets Configuration
GitHub Repository Settings → Secrets:
DEPLOY_HOST=production.example.com
DEPLOY_USER=deploy
SSH_PRIVATE_KEY=<private_key_content>
STAGING_HOST=staging.example.com
PRODUCTION_HOST=production.example.com
SLACK_WEBHOOK_URL=https://hooks.slack.com/services/...
24. Resources, Reading List and CLI Cheat-Sheet (Quick Reference)
24.1 Key Docs / Official Repos
Official Documentation
Docker:
- Official Docs: https://docs.docker.com
- GitHub: https://github.com/moby/moby
- Docker Hub: https://hub.docker.com
Dockerfile Reference:
- https://docs.docker.com/engine/reference/builder/
- Best Practices: https://docs.docker.com/develop/develop-images/dockerfile_best-practices/
Docker Compose:
- Docs: https://docs.docker.com/compose/
- Compose File Reference: https://docs.docker.com/compose/compose-file/
- GitHub: https://github.com/docker/compose
BuildKit:
containerd:
- Site: https://containerd.io
- GitHub: https://github.com/containerd/containerd
- Docs: https://containerd.io/docs/
Podman:
- Site: https://podman.io
- GitHub: https://github.com/containers/podman
- Docs: https://docs.podman.io
Security and Scanning Tools
Trivy:
Docker Bench for Security:
Cosign (Sigstore):
Notary:
Monitoring and Logging
cAdvisor:
Prometheus:
- Site: https://prometheus.io
- Docs: https://prometheus.io/docs/
Grafana:
- Site: https://grafana.com
- Docs: https://grafana.com/docs/
ELK Stack:
- Elasticsearch: https://www.elastic.co/elasticsearch/
- Logstash: https://www.elastic.co/logstash/
- Kibana: https://www.elastic.co/kibana/
Fluentd:
- Site: https://www.fluentd.org
- Docs: https://docs.fluentd.org
Orchestration
Kubernetes:
- Site: https://kubernetes.io
- Docs: https://kubernetes.io/docs/
- GitHub: https://github.com/kubernetes/kubernetes
Docker Swarm:
Nomad:
Registry
Harbor:
- Site: https://goharbor.io
- GitHub: https://github.com/goharbor/harbor
- Docs: https://goharbor.io/docs/
Nexus Repository:
Learning Resources
Interactive Learning:
- Play with Docker: https://labs.play-with-docker.com
- Katacoda Docker Scenarios: https://www.katacoda.com/courses/docker
Tutorials:
- Docker Labs: https://github.com/docker/labs
- Awesome Docker: https://github.com/veggiemonk/awesome-docker
Books (Free Online):
- Docker Curriculum: https://docker-curriculum.com
- Docker for Beginners: https://docker-curriculum.com
Community
Forums:
- Docker Community Forums: https://forums.docker.com
- Stack Overflow Docker Tag: https://stackoverflow.com/questions/tagged/docker
Slack/Discord:
- Docker Community Slack: https://dockercommunity.slack.com
- Kubernetes Slack: https://kubernetes.slack.com
24.2 Quick Command List — Linux vs Windows
Container Management
Linux
# Run container
docker run -d --name myapp -p 8080:80 nginx
# Interactive shell
docker exec -it myapp bash
# Stop container
docker stop myapp
# Remove container
docker rm myapp
# List all containers
docker ps -a
# Container logs
docker logs -f myapp
# Container resource usage
docker stats myapp
# Container details
docker inspect myapp
# Restart container
docker restart myapp
Windows (PowerShell)
# Run container
docker run -d --name myapp -p 8080:80 nginx
# Interactive shell
docker exec -it myapp powershell
# Stop container
docker stop myapp
# Remove container
docker rm myapp
# List all containers
docker ps -a
# Container logs
docker logs -f myapp
# Container resource usage
docker stats myapp
# Container details
docker inspect myapp
# Restart container
docker restart myapp
Image Management
Linux
# Build image
docker build -t myapp:1.0.0 .
# List images
docker images
# Remove image
docker rmi myapp:1.0.0
# Pull image
docker pull nginx:alpine
# Push image
docker push username/myapp:1.0.0
# Tag image
docker tag myapp:1.0.0 myapp:latest
# Image history
docker history myapp:1.0.0
# Clean unused images
docker image prune -a
# Export image
docker save -o myapp.tar myapp:1.0.0
# Import image
docker load -i myapp.tar
Windows (PowerShell)
# Build image
docker build -t myapp:1.0.0 .
# List images
docker images
# Remove image
docker rmi myapp:1.0.0
# Pull image
docker pull mcr.microsoft.com/windows/nanoserver:ltsc2022
# Push image
docker push username/myapp:1.0.0
# Tag image
docker tag myapp:1.0.0 myapp:latest
# Image history
docker history myapp:1.0.0
# Clean unused images
docker image prune -a
# Export image
docker save -o myapp.tar myapp:1.0.0
# Import image
docker load -i myapp.tar
Volume Management
Linux
# Create volume
docker volume create mydata
# List volumes
docker volume ls
# Volume details
docker volume inspect mydata
# Remove volume
docker volume rm mydata
# Mount volume
docker run -v mydata:/data nginx
# Bind mount
docker run -v /host/path:/container/path nginx
# Read-only mount
docker run -v mydata:/data:ro nginx
# Backup volume
docker run --rm -v mydata:/volume -v $(pwd):/backup alpine \
tar czf /backup/mydata.tar.gz -C /volume .
# Restore volume
docker run --rm -v mydata:/volume -v $(pwd):/backup alpine \
tar xzf /backup/mydata.tar.gz -C /volume
# Clean unused volumes
docker volume prune
Windows (PowerShell)
# Create volume
docker volume create mydata
# List volumes
docker volume ls
# Volume details
docker volume inspect mydata
# Remove volume
docker volume rm mydata
# Mount volume
docker run -v mydata:C:\data nginx
# Bind mount
docker run -v "C:\host\path":"C:\container\path" nginx
# Backup volume
docker run --rm -v mydata:C:\volume -v ${PWD}:C:\backup alpine `
tar czf C:\backup\mydata.tar.gz -C C:\volume .
# Restore volume
docker run --rm -v mydata:C:\volume -v ${PWD}:C:\backup alpine `
tar xzf C:\backup\mydata.tar.gz -C C:\volume
# Clean unused volumes
docker volume prune
Network Management
Linux
# Create network
docker network create mynet
# List networks
docker network ls
# Network details
docker network inspect mynet
# Remove network
docker network rm mynet
# Connect container to network
docker network connect mynet mycontainer
# Disconnect container from network
docker network disconnect mynet mycontainer
# Run container on custom network
docker run --network mynet nginx
# Host network
docker run --network host nginx
# Container-to-container communication
docker run --name web --network mynet nginx
docker run --network mynet alpine ping web
Windows (PowerShell)
# Create network
docker network create mynet
# List networks
docker network ls
# Network details
docker network inspect mynet
# Remove network
docker network rm mynet
# Connect container to network
docker network connect mynet mycontainer
# Disconnect container from network
docker network disconnect mynet mycontainer
# Run container on custom network
docker run --network mynet nginx
# Container-to-container communication
docker run --name web --network mynet nginx
docker run --network mynet mcr.microsoft.com/windows/nanoserver ping web
Docker Compose
Linux
# Start compose
docker-compose up -d
# Stop compose
docker-compose down
# Compose logs
docker-compose logs -f
# Specific service logs
docker-compose logs -f web
# Services list
docker-compose ps
# Restart service
docker-compose restart web
# Build service
docker-compose build
# Build and start
docker-compose up -d --build
# With a specific compose file
docker-compose -f docker-compose.prod.yml up -d
# Clean with volumes
docker-compose down -v
# Run a command inside a container
docker-compose exec web bash
# Scale a service
docker-compose up -d --scale web=3
Windows (PowerShell)
# Start compose
docker-compose up -d
# Stop compose
docker-compose down
# Compose logs
docker-compose logs -f
# Specific service logs
docker-compose logs -f web
# Services list
docker-compose ps
# Restart service
docker-compose restart web
# Build service
docker-compose build
# Build and start
docker-compose up -d --build
# With a specific compose file
docker-compose -f docker-compose.prod.yml up -d
# Clean with volumes
docker-compose down -v
# Run a command inside a container
docker-compose exec web powershell
# Scale a service
docker-compose up -d --scale web=3
System Management
Linux
# Docker version
docker version
# Docker system info
docker info
# Disk usage
docker system df
# Detailed disk usage
docker system df -v
# System cleanup (all)
docker system prune -a --volumes
# Container prune
docker container prune
# Image prune
docker image prune -a
# Volume prune
docker volume prune
# Network prune
docker network prune
# Watch Docker events
docker events
# Container processes
docker top mycontainer
# Container filesystem changes
docker diff mycontainer
# Docker daemon restart
sudo systemctl restart docker
# Docker daemon status
sudo systemctl status docker
Windows (PowerShell)
# Docker version
docker version
# Docker system info
docker info
# Disk usage
docker system df
# Detailed disk usage
docker system df -v
# System cleanup (all)
docker system prune -a --volumes
# Container prune
docker container prune
# Image prune
docker image prune -a
# Volume prune
docker volume prune
# Network prune
docker network prune
# Watch Docker events
docker events
# Container processes
docker top mycontainer
# Container filesystem changes
docker diff mycontainer
# Docker Desktop restart
Restart-Service docker
Debugging
Linux
# Last 100 lines of logs
docker logs --tail 100 mycontainer
# Logs with timestamps
docker logs -t mycontainer
# Run command inside container
docker exec mycontainer ls -la
# Inspect container filesystem
docker exec mycontainer find / -name "*.log"
# Check container networking
docker exec mycontainer netstat -tlnp
# Container processes
docker exec mycontainer ps aux
# Shell inside container
docker exec -it mycontainer /bin/bash
# As root
docker exec -it --user root mycontainer bash
# Container ports
docker port mycontainer
# Container inspect (JSON)
docker inspect mycontainer | jq '.'
# Specific field
docker inspect --format='{{.State.Status}}' mycontainer
# Container IP
docker inspect --format='{{range .NetworkSettings.Networks}}{{.IPAddress}}{{end}}' mycontainer
# Health check status
docker inspect --format='{{.State.Health.Status}}' mycontainer
Windows (PowerShell)
# Last 100 lines of logs
docker logs --tail 100 mycontainer
# Logs with timestamps
docker logs -t mycontainer
# Run command inside container
docker exec mycontainer cmd /c dir
# Check container networking
docker exec mycontainer netstat -an
# Container processes
docker exec mycontainer powershell Get-Process
# PowerShell inside container
docker exec -it mycontainer powershell
# Container ports
docker port mycontainer
# Container inspect (JSON)
docker inspect mycontainer | ConvertFrom-Json
# Specific field
docker inspect --format='{{.State.Status}}' mycontainer
# Container IP
docker inspect --format='{{range .NetworkSettings.Networks}}{{.IPAddress}}{{end}}' mycontainer
# Health check status
docker inspect --format='{{.State.Health.Status}}' mycontainer
BuildKit
Linux and Windows (same)
# Enable BuildKit
export DOCKER_BUILDKIT=1
# Build with cache
docker buildx build \
--cache-from type=registry,ref=user/app:cache \
--cache-to type=registry,ref=user/app:cache \
-t user/app:latest \
.
# Multi-platform build
docker buildx build \
--platform linux/amd64,linux/arm64 \
-t user/app:latest \
--push \
.
# Build with secret
docker buildx build \
--secret id=mysecret,src=secret.txt \
-t myapp .
# Create builder instance
docker buildx create --name mybuilder --use
# List builders
docker buildx ls
# Inspect builder
docker buildx inspect mybuilder --bootstrap
Docker Registry
Linux
# Login to registry
docker login
# Login to private registry
docker login registry.example.com
# Pull from registry
docker pull registry.example.com/myapp:latest
# Push to registry
docker push registry.example.com/myapp:latest
# Tag image for registry
docker tag myapp:latest registry.example.com/myapp:latest
# Logout
docker logout
Windows (PowerShell)
# Login to registry
docker login
# Login to private registry
docker login registry.example.com
# Pull from registry
docker pull registry.example.com/myapp:latest
# Push to registry
docker push registry.example.com/myapp:latest
# Tag image for registry
docker tag myapp:latest registry.example.com/myapp:latest
# Logout
docker logout
Shortcut Aliases (Linux .bashrc/.zshrc)
# Bashrc/zshrc aliases
alias d='docker'
alias dc='docker-compose'
alias dps='docker ps'
alias dpsa='docker ps -a'
alias di='docker images'
alias dex='docker exec -it'
alias dlog='docker logs -f'
alias dstop='docker stop $(docker ps -q)'
alias drm='docker rm $(docker ps -aq)'
alias drmi='docker rmi $(docker images -q)'
alias dprune='docker system prune -a --volumes'
PowerShell Profile Aliases (Windows)
# Add to $PROFILE
function d { docker $args }
function dc { docker-compose $args }
function dps { docker ps }
function dpsa { docker ps -a }
function di { docker images }
function dex { docker exec -it $args }
function dlog { docker logs -f $args }
function dstop { docker ps -q | ForEach-Object { docker stop $_ } }
function drm { docker ps -aq | ForEach-Object { docker rm $_ } }
function dprune { docker system prune -a --volumes }
This cheat-sheet includes the most commonly needed commands in daily Docker usage. Platform-specific differences (especially paths and shells) are noted. Add commands to your terminal or PowerShell profile for faster access.
Final note: This documentation offers a comprehensive guide from Docker fundamentals to production-ready deployment. Each section is designed to reinforce theory with practical examples. Good luck on your Docker learning journey!